

The first time a broker handed me a dim, mixed-light condo shoot and said, “Can you make it look right without making it look fake,” that was the true assignment. Real estate photography editing isn't about pushing sliders until a room glows. It's about making a space feel credible, clear, and worth walking into.
Editing Beyond Aesthetics The Business of First Impressions
A difficult property usually tells you what editing is really for. Dark hallway, bright windows, uneven lamp color, and a floor plan that feels tighter on camera than it does in person. If the edit only makes that file prettier, it has done half the job. If it makes the listing feel trustworthy at first glance, it has done the work that matters.
That distinction matters because buyers screen homes online before they ever step inside. One industry summary reports that 100% of buyers use the internet during the home search process, while only about 15% of properties online were professionally shot in one cited market snapshot, a gap that explains why polished visuals stand out so sharply in listing feeds and search results, as noted in Phixer's roundup of real estate photo editing facts.
Professional editing also has a direct business case. Professionally edited, high-quality listing images are associated with a 32% faster sale rate, with one commonly cited comparison showing homes averaging 89 days on market versus 123 days, according to PhotoUp's analysis of the ROI of real estate photo editing. The same reporting links stronger visuals to closing-price lifts ranging from $934 to $116,076 over comparable properties with weak imagery.
What editing is actually selling
The image has to do three things at once:
- Clarify the space: Buyers need to understand layout, light direction, finishes, and scale.
- Reduce friction: Nothing should distract from the architecture, not color casts, crooked walls, or dead skies.
- Build confidence: If a room looks manipulated, stretched, or synthetic, the edit creates doubt instead of interest.
Practical rule: In real estate photography editing, every correction should answer one question. Does this help the buyer trust what they're seeing?
That's why post-production isn't a cosmetic add-on. It's part of the sales presentation. A clean edit tells the viewer the property has been handled carefully. A sloppy one suggests the opposite.
The difference between polished and overprocessed
Magazine-quality doesn't mean dramatic. It means controlled. Whites should look neutral without going blue. Wood tones should stay warm without turning orange. Window views should hold detail without looking pasted in. The strongest real estate images rarely announce the editing. They feel finished.
That's the standard worth chasing.
The Foundation RAW Processing and Exposure Blending
Good editing starts before any heroic retouching. If the RAW files are disorganized, if the brackets are inconsistent, or if the first pass is too aggressive, the rest of the workflow becomes cleanup. A strong foundation keeps the image flexible and believable all the way through delivery.
Start with selection and repeatable corrections
My first pass is always practical. Import the full set, reject the obvious misses, and group bracketed interiors so each composition stays together. Then apply the same baseline corrections to the entire shoot: profile correction, chromatic aberration cleanup, modest sharpening, and restrained noise reduction.
That repeatable first layer matters because it removes technical distractions before you make aesthetic decisions. One expert workflow recommends applying a universal preset first for recurring corrections, then synchronizing it across the full set before manual cleanup, which improves consistency and cuts repetitive work, as shown in this universal preset workflow demonstration on YouTube.
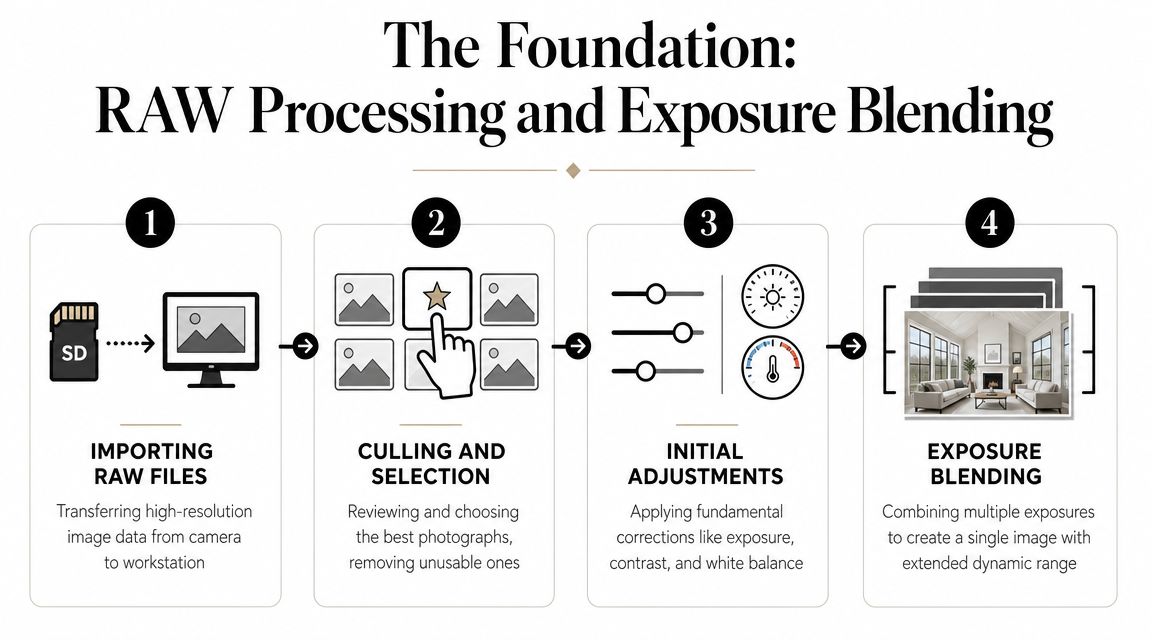
Build the base image before stylizing it
For interiors, the base image should solve dynamic range first. Styling comes later. Windows, recessed ceilings, matte walls, polished counters, and dark cabinetry all pull exposure in different directions. If you try to fix that with one global exposure move, the file falls apart quickly.
A practical benchmark for HDR interiors is to merge 3 exposures, typically dark, mid, and bright. When compositing window detail, a 1-pixel feather on the mask edge helps keep transitions clean and reduces seams or halos, based on this HDR interior blending walkthrough on YouTube.
Two workable approaches
Use whichever method gives you the most control without slowing delivery beyond reason.
| Approach | Where it works well | Main risk |
|---|---|---|
| Automated HDR merge | High-volume sets, consistent brackets, straightforward interiors | Crunchy contrast and muddy color if defaults are pushed too far |
| Manual exposure blending in Photoshop | Premium listings, difficult window pulls, reflective rooms | Slower turnaround if your layer workflow isn't disciplined |
Automated HDR can get you close fast. Manual blending gives you cleaner edges and better judgment in problem areas, especially around windows, lampshades, glossy furniture, and bright trim.
The base edit should look a little understated. If the starting file already feels “finished,” it's usually too far along.
What works and what fails
A reliable base workflow looks like this:
- Cull by composition first. Don't waste time editing weak frames.
- Apply a synced technical preset. Keep it neutral and repeatable.
- Normalize white balance roughly. Not perfectly. Just enough to compare files accurately.
- Blend exposures for dynamic range. Prioritize believable window transitions.
- Hold off on aggressive contrast. Contrast belongs later, after geometry and local light work.
What doesn't work is trying to rescue everything at once. Over-bright shadows flatten depth. Heavy HDR texture makes drywall and cabinetry look brittle. Saturation used as a substitute for good blending almost always cheapens the room.
A clean base file should feel calm. It should contain information, not effects. Once that's in place, geometry, color, and polish become precision work instead of damage control.
Shaping Space Geometry and Compositional Correction
Most amateur real estate edits fail in one obvious place. The room doesn't stand up straight. Walls lean, door frames bow, and wide lenses make one side of the space feel inflated. Buyers may not name the problem, but they feel it instantly.
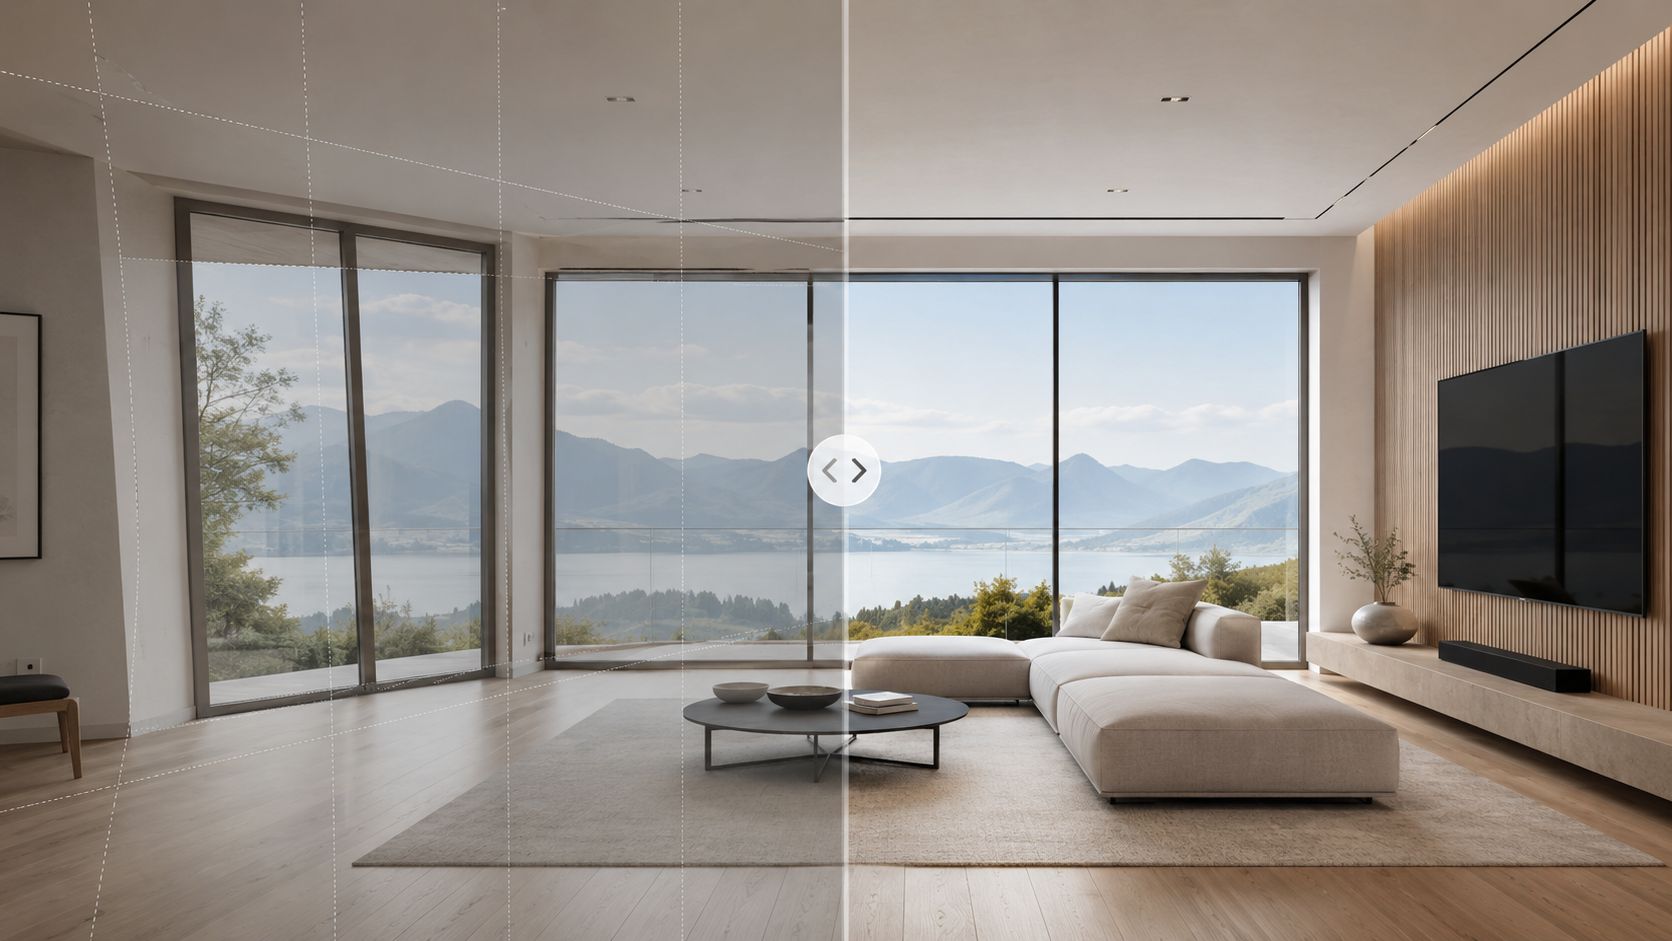
Perspective correction matters because architecture depends on order. When verticals drift, the image stops feeling trustworthy. But there's a second mistake that shows up in more advanced work. Editors force every line into mathematical precision, stretch the outer frame, and end up with a room that looks bigger but less believable.
PhotoUp makes the point clearly in its discussion of line and distortion correction. “Better” editing is not maximum correction but believable realism, and pushing verticals or room proportions too far can make the image look unnatural, as explained in their guide to correcting lines, angles, and distortion.
Correct the lens, then judge the room
The order matters. First remove lens profile distortion. Then address verticals. Then decide whether the image still represents the space accurately. If you reverse that order, you often chase one distortion with another.
Three checks help:
- Door frames: They reveal overcorrection quickly.
- Cabinet faces: If they start looking stretched, back off.
- Ceiling height: If the room suddenly feels implausibly tall, the transform is too strong.
For structural subjects, I often prefer a slight concession to reality over sterile straightness. A tiny bit of natural convergence can preserve the feeling of standing in the room with a camera rather than hovering in a rendering.
Composition correction is not the same as perspective correction
Perspective fixes lines. Composition fixes attention. That can mean trimming dead ceiling, reducing an overly dominant foreground rug, or shifting the crop so the strongest architectural feature carries the frame. Sometimes the better edit isn't more correction. It's a better crop.
If you want to see how post-production can help rescue difficult architectural files without misrepresenting the structure, this article on using post-production to fix structural photos is a useful companion to the geometry side of the workflow.
A quick visual reference helps here:
Editing note: If a correction makes the room feel wider than it felt on site, the image may be cleaner but it's no longer more accurate.
The trade-off most editors miss
The market rewards clarity, but buyers punish exaggeration. That's why believable realism is the right standard. Straighten enough that the architecture feels intentional. Stop before the image starts advertising the edit.
That line is where experienced real estate photography editing separates itself from software-driven correction.
Mastering Light and Color for Mood and Clarity
Once geometry is stable, light and color become the voice of the image. At this point, the file stops being technically acceptable and starts feeling inhabited. Good light work doesn't just brighten a room. It tells the eye where to go first and what to trust.
Neutralize the room before you stylize it
Most interiors contain conflicting color temperatures. Window daylight hits blue. Lamps go warm. Under-cabinet LEDs turn green or magenta depending on the fixture. If you try to “make it pop” before neutralizing those conflicts, the image never settles.
Start globally. In Lightroom or Adobe Camera Raw, adjust white balance until whites, trim, and neutral surfaces stop fighting each other. Then evaluate local problem zones. Kitchen pendants, recessed can lights, and mixed daylight corners almost always need masked correction.
A simple sequence works well:
- Set a credible global white balance: Aim for neutral walls and realistic wood.
- Pull back hotspots: Use local masks on windows, lampshades, and reflective counters.
- Open dark corners carefully: Lift shadow density enough to reveal the room, not flatten it.
- Refine color selectively: HSL and local color masks work better than brute-force saturation.
Direct the eye with local contrast
Architectural images need hierarchy. The viewer should understand the room in a second, then discover details. That usually means the primary seating area, kitchen island, fireplace wall, or window line gets slightly more tonal separation than the rest of the frame.
Local dodging and burning still matters here. Not dramatic portrait-style shaping, just subtle control. Lift the face of cabinetry. Add a touch of density under countertops. Lower distraction in bright corners that pull the eye off-axis.
For a capture-side complement to this editing discipline, lighting for interior photography is worth reviewing because many color problems are easier to prevent than to repair.
Warmth should come from the room, not from a blanket temperature shift across the whole frame.
What clean color looks like
A polished interior edit usually has these traits:
| Area | What you want | What to avoid |
|---|---|---|
| Walls and trim | Neutral and consistent | Blue shadows or yellow patches |
| Wood tones | Warm with detail retained | Orange saturation and muddy grain |
| Window light | Bright but controlled | Chalky highlights |
| Metal and stone | Crisp, material-specific color | Gray flattening or fake shine |
What fails is the common shortcut of pushing clarity, dehaze, and vibrance together. That combo can make marble, tile, and paint all react the same way, which strips materials of their distinct character. Real spaces feel convincing because different surfaces hold light differently. Your edit should preserve that.
Mood comes from restraint. The room should feel open, calm, and readable, not processed into submission.
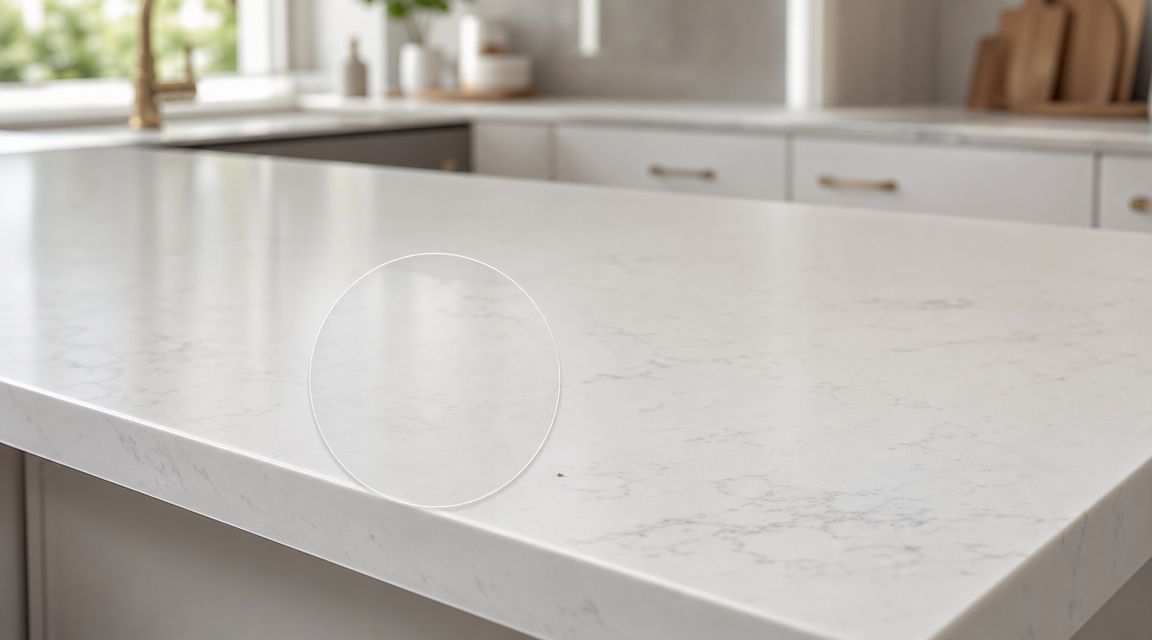
The Final Polish Advanced Retouching and Refinements
The last pass is where professional discipline shows. This stage isn't about changing the property. It's about removing distractions that the camera exaggerates and the eye would naturally ignore during an in-person visit.
Remove what interrupts the architecture
Cords, outlet glow, smudges on stainless steel, lawn debris, wall scuffs, sensor spots in a bright sky, and small staging leftovers all compete with the room. None of them deserve attention. Retouch them cleanly and move on.
In Photoshop, this usually means a mix of Spot Healing Brush, Clone Stamp, Content-Aware Fill, and occasional manual patching on separate layers. Keep the repair local. The mistake many editors make is using broad content-aware moves on textured surfaces like grout, wood grain, or stone. The fix becomes more visible than the original problem.
Handle reflections with intent
Reflections aren't automatically bad. They often describe the finish of glass, polished stone, lacquer, or appliance surfaces. The issue is uncontrolled reflection, especially when it introduces glare, obscures a view, or reveals clutter.
A practical approach:
- Reduce, don't erase: A little reflection helps the surface feel real.
- Target the brightest distractions first: Window glare and blown specular streaks usually matter more than soft ambient reflection.
- Preserve material cues: Stainless steel should still look metallic. Glass should still read as glass.
Sky replacement only works when the whole exterior agrees
Sky replacement is common because weather doesn't cooperate with listing schedules. It can also look terrible if the replacement ignores the direction and quality of existing light. A vivid blue sky above a flat, gray-lit facade is one of the fastest ways to make an exterior look synthetic.
For believable results, match three things:
- Light direction
- Contrast level
- Color temperature in the building and ground plane
If the house was shot under soft overcast, the replacement should still feel soft. If trees, roof edges, or balcony rails have complex edges, take the time to refine the mask. Sloppy edge work announces itself immediately.
Retouching should remove friction, not invent a different property.
Final review catches the mistakes software misses
Before export, zoom out and zoom in. At full frame, check whether anything bright hijacks attention. At close view, inspect windows, mirror edges, countertop seams, and ceiling lines. These are the areas where rushed editing shows.
The strongest final polish is often invisible. The viewer doesn't notice the cleanup. They notice that the space feels orderly, expensive, and easy to understand.
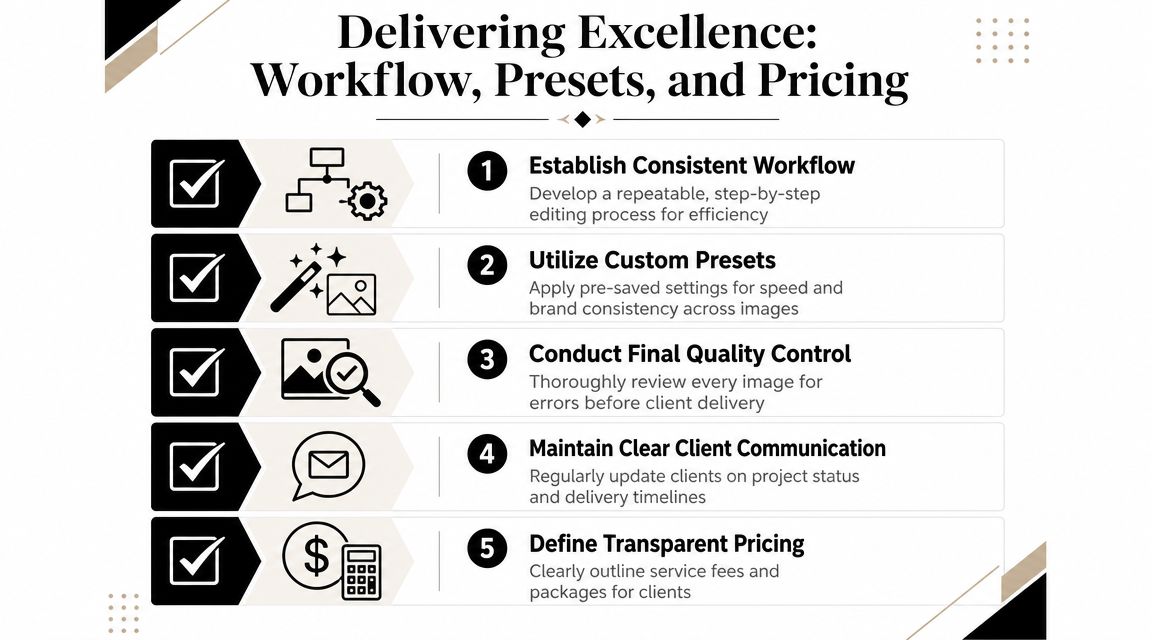
Delivering Excellence Workflow, Presets, and Pricing
Editing one hero image is easy compared with delivering an entire listing set that feels unified. Consistency is what clients remember. If the kitchen is warm, the bedroom is cool, and the exterior has a different contrast style than the interior set, the gallery feels assembled rather than authored.
Use presets for repetition, not for taste
A preset should handle what repeats on nearly every frame. Lens profile corrections, base sharpening, noise reduction, and a conservative tonal starting point all belong there. One efficient workflow recommends applying a universal preset first and syncing it across the set before making image-specific manual fixes. Recent tools also support AI-assisted culling, exposure balancing, and noise cleanup to streamline the capture-to-edit pipeline, as described in Imagen AI's overview of real estate retouching workflows.
What a preset should not do is define the final look. Every room still needs individual judgment on white balance, geometry, window pulls, and local attention control.
A delivery workflow that scales
When volume increases, the solution isn't random automation. It's a sequence you can trust.
| Stage | Keep it standardized | Keep it manual |
|---|---|---|
| Import and cull | Folder structure, naming, first-pass rejects | Final composition choices |
| Base corrections | Presets, lens corrections, noise reduction | Exposure exceptions |
| Core editing | Batch sync where compositions match | Geometry, masking, color conflicts |
| Retouching | File prep and layer organization | Object removal and reflection control |
| Export and delivery | Output presets and file versions | Final quality check |
That final quality check matters more than people think. Small mistakes become obvious when a client flips through a full set quickly.
Pricing follows labor, revision risk, and expectation
There isn't one correct pricing model for real estate photography editing. Some photographers charge per image. Others fold editing into a shoot package. Others price premium retouching separately for hero images, brochures, or developer marketing. The right structure depends on how much hand work each image requires and how many revision rounds the client expects.
A simple way to understand this is:
- Standard listing work fits a more repeatable package.
- Luxury listings and design-forward interiors justify more manual blending and retouching.
- Commercial and portfolio imagery often needs the most exacting cleanup and consistency.
If your queue is growing, outsourcing can make sense when your time is better spent shooting, directing, or managing client relationships than repairing dozens of files at night. For photographers who need support on the post side, Jimmy Clemmons Photographer's interior design photo editing services are one example of a specialist option focused on polished architectural imagery.
Business check: If your editing process changes wildly from one property to the next, your pricing will feel arbitrary to you and to the client.
Export for the actual use case
MLS, brochure, website, and portfolio files don't need the same treatment. Sharpening, dimensions, and file weight should match the destination. Keep your master files layered and organized, but deliver exports that are easy for the client to use immediately.
The photographers who stay profitable aren't just good at retouching. They're good at repeatability. In real estate photography editing, that's what turns craft into a business.
Common Questions in Real Estate Editing
Should you use Lightroom alone or add Photoshop?
Lightroom handles selection, global correction, syncing, and export well. Photoshop becomes necessary when the image needs manual exposure blending, advanced masking, object removal, reflection control, or refined compositing.
How should editing be priced?
Use a structure that matches the labor. Per-image pricing works when the scope is consistent. Hourly pricing fits irregular retouching. Bundled pricing works when editing is part of a larger photography package.
When should you outsource?
Outsource when editing delays delivery, when file volume is too high for one person to maintain consistency, or when the job needs a level of retouching that doesn't make sense to do in-house every time.
What's the easiest way to improve quality fast?
Standardize the base workflow. Most inconsistency comes from changing the order of operations from one shoot to the next.
If you need architectural or listing imagery that's edited with the same emphasis on believable realism, clean geometry, and consistent delivery, Jimmy Clemmons Photographer provides photography and post-production for interiors, exteriors, and design-focused spaces.