

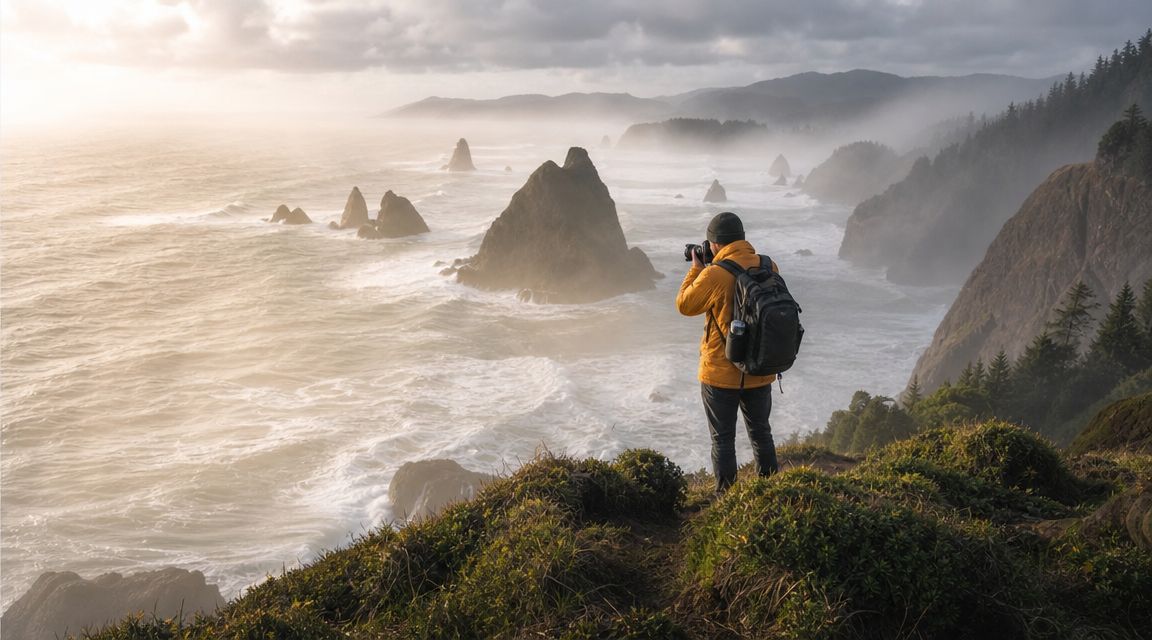
The Oregon Coast usually looks better in person than it does on the back of your camera. You stand on a bluff with salt on the front element, mist moving sideways, surf folding over black rock, and a sea stack holding the horizon like an anchor. Then you review the frame and it feels thin. The place had weight. The image doesn't.
That gap is why Oregon Coast photography frustrates good photographers. The coast gives you scale, weather, texture, and mood, but it rarely gives you a finished picture. You have to impose order. More important, you have to decide what the frame is about before the light turns.
A professional approach helps because the coast behaves less like a scenic backdrop and more like an active subject. Wind alters the water's surface. Fog edits the composition for you. Wet sand becomes either a mirror or a distraction. Headlands, sea stacks, drift, and tidal channels can support a narrative, or fight each other inside the same frame.
Architectural and editorial habits translate well here. Look for structure first. Decide what carries the story. Then use exposure, lens choice, and position to support that one idea. That discipline is what turns a dramatic place into a readable photograph.
Beyond the Postcard An Introduction
You arrive at the shoreline with all the usual intentions. Get the big vista. Catch some color. Maybe bring home the classic frame with sea stacks, a streak of surf, and warm light under a cloud break. But after a few hours, the problem becomes obvious. The coast is doing too much at once.
The Pacific doesn't sit still for your composition. Wind rearranges the surface every few seconds. Mist lowers contrast. The brightest part of the sky keeps shifting. Rocks that looked bold to the eye flatten into dark shapes. A scene that felt cinematic becomes a collection of unrelated parts.
That's where most location-based advice falls short. A list of famous viewpoints won't solve the underlying problem. Oregon Coast photography is less about standing in the right place than about building a workflow that can absorb changing conditions and still produce a coherent image.
The strongest coastal frames don't merely describe where you were. They tell the viewer how the place felt when weather, tide, and light aligned for a brief moment.
That means treating weather as subject matter, not interference. It means choosing whether the image is about force, stillness, isolation, or transition. It also means accepting trade-offs. The widest lens may include too much. The most dramatic sky may weaken the foreground. The cleanest exposure may strip out the mood that made you stop in the first place.
The Oregon Coast rewards intent. If you bring that to the field, the coast stops being overwhelming and starts becoming legible.
Developing a Photographer's Vision for the Coast
The first decision in Oregon Coast photography isn't exposure. It's narrative. Before the tripod comes out, decide what the frame needs to say.
Start with the coast as a cultural landscape
The Oregon Coast has been photographed for a long time, and that matters to how you see it now. The Cannon Beach History Center & Museum reports more than 12,000 historic photos in its archives, a reminder that this shoreline has long been documented through images of working scenes, maritime heritage, and weathered environments in the museum's historical photo archive.
That history changes your approach. The coast isn't only scenic. It is also practical, inhabited, and shaped by labor and exposure. Harbors, roads, weather-beaten structures, drift lines, and headlands all carry that visual memory. If you ignore that and chase only spectacle, the work can feel generic very quickly.
Previsualize the sentence before the frame
A useful exercise is to reduce the image to one sentence before you shoot it. Not a caption. A visual intent.
Examples:
- Power: the coast overpowering a small static element
- Solitude: fog removing depth until one form remains
- Resilience: a human trace holding against weather
- Transition: light moving across wet surfaces after a squall
When you have that sentence, decisions become easier. A broad heroic composition may support power. A tighter crop with negative space may better support solitude. If your subject is resilience, a path, railing, structure, or distant light may belong in the frame. If it isn't helping the idea, remove it.
Field test: If you can't explain the frame in one clear sentence, you probably haven't simplified enough.
Work like an editorial photographer, not a collector
Postcard thinking encourages accumulation. One more overlook. One more famous rock. One more sunset. Editorial thinking is narrower and better. It asks what the image is for.
A practical way to apply that in the field:
Identify the dominant element
Choose one thing that carries the image. Sea stack, cove, wet sand reflection, weather front, cliff line.Define the supporting elements
Let only two or three secondary elements remain. Foreground texture, receding foam, a shaft of light, distant horizon.Choose the emotional distance
Do you want the viewer standing in the weather, or observing it from a calm remove?Commit to exclusion
Oregon Coast scenes usually improve when you remove visual competition.
Ask better questions on location
Instead of “What's the best spot here?” ask:
| Better question | Why it matters |
|---|---|
| What is the frame actually about? | Prevents scenic but empty images |
| Is the weather adding clarity or confusion? | Helps decide whether to simplify or wait |
| Does the foreground support the story? | Avoids decorative clutter |
| Is this a wide image or a selective one? | Lens choice follows intent, not habit |
Photographers who make strong coast work don't just react to beauty. They edit it in real time. That's the difference between recording a landmark and making a picture with a point of view.
Essential Gear for Oregon's Coastal Conditions
Coastal gear matters most when it solves a specific problem. The Oregon Coast gives you wind, moisture, glare, spray, and rapidly changing light. Every item in your bag should answer one of those conditions.
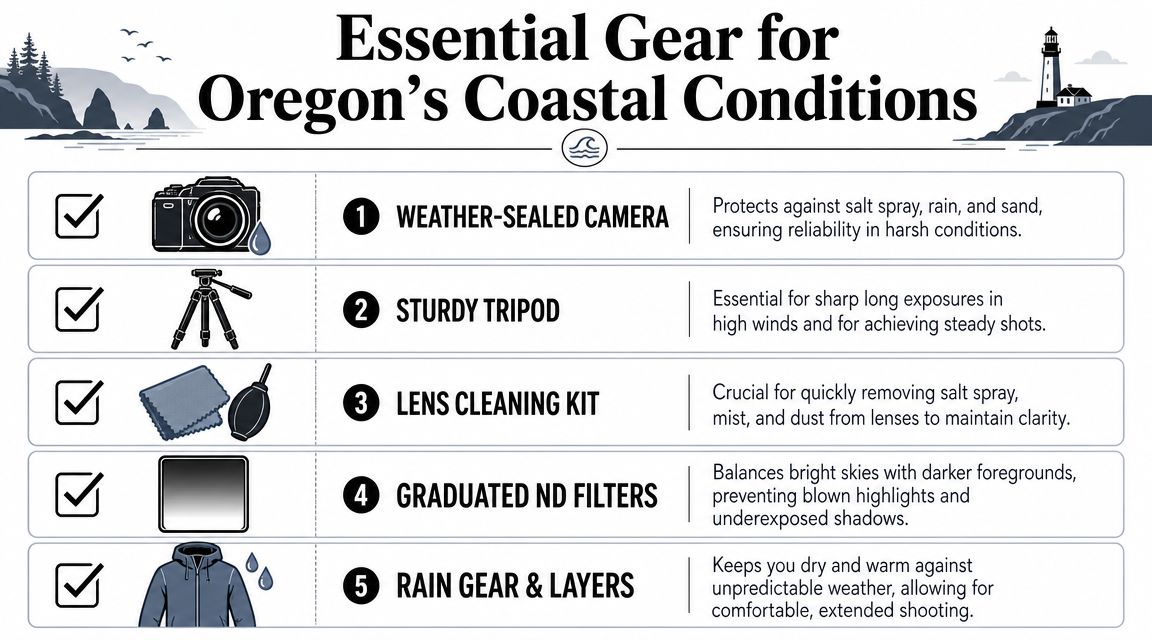
A recent creator guide notes that Oregon weather shifts fast and recommends rain gear, a tripod, ND filters, a wide-angle lens, and a polarizer, while also noting that July brings the best coastal conditions in that guide's discussion of shooting the coast in changing weather on YouTube. That's a useful baseline, but the true value is knowing why each piece earns its place.
The tripod is not optional
On the coast, a tripod isn't just for long exposures. It slows you down and fixes your frame when conditions are unstable. Wind and shifting surf encourage sloppy recomposition. The tripod prevents that.
A weak tripod fails in exactly the way coastal photography punishes. It vibrates in gusts, settles into wet sand, and introduces tiny inconsistencies when you're bracketing or refining edge relationships. Use a sturdy setup, spread the legs deliberately, and press them into stable ground if the sand is soft.
Lens choice should follow story
A wide-angle lens belongs in most Oregon Coast kits because it handles foreground relationships, cliff edges, and broad environmental context. But wide isn't always better.
Use a wider view when you need:
- Scale: sea stacks against foreground channels or rock shelves
- Spatial clarity: leading lines in wet sand or receding foam
- Environmental storytelling: weather moving through a larger scene
Reach for a longer lens when you need:
- Compression: stacking headlands or isolating offshore rock forms
- Abstraction: separating fog bands, surf patterns, or layered cliffs
- Control: removing weak foregrounds that don't deserve inclusion
Many coast images fail because the photographer defaults to the widest focal length in the bag. If the foreground has no job, wider only exposes the weakness.
Filters are problem-solvers, not accessories
A polarizer helps on the coast because wet surfaces can either sing or glare. Rotate it carefully. Too much polarization can make some parts of the frame look controlled and others look messy, especially across broad skies and reflective sand.
An ND filter becomes important when you want shutter speed to shape the water, rather than merely record it. If you're comparing options, a variable neutral density filter review is useful background for understanding when flexible filtration helps and when fixed choices are cleaner.
Packing rule: Bring filters only if you know the effect you want. On the coast, unnecessary glass in front of the lens also means one more surface for spray to ruin.
Protect the camera, but protect your rhythm too
Weather sealing helps, but process matters more. Salt spray gets everywhere. Rain arrives sideways. Sand finds its way into bags, controls, and lens mounts.
A practical coastal kit should include:
- Rain layers for you so you can keep shooting instead of retreating
- A lens cloth and blower because front-element contamination happens constantly
- A simple bag layout that keeps lens changes fast and infrequent
- A towel or dry cloth for hands, grips, and tripod legs
The camera only works if you can keep working. On the Oregon Coast, comfort is not luxury. It is operational discipline.
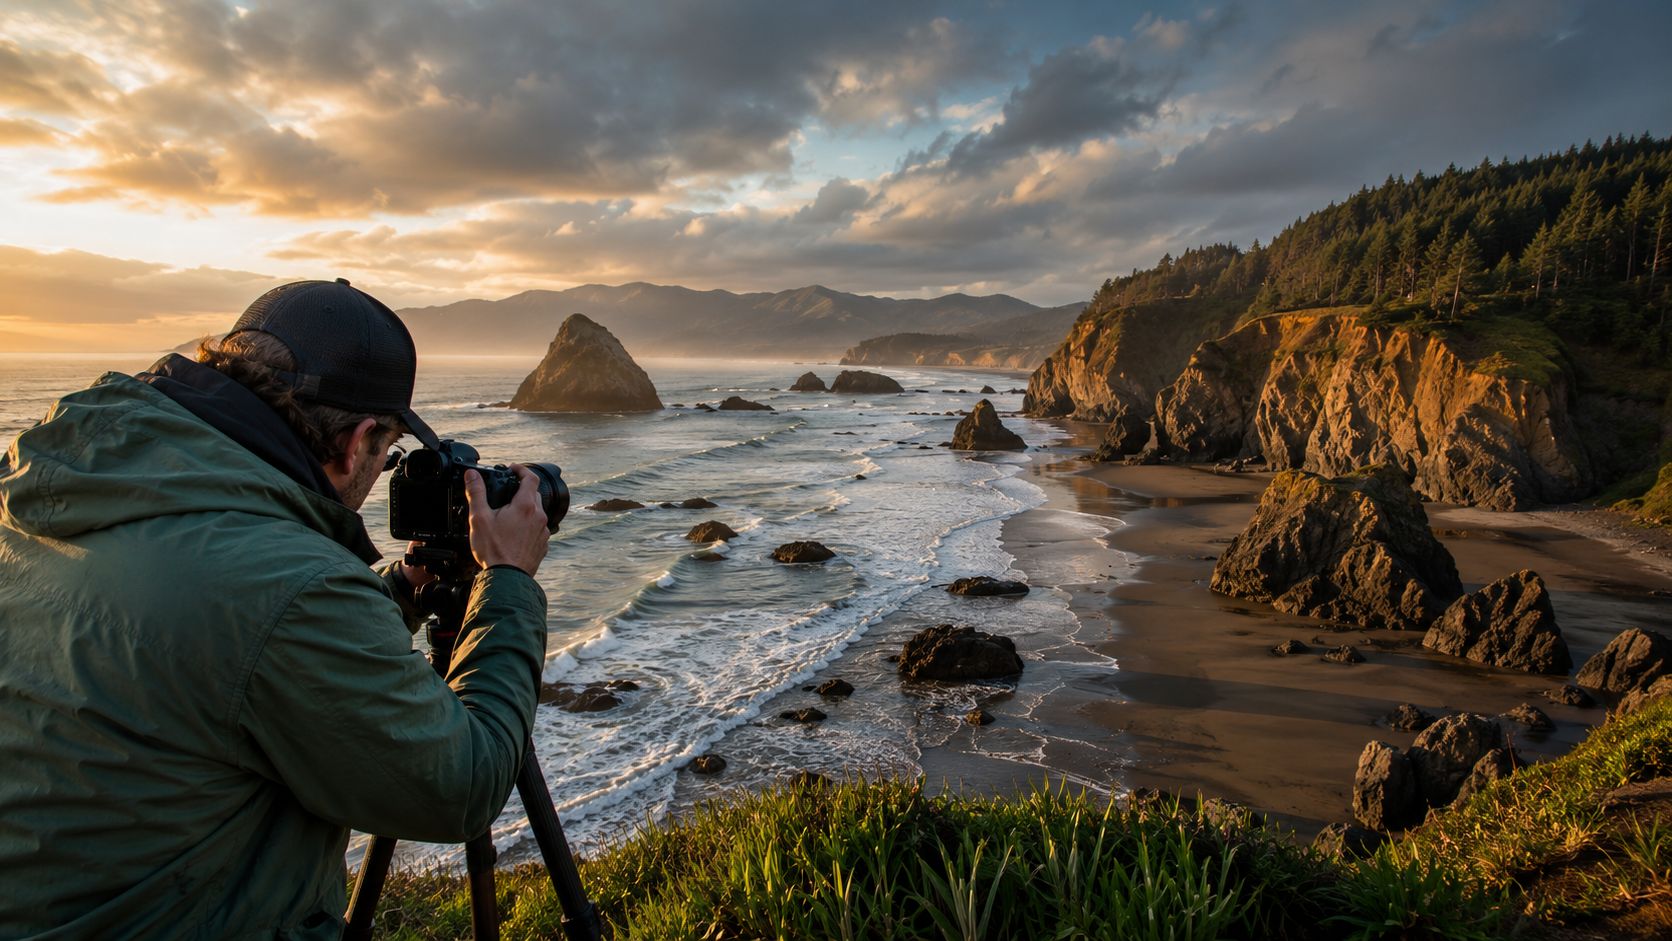
Mastering Coastal Light and Exposure
You arrive before dawn. The tide is pulling back, the sand is acting like a mirror, and a gap in the cloud deck opens for less than a minute. On the Oregon Coast, exposure decisions happen inside that kind of narrow window. The work is less about chasing perfect light and more about recognizing what the weather is already giving the frame.
Use shutter speed as a narrative control
Shutter speed decides what role the ocean plays in the picture. Fast exposures hold impact and shape in the breaking water. Longer exposures simplify the surf into mass and tone. Neither choice is more correct. The right one depends on whether the final image is about force, stillness, or tension between the two.
Michael Frye's study of motion and mood along the Oregon Coast shows how longer tripod-based exposures can smooth water without stripping the rocks and sky of structure. That matters because the coast often gives you too much visual chatter at once. A longer shutter can edit the scene before you ever get to post.
| Exposure approach | What it gives you | What it risks |
|---|---|---|
| Faster shutter | Shape, force, and timing in waves | Busy water that competes with the subject |
| Moderate long exposure | Motion with some definition | A soft middle ground with no clear point of view |
| Long exposure | Atmosphere, separation, simplified water | Loss of energy if the scene needs impact |
Choose the shutter after you decide what the water needs to say.
Expose for materials, not averages
A reflected sky on wet sand can meter brighter than the actual sky. Dark basalt absorbs light. Foam clips fast. Tide pools can sit in the same frame as shadowed cliffs and a bright opening on the horizon. Average metering tends to flatten those differences, and the final image loses hierarchy.
A better method is to read the frame by surface. Check the brightest reflection you want to keep. Check the darkest rock where texture still matters. Then decide whether one frame can hold both, or whether the scene needs a bracketed sequence. I bracket on the coast when the contrast is structural to the picture, not just because the histogram looks busy.
That restraint matters. If the file is built from too many safety frames, the final photograph often loses the weather's tension.
Wide compositions usually benefit from moderate apertures that hold foreground detail without pushing the lens into diffraction. Keep ISO low when you can. Raise it only when wave timing or wind movement matters more than absolute file cleanliness. Those trade-offs are part of the workflow, not technical mistakes.
Don't meter the coast as one scene. Meter sky, water, wet sand, and rock as separate materials with different reflectance.
Weather carries the story
Clear sunsets get attention, but they are only one version of coastal light. The Oregon Coast often photographs better when the weather does more of the narrative work. Fog removes weak background detail. Drizzle deepens color and darkens stone. Broken cloud gives selective light that can isolate a headland or sea stack more effectively than a full burst of sun.
Photographers who shoot architecture and interiors already know this discipline. Soft light reveals shape with more control. The same logic applies here, especially if the goal is an editorial frame rather than a postcard.
A practical read on common conditions:
- Fog reduces distance and strengthens silhouette
- Mist and spray create visible air when backlit
- Broken cloud gives the most useful selective illumination
- Heavy overcast supports quieter tonal compositions
- Clear sunset needs stronger foreground structure to avoid looking generic
That same transitional quality is part of why blue hour works so well in high-end visual storytelling. The coast often feels most believable when the light is restrained and the atmosphere stays intact.
A strong visual example helps when you're studying these transitions in the field.
Build the frame before the light arrives
The best coastal light is brief and rarely repeats on command. Composition has to be settled early. Set the camera position. Watch how the water enters and exits the foreground. Check whether reflections are helping the structure or diluting it. Then wait for the weather to complete the picture.
That order separates reactive shooting from deliberate work. On this coastline, exposure is part of narrative control. It determines whether the final image feels transient, grounded, turbulent, or quiet.
Signature Locations and Compositional Strategies
The most useful way to think about Oregon Coast locations is not north versus south or famous versus hidden. Think in terms of visual behavior. What kind of picture does a place naturally support?
That shift matters because the coast is not one consistent subject. It's a chain of very different working environments. And as one travel guide's location overview suggests, southern sites such as Secret Beach, Natural Bridges, and Whaleshead Viewpoint each lend themselves to distinct visual narratives that need different planning and compositional treatment in that roundup of southern Oregon Coast photo stops.
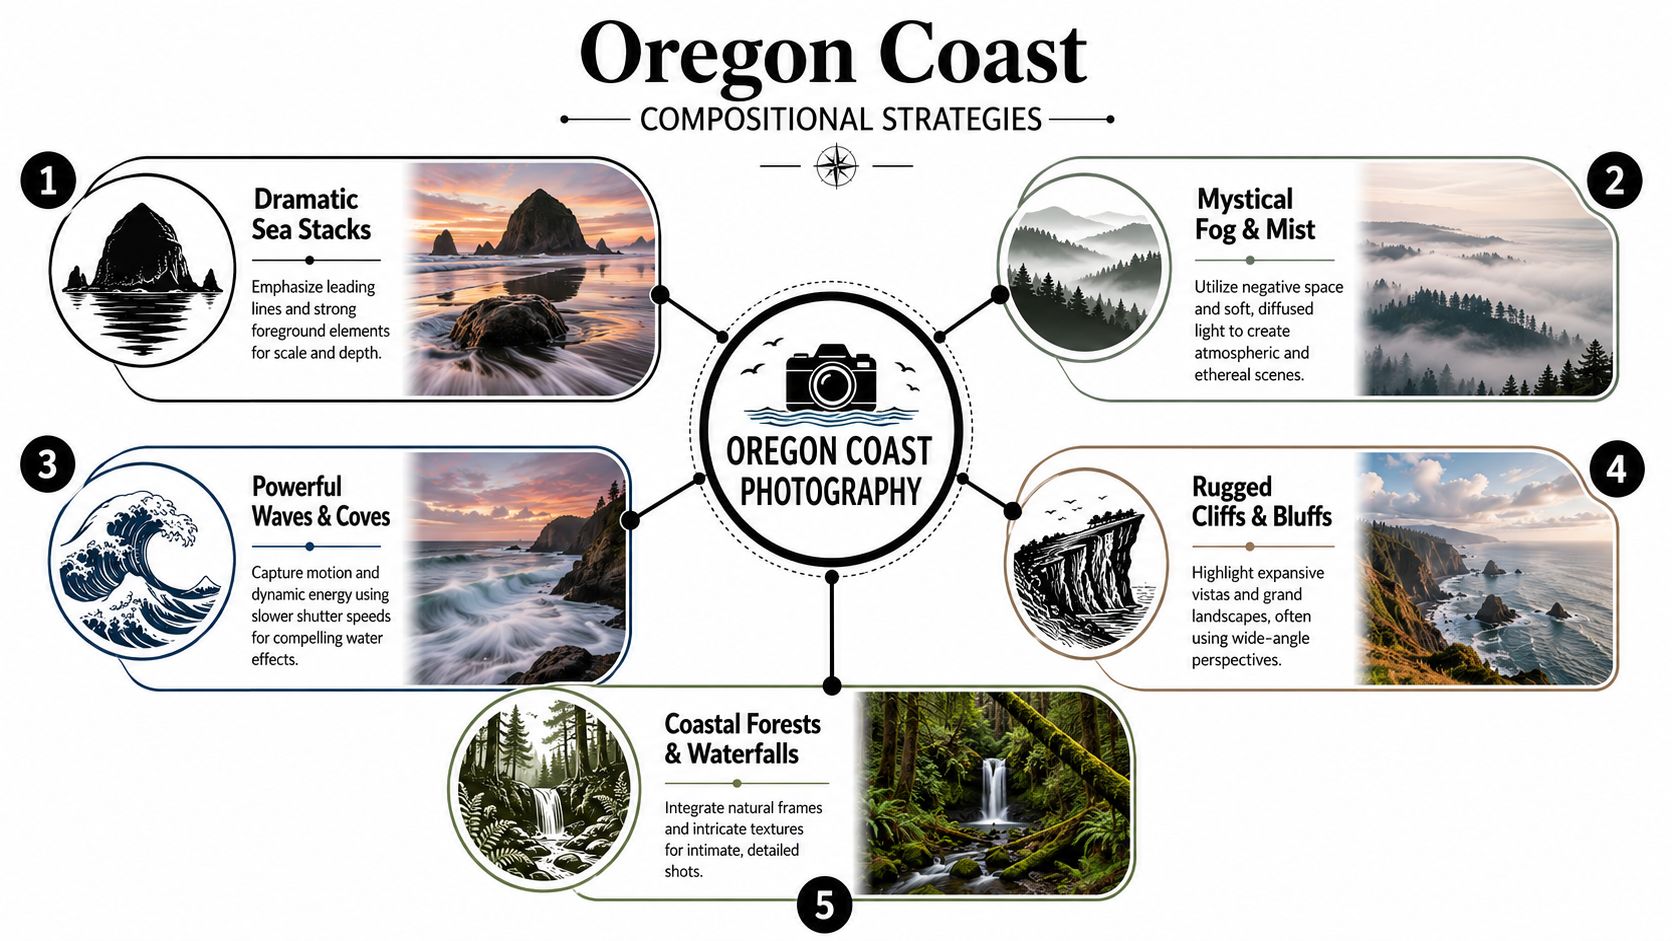
Iconic grandeur
Some locations are built for scale. Cannon Beach and stretches of the Samuel H. Boardman corridor fall into this category. These places reward strong foreground structure and clear anchor points.
What works:
- Low camera position when the foreground has shape and direction
- Sea stacks placed to hold the frame, not merely occupy it
- Tidal channels or foam lines used as guides, not decoration
What doesn't:
- Weak near foreground with a very wide lens
- Horizon placement that splits the frame into equal, competing halves
- Letting multiple rock forms fight for primary attention
At these sites, the temptation is to include everything because everything looks impressive. Resist that. Grandeur still needs hierarchy.
Moody and abstract environments
Bandon Beach, Thor's Well, and similar wave-driven areas are better approached as studies in rhythm, tone, and form. These aren't always “big view” places, even when they are physically dramatic.
A longer lens often helps because it compresses breakers, isolates spray, and removes dead zones in the foreground. Mist, receding surf, and backlit water can become the subject while rock forms act as punctuation.
Strong moody frames usually come from subtraction. The coast already supplies drama. Your job is to keep it legible.
Intimate coastal scenes
Not every Oregon Coast frame needs a horizon. Secret Beach, protected coves, smaller tide-pool areas, and weathered edge details often produce more memorable work when you stay close.
Look for:
Rock relationships
Repeated shapes, fractures, or wet tonal transitions.Surface behavior
Reflections in shallow pools, foam tracing a contour, slick stone catching dim light.Small-scale narratives
Drift against black sand, a channel opening toward offshore light, vegetation holding at the edge of exposure.
These images often benefit from the same discipline used in interiors or detail work. Keep lines clean. Watch edges. Remove anything that doesn't contribute.
A practical location framework
Instead of asking “Where should I go?” use this planning lens:
| Visual goal | Best kind of location | Preferred lens tendency |
|---|---|---|
| Monumental scale | Sea stack beaches, bluffs, open coves | Wide to moderate wide |
| Atmosphere and weather | Misty headlands, layered shoreline views | Moderate to telephoto |
| Motion and energy | Surf-heavy inlets, channels, wave zones | Moderate, sometimes long |
| Quiet detail | Tide pools, sheltered coves, wet rock shelves | Moderate to short telephoto |
Match place to assignment intent
Editorial, commercial, and personal work often need different versions of the coast.
A broad scenic image may suit travel storytelling. A more selective composition with architectural adjacency, clean horizon management, and restrained color may fit design-oriented work better. A brand narrative may need a place that feels raw but not chaotic. That's where sites differ meaningfully.
For example:
- Natural Bridges can feel sculptural and graphic
- Whaleshead Viewpoint can support layered distance and broad atmosphere
- Secret Beach can become intimate, enclosed, and textural depending on tide and weather
The lesson is simple. Don't choose a place because it is famous. Choose it because it behaves in a way that supports the image you need to make.
Planning Workflow Safety and Access
Successful Oregon Coast photography usually looks spontaneous in the final frame and methodical everywhere else. The planning work happens before dawn, before the drive, and before the tide turns.
Build the shot on the map first
Digital scouting reduces wasted movement and bad assumptions. Google Earth is useful for understanding orientation, cliff edges, beach access, and whether a sea stack separates from the background from your intended position. PhotoPills helps if you want to estimate where sunrise, sunset, moon direction, or blue-hour glow may sit in relation to a cove or headland.
Neither tool makes the image. Both make the first field decision better.
A simple planning workflow looks like this:
Identify access points
Parking, trailheads, pullouts, and likely walking distance.Study landform geometry
Bluff height, beach curvature, offshore stacks, and possible foregrounds.Check the direction of light
Not for spectacle alone, but for whether the chosen angle gives shape to wet surfaces and rocks.Prepare a backup composition
If the main view is crowded, unsafe, or flat, you need a second idea.
Tides are part of the composition and the risk
Tide awareness is basic field discipline on the coast. It affects access, foreground viability, and your margin for error. A cove that looks open on arrival can narrow quickly. A rock shelf that seems manageable can become hazardous when the water climbs or when larger sets arrive.
Read tide information before you go, then keep reevaluating once you're on site. Don't trust a static first impression. Watch the water for a few minutes before stepping farther out.
Non-negotiable: If a composition requires you to ignore wave rhythm, slippery footing, or a narrowing exit, it isn't worth making.
Move like a professional, not a tourist with a camera
There's a difference in pace. Tourists react to views. Working photographers evaluate surfaces, exits, and repetition in wave behavior before committing to a position.
Practical habits matter:
- Keep one eye on the ocean when working near surf zones
- Test footing before carrying the tripod forward
- Avoid turning your back for long lens changes
- Know your return path before the light gets low
Wet rock is especially deceptive. It can look textured and stable while behaving like polished glass.
Respect access and keep the place usable
State parks, pullouts, and beach approaches vary in how easy they are to reach and how fragile they are once you're there. Stay on established paths when possible. Don't trample vegetation to force a novel angle. Don't leave bags in the middle of narrow access routes. Don't build rock stacks or alter a foreground because it improves your frame.
The coast doesn't need rearranging. It needs patience.
A professional field workflow is part logistics, part restraint. The better you plan access, safety, and timing, the calmer you'll be when the weather finally gives you the frame you came for.
Editing Techniques for a Polished Editorial Look
A clean coast edit starts with a clear question. What needs to be seen, and what should stay implied? On the Oregon Coast, that decision matters more than any preset because weather is often the subject, not just the condition you happened to shoot in.
Blend for realism and hierarchy
If you bracketed exposures in the field, merge them with restraint. The goal is usable highlight and shadow information, especially in reflective sand, pale foam, and dark sea stacks. The file should hold the scene together without announcing how much work went into it.
That usually means keeping some areas quiet.
Dark basalt can remain heavy. Fog should still veil distance. A storm frame loses tension when every crack in the rock and every cloud layer gets pushed to the same tonal importance. I blend to preserve the exposure relationships that made the scene worth photographing in the first place.
Grade to support the weather you actually saw
Editorial color on the coast tends to be restrained. Strong grading can overwhelm the picture's narrative, especially when the frame already has enough tension from surf, wind, and shifting light.
A few reliable directions:
- Cooler white balance suits fog, overcast skies, and metallic water
- Slight warmth in highlights can preserve late light without turning the frame amber
- Lower overall saturation often gives coastal files a more credible editorial finish
The same discipline applies across genres. Good post-production keeps color organized and tonal transitions controlled. A workflow built around real estate photography editing principles can be surprisingly useful here because it favors neutral correction, clean contrast, and believable materials over obvious effects.
The best coast edits feel settled, not stylized.
Use local adjustments to build the story
Global sliders set the base. Local control finishes the picture.
Dodge and burn with intent. Lift a strip of foam if it carries the eye toward the subject. Darken a bright edge if it competes with the headland, rock arch, or weather front that should hold attention. If the narrative is about isolation, let the corners fall off a little. If it is about incoming weather, keep the sky active and the foreground quieter.
Check the frame boundary before exporting. Coastal images often break down at the edges. Small bright reflections, detached foam patches, and pale stones near the border can pull the eye harder than the main subject. Fixing those distractions is often what separates a competent file from a polished one.
A polished editorial look is usually quieter than expected. Clear hierarchy, controlled color, and tonal decisions that respect the coast's mood are enough.
If your brand, publication, or design project needs images with that same level of intention, Jimmy Clemmons Photographer brings an editorial eye and architectural discipline to every assignment. From built environments to commercial storytelling, the work is shaped by precise composition, controlled light, and a clear visual point of view.