
You've probably had this happen: an architectural frame looks perfectly crisp on the rear LCD, yet the printed proof shows soft foreground edges and a distant wall that never quite settles into detail. The camera recorded the scene correctly, but the depth of field wasn't deep enough for the way the image was going to be viewed.
Understanding depth of field means moving beyond the simple advice to “stop down.” Aperture matters, but so do focus distance, focal length, sensor format, viewing distance, and the final size of the image. A working photographer treats sharpness as a production decision, not a setting chosen by habit.
What Depth of Field Really Means
Depth of field is the range of distances that appears acceptably sharp for a particular viewer, display, and reproduction size. The lens still focuses on one precise plane. Points in front of and behind it become progressively blurred, but viewers may accept that blur as sharpness until it crosses a visible threshold.
A rear LCD can make a hotel lobby look crisp from foreground paving or furniture to a distant wall. A large print may reveal soft edges in the nearest detail or weak definition in lettering at the back of the room. Acceptable sharpness is a perception threshold, not a resolution limit. A print can look crisp at arm's length and soft under a loupe. The sensing medium, reproduction size, viewing distance, human vision, and final output all influence that judgment through the circle of confusion, as explained in Stanford's computer-graphics optics lecture.
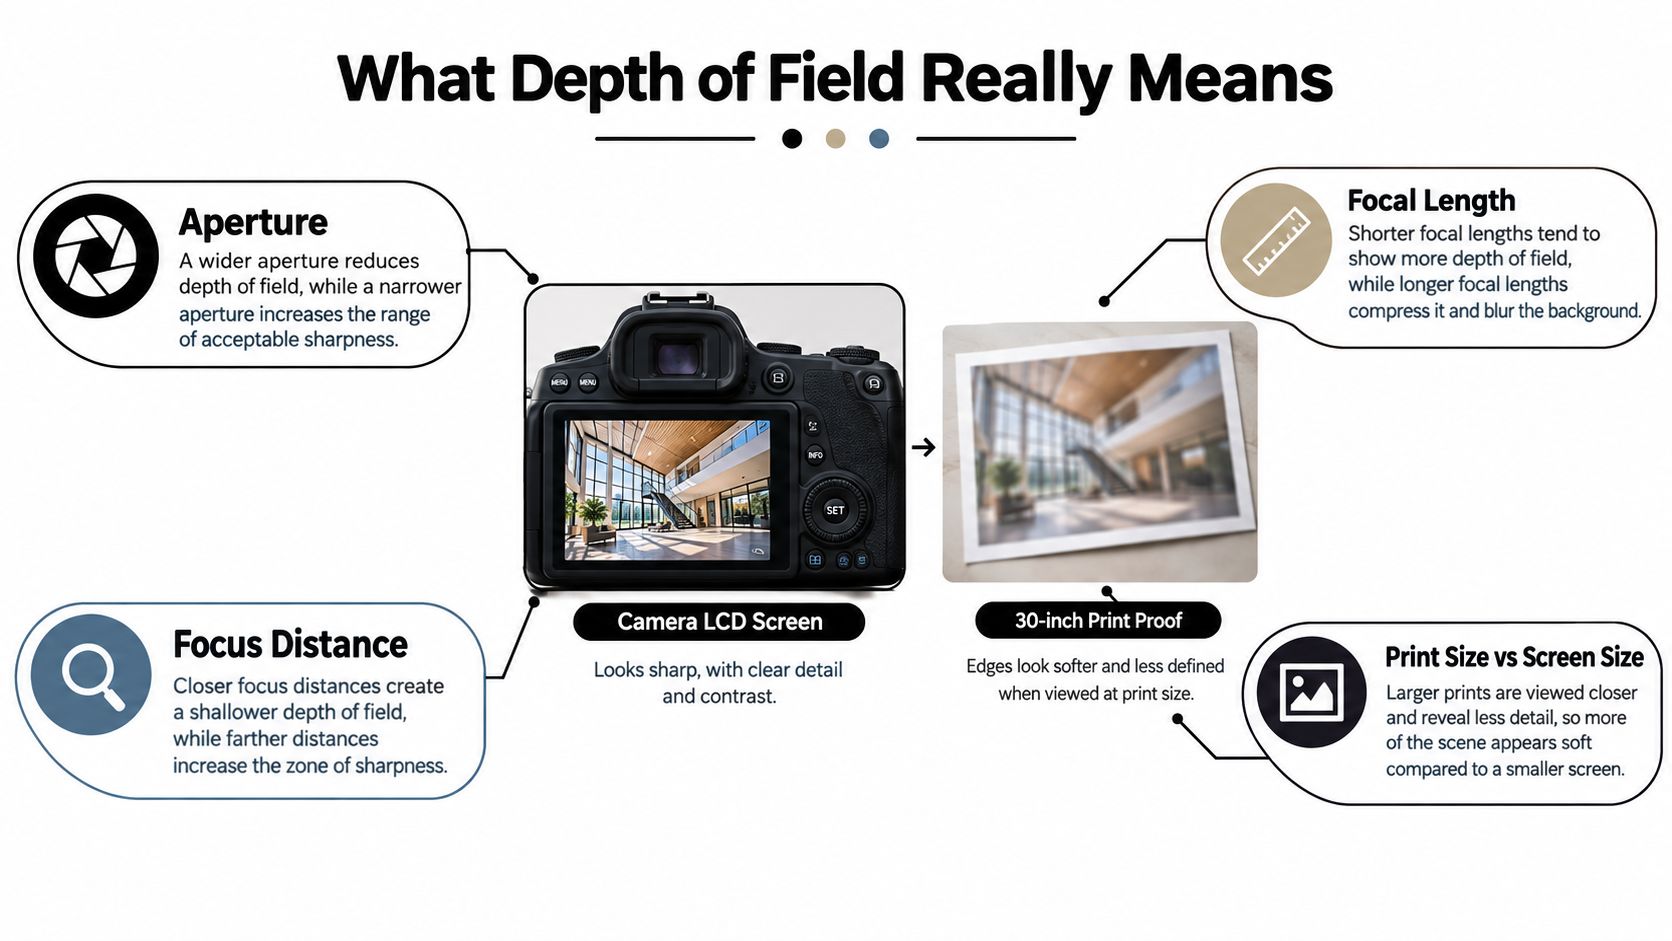
Sharp enough is a viewing decision
Suppose you are photographing a hotel lobby with furniture leading toward a reception desk. You focus through the middle of the room, yet the foreground furniture and rear wall still carry some blur. If that blur stays below the viewer's perception threshold, the frame reads as sharp. Enlarge the photograph, and the same blur becomes easier to see.
Depth of field also extends unevenly around the focused plane. The apparently sharp area is usually deeper behind focus than in front of it, with its near and far limits shaped by aperture, focal length, focus distance, and the acceptable circle of confusion.
A practical on-set workflow starts with three questions:
- What must remain sharp? Mark the nearest critical detail and the farthest one. A scene rarely gives every object equal priority.
- How will the image be used? A website preview, editorial spread, client presentation, or wall display can require different focusing choices.
- How will I verify it? Magnify details near the camera and at the far end of the scene. Review the full composition too, but do not rely on the LCD preview alone.
For an architectural commission, decide this before changing the aperture. If the foreground and background both carry client-facing detail, the final output may require a different focus distance, a tilt-shift approach, or multiple frames rather than stopping down.
Practical rule: Choose depth of field for the final deliverable, not for the size of the camera preview.
The Circle of Confusion and Why Output Size Changes Everything
On a hotel commission, a lobby can look acceptably sharp on the camera's rear screen while a large client print reveals soft lettering on the reception desk. The lens and focus position have not changed. The viewing conditions have.
The circle of confusion is the diameter of a blur spot that a viewer still accepts as a point at a chosen viewing condition. A point on the focus plane is rendered as a point. A point slightly in front of or behind it becomes a small disk. While that disk stays below the viewer's perception threshold, the detail appears sharp. Once it grows beyond the threshold, the same detail reads as blurred.
That judgment depends on the entire image chain:
- The lens projects light onto the sensor or film.
- The capture medium records detail at a particular scale.
- The file is enlarged, reduced, or reproduced.
- The viewer sees it from a particular distance.
- Human vision decides whether the blur remains acceptable.
A traditional 35 mm film print may use approximately 0.02 mm as a circle-of-confusion reference. A high-end digital SLR may use roughly 6 micrometres, or 0.006 mm, as a practical reference, about the width of one pixel. These are working assumptions, not permanent properties of film and digital capture. They depend on reproduction and viewing conditions, as described in Stanford's optics material.
Circle of confusion by output type
The examples below give useful starting points rather than universal conversion rules. A print viewed close to the eyes demands a smaller acceptable blur than a larger print seen from farther away.
| Output Type | Viewing Distance | Typical CoC (mm) |
|---|---|---|
| Traditional 35 mm film print | Depends on reproduction and viewing conditions | Approximately 0.02 |
| High-end digital SLR reference | Depends on reproduction and viewing conditions | Approximately 0.006 |
| 5×7 print | At arm's length | Approximately 0.03 |
| 1 m print | Viewed from 2 m | Approximately 0.08 |
For an architectural image, output planning belongs beside the camera settings. A web preview can conceal a small focus error that becomes visible in a large editorial print. A wall image viewed from farther away may tolerate a blur that would distract someone standing close to it.
Depth-of-field formulas use the acceptable circle of confusion together with aperture, focal length, and focus distance. Change the threshold, and the predicted near and far limits change too. Choose the threshold from the final deliverable, then verify critical foreground and background details at the intended display size.
The Four Variables That Control Depth of Field
A room may look sharp on a laptop but reveal a soft foreground edge in a large print. On set, depth of field is therefore a viewing-dependent judgment, not a fixed property you can read from the aperture alone. Four connected variables shape the result: aperture, focal length, focus distance, and sensor format.
Aperture
A lower f-number opens the iris wider and generally produces less depth of field. A higher f-number closes it down and generally produces more. Moving from f/2.8 to f/11 can change a selective-focus frame into one where much more of a room or façade appears acceptably sharp.
The gain eventually comes with a trade-off. Stopping down enlarges the geometrical sharp zone, while diffraction spreads light and reduces fine texture and edge acuity. The MIT photographic-computing lecture notes describe diffraction-related sharpness loss at f/16, so f/22 rarely rescues a difficult interior. Check the final image at its intended output size before sacrificing detail for a theoretical increase in depth.
Focal length
With the camera position and focus distance held constant, a longer focal length generally gives a shallower acceptable-sharpness range and a narrower field of view. That can isolate a product or compress layers across a façade, yet it makes a near-to-far architectural composition harder to keep sharp.
Changing focal length from the same position changes framing, not perspective. If you step backward and use a longer lens to restore the framing, the new camera position changes the relationship between foreground and background. Set the position first, then choose the focal length that provides the required coverage.
Focus distance
Focus distance has a nonlinear effect. As the camera moves farther from the subject, usable depth of field grows more quickly than it does at close range. A position farther back may keep a foreground threshold and distant wall acceptably sharp, while moving close to a room feature can reduce the usable zone sharply.
On a 24 mm tilt-shift at f/8, choosing 16 mm or 24 mm changes both coverage and how precisely the focus plane must sit. The architectural photography lens guide also helps compare those practical coverage decisions.
Sensor format
Sensor format affects the acceptable circle of confusion and the focal length required for an equivalent angle of view. Smaller formats generally show greater apparent depth of field at the same framing and f-number. Larger formats can produce a shallower appearance under comparable conditions and demand more exact focusing when a commercial image must hold detail from foreground to background.
The choice is tied to the job. A larger sensor may suit the required tonal control, resolution, or rendering style, while a smaller format may make front-to-back sharpness easier to manage.
The camera position establishes the geometry. The lens controls the view. Aperture fine-tunes the sharp range.
Hyperfocal Distance for Front-to-Back Sharpness
A foreground paving edge and a distant building can both look sharp in one frame, provided the focus distance is chosen for the whole scene rather than for the farthest subject. Hyperfocal distance is the focusing distance that places the far limit of acceptable sharpness at infinity. Focusing there puts the near limit at approximately half that distance.
A commonly used approximation is:
H = f² / (N × c) + f
Here, H is hyperfocal distance, f is focal length, N is the f-number, and c is the acceptable circle of confusion. The result depends on the CoC assumption. Final viewing size and magnification still determine whether the predicted blur is acceptable, so hyperfocal distance is a planning reference rather than a guarantee of optical sharpness at every output size.
A worked architectural example
Take a 24 mm lens at f/8 on full frame, using a 0.030 mm circle of confusion. The resulting hyperfocal distance is approximately 2.43 m. Focusing near that distance places the far limit at infinity and the near acceptable-sharpness boundary near 1.22 m, approximately half the hyperfocal distance. Canon's explanation of hyperfocal focusing describes the same practical relationship and clarifies that the result defines acceptable sharpness, not infinite optical sharpness.
This setup can suit an exterior containing paving, planting, or a low wall in the foreground, with a building or skyline beyond it. Focusing on the distant façade may waste near depth. Setting focus within the scene distributes the available sharpness more effectively.
Hyperfocal distance at common wide-angle settings
These planning references assume full frame and a 0.03 mm CoC. The values are approximate, and the focus point should be checked against the intended output size.
| Focal Length | Aperture | Hyperfocal Distance | Recommended Focus Point for Scene Type |
|---|---|---|---|
| 24 mm | f/8 | Approximately 2.4 m | Near the hyperfocal distance |
| 24 mm | f/11 | Approximately 1.7 m | Near the hyperfocal distance |
| 35 mm | f/8 | Approximately 5.1 m | Near the hyperfocal distance |
| 35 mm | f/11 | Approximately 3.6 m | Near the hyperfocal distance |
A useful field method avoids calculations at the tripod. Identify the nearest detail that must remain sharp, then check whether the selected focus distance keeps infinity within the far limit. If the lens has a usable distance scale, focus at the nearest practical distance that still includes infinity. With modern autofocus lenses, magnified live view and a hyperfocal calculator can be more dependable than a small printed scale.
Aperture, focal length, and sensor format all change the result. A longer focal length increases hyperfocal distance, while a smaller aperture reduces it. A different CoC assumption changes the calculation as well. The same f-number therefore cannot guarantee the same foreground-to-infinity coverage across every camera, framing, and final viewing size.
Practical Techniques for Architectural and Commercial Work
A façade can look sharp on the camera screen and soft in the delivered brochure. Judge depth of field against the final viewing size, not only the live-view image. A web image, large print, and cropped detail place different demands on the same capture.
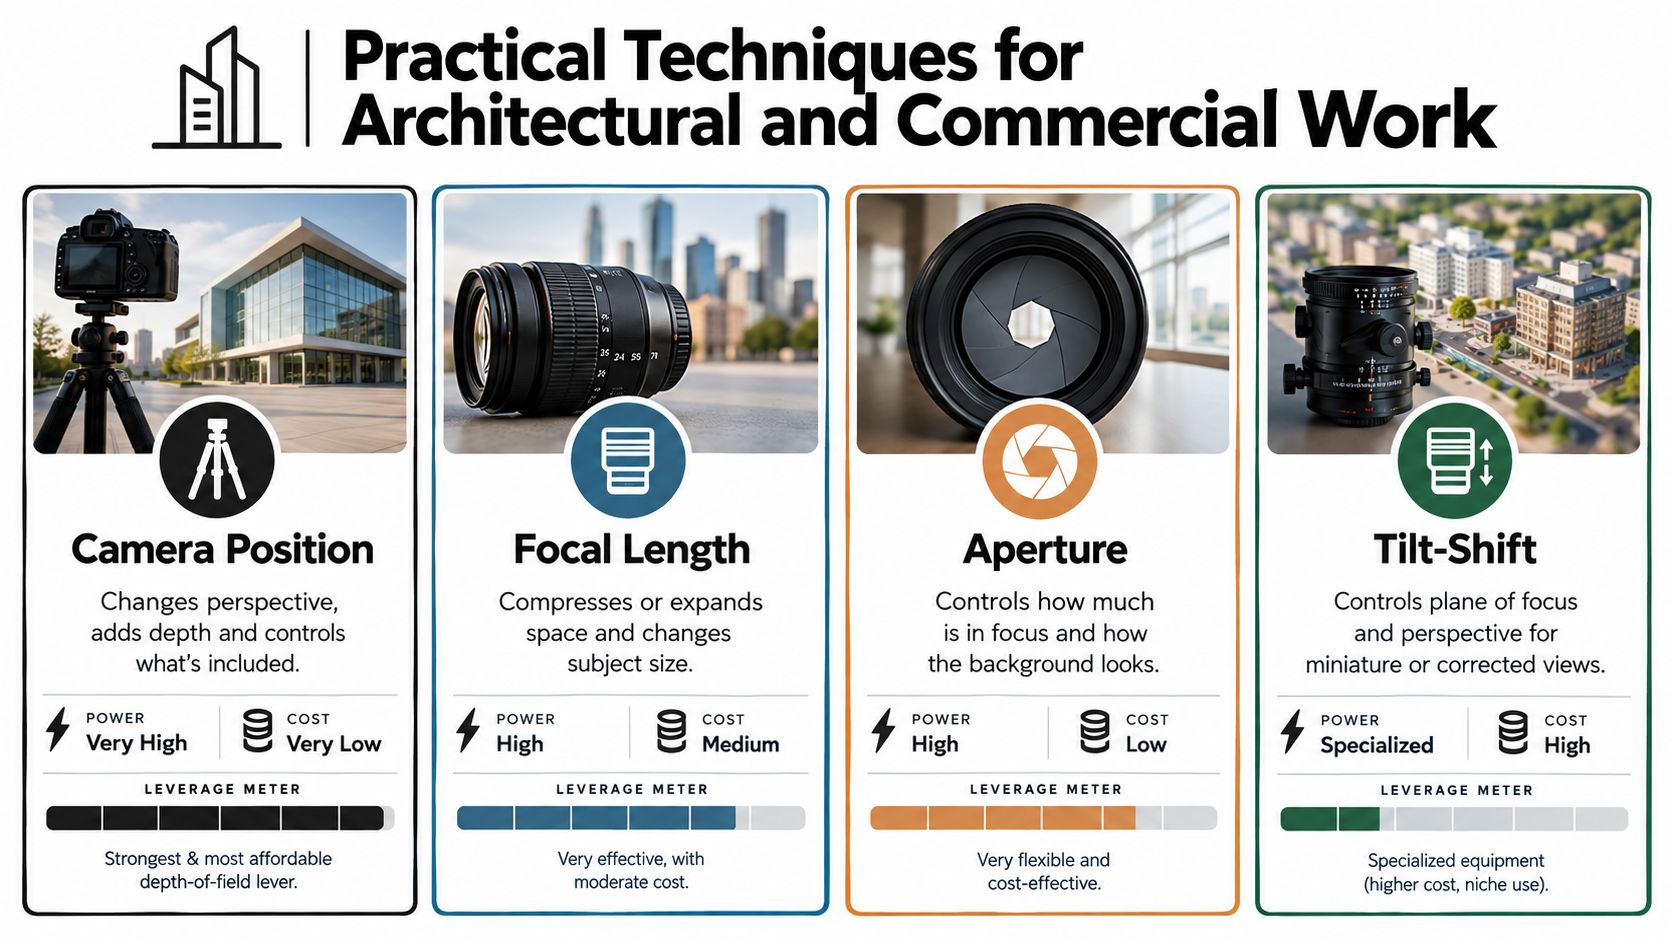
On a commercial set, four controls shape the result: camera position, focal length, aperture, and tilt-shift movement. They solve different problems, so changing the aperture should not be the automatic first response.
Camera position has the broadest effect. Moving backward can make a deep composition easier to keep sharp, but it also changes the relationship between foreground and background. Perspective, wall convergence, and the apparent size of spaces are set by position, so establish the camera location before choosing the lens.
Focal length determines coverage from that position. A wide lens can include a compact interior, while a longer lens can isolate a façade bay and reduce surrounding clutter. Replacing a 24 mm lens with a 35 mm lens changes the field of view and depth-of-field geometry. Moving the camera to restore the original framing changes perspective too.
Aperture in a real assignment
Stopping down expands the geometrical sharp zone, but the smallest opening is not automatically the best choice. For façades with signage, test f/8 and f/11 side by side at 100 percent on the lettering before committing. Inspect fine window mullions, stone texture, product surfaces, and small material transitions. A setting that looks convincing in a full-frame preview may lose detail in the final crop or print.
Tilt-shift and the plane of focus
A tilt-shift lens offers another route. Tilting reorients the plane of focus so it can align more closely with a receding wall, tabletop, or similar surface. The plane still requires careful positioning. It will not follow every object at different distances.
Tilt can let you use a wider aperture while placing focus where the subject needs it, preserving detail that a very small aperture might reduce. Shift controls perspective and line placement. Tilt controls focus-plane orientation. Use them for their separate jobs.
Set up the frame in a consistent order:
- Establish the camera position and composition.
- Choose the focal length for the required coverage.
- Select an aperture based on the nearest and farthest critical details.
- Add tilt if the subject geometry supports it.
- Inspect those details at magnified view.
- Capture a test frame and review it at the intended delivery size.
A printed resolution chart can reveal weaknesses hidden by a screen preview. Test the candidate setup before a major assignment, particularly when the image must work both on screen and in print.
Focus Stacking When One Frame Is Not Enough
A close product edge may sit only a short distance from the lens while its far surface recedes behind it. At the final delivery size, both areas may need to show clean texture. A single aperture setting may leave one area soft, even when the image looks sharp in a full-frame preview. Focus stacking solves that problem by combining frames focused at different distances into one composite with a wider apparent sharp range.
The judgment depends on the intended output. A stack may be unnecessary for a web image viewed small, yet worthwhile for a large print, close crop, or commercial detail image. The goal is not maximum sharpness everywhere. It is enough usable detail across the areas the viewer needs to inspect.
A controlled stacking workflow
Begin with a rigid tripod and lock the head. A guide to choosing a tripod for architectural photography explains why the camera must stay fixed between frames. Disable autofocus, then keep the composition, exposure, white balance, and lighting unchanged throughout the sequence.
Focus from the nearest important detail toward the farthest. Let the sharp zones overlap, using smaller focus changes for close subjects and broader steps when the subject is distant. The aperture and subject distance determine how much each frame covers. Check the nearest and farthest critical areas rather than assuming that a longer sequence will produce a better file.
The software aligns the frames, selects sharper regions, masks the boundaries, and blends the layers. Photoshop can handle many architectural composites. Capture One can prepare consistent raw files before blending, while Helicon Focus and Zerene Stacker provide dedicated workflows for detailed close work and product subjects.
A stack increases both capture control and retouching time. Moving people, leaves, reflections, clouds, or changing daylight can produce mismatched edges and ghosting. A product hero with a receding surface may justify that work. A static interior that already holds together at a moderate aperture may be better served by one clean exposure.
Use stacking when
- The depth is extreme: Foreground and background details both matter commercially.
- Diffraction is becoming visible: A smaller aperture would extend coverage but soften fine texture.
- The subject is stationary: The scene can remain unchanged during the sequence.
- Retouching time is available: The final output warrants alignment and masking.
Skip stacking when
- People or foliage are moving: Layer boundaries may reveal artifacts.
- Light is changing quickly: Frames may differ in exposure or color.
- One moderate aperture is enough: A single clean frame is more efficient.
- The scene has reflective or transparent surfaces: Reflections may shift between frames and blend unpredictably.
Suggested Settings and Post-Processing Verification
Settings should express the subject's geometry, not a universal recipe. Use the following combinations as starting points, then confirm the nearest and farthest important detail at magnified view.
| Scenario | Focal Length | Aperture | Focus Strategy |
|---|---|---|---|
| Exterior architecture | 24 mm | f/11 | Focus near the hyperfocal distance |
| Interior architecture | 16 mm | f/8 | Use tilt-shift when appropriate, or focus through the room |
| Interior architecture with stronger perspective control | 24 mm tilt-shift | f/8 | Align the focus plane and verify room corners |
| Commercial product | 90 mm | f/8 | Focus stack from approximately 1:1.5 to 1:2 when necessary |
| Editorial portrait | 85 mm | f/2.8 | Focus on the near eye |
For an exterior, a 24 mm lens at f/11 focused near hyperfocal distance can be a sensible starting point when the composition runs from foreground paving to a distant building. An interior may need an f/8 approach with a 16 mm lens, or a 24 mm tilt-shift lens at f/8 when perspective and focus-plane control matter more than maximum width.
A product photographed at 90 mm and f/8 may need focus stacking if the subject recedes substantially toward the background. For an editorial portrait, an 85 mm lens at f/2.8 focused on the near eye gives a different priority. The goal isn't wall-to-wall sharpness. It's to keep the important facial plane clear while allowing the background to recede.
Verify the delivered image
Review the raw file at 100 percent on a calibrated display. Look first at the nearest critical detail, then inspect the background. If both areas are soft, sharpening won't repair the missed depth of field. Raw files preserve flexibility in exposure, color, and tonal adjustment, but post-processing can't recreate detail that the lens rendered outside the acceptable sharpness range.
Apply sharpening sparingly. Web output and print output need different finishing decisions, so create output-specific versions rather than sharpening one master aggressively. Finally, inspect the finished deliverable at its intended viewing distance. A screen review and a large printed proof answer different questions.
Jimmy Clemmons' guidance on using post-production to fix structural photos is useful for separating perspective correction from focus correction. Software can improve geometry and presentation, but it can't replace sound focus planning on set.
Jimmy Clemmons Photographer creates architectural imagery, commercial brand content, and professional portraits with careful attention to composition, focus strategy, lighting, and final delivery. If your project needs images that hold detail from foreground to background across web, editorial, presentation, or print use, visit Jimmy Clemmons Photographer to discuss the assignment.