

You're probably looking at a portrait that is technically fine and still not usable.
The exposure is clean. The face is visible. The client can't point to anything obviously wrong. But the frame feels generic, or worse, disconnected from the person and the brand it's supposed to represent. That usually isn't a camera problem. It's a lighting problem.
In professional portrait work, especially for editorial and corporate assignments, lighting for portraits isn't about making a face brighter. It's about deciding what the face should communicate. Competence. Warmth. Authority. Reserve. Openness. Tension. Precision. Light either supports that message or it fights it.
Beyond Illumination Why Light Control Defines a Portrait
A flat corporate headshot often happens because the photographer solved only for visibility. The subject is lit evenly, the background is acceptable, and nothing is offensive. But there's no structure in the face, no hierarchy in the frame, and no sense that the lighting was chosen for this person rather than dropped in from a template.
That's the difference between illumination and control. Control means deciding where the viewer looks first, what parts of the face recede, how much shadow the subject can carry, and whether the portrait should feel polished, severe, approachable, or introspective. Architects work the same way with space. They don't just add windows. They shape how light reveals form. Portrait lighting should be treated with that level of intention.
What control actually means on set
In practice, control comes down to a few decisions:
- Source position: Where the key light sits determines facial structure more than power does.
- Shadow design: A shadow under the jaw can define the face, or make it look heavy, depending on placement.
- Background relationship: The subject and background need a clear visual relationship. They shouldn't collapse into the same tone unless that's deliberate.
- Catchlights: Eyes need life, but not every portrait needs the same bright, open sparkle.
Practical rule: If the light doesn't describe bone structure, it won't carry narrative.
This is why I rarely start by asking what modifier to use. I start by asking what the portrait needs to say, then I decide how much contrast the face should hold.
Portrait lighting has always been about repeatable control
This isn't a modern obsession. It's built into photography's history. Photography only became practical after artificial illumination developed enough to overcome early technical limits. As Britannica's history of photography notes, L. Ibbetson was already using oxy-hydrogen light in 1839, which tells you controlled artificial light became important very early. That matters because portrait photographers have always needed more than brightness. They needed repeatable exposure on a human face, with intentional shadow and mood.
Good portrait lighting doesn't rescue a subject from darkness. It places the subject inside a designed visual structure.
That's still the job now. Whether you're using strobes, continuous fixtures, or a window with careful negative fill, the point is the same. Build a portrait that feels authored.
The Four Core Portrait Lighting Patterns Decoded
The classic patterns matter because they give you a predictable visual language. They aren't academic labels for their own sake. They let you choose structure quickly, communicate with assistants, and diagnose a bad frame before you waste time fine-tuning power.
Start by learning what each pattern does to the face. Then stop treating them as formulas and start using them as intent.
Here's the basic visual map.
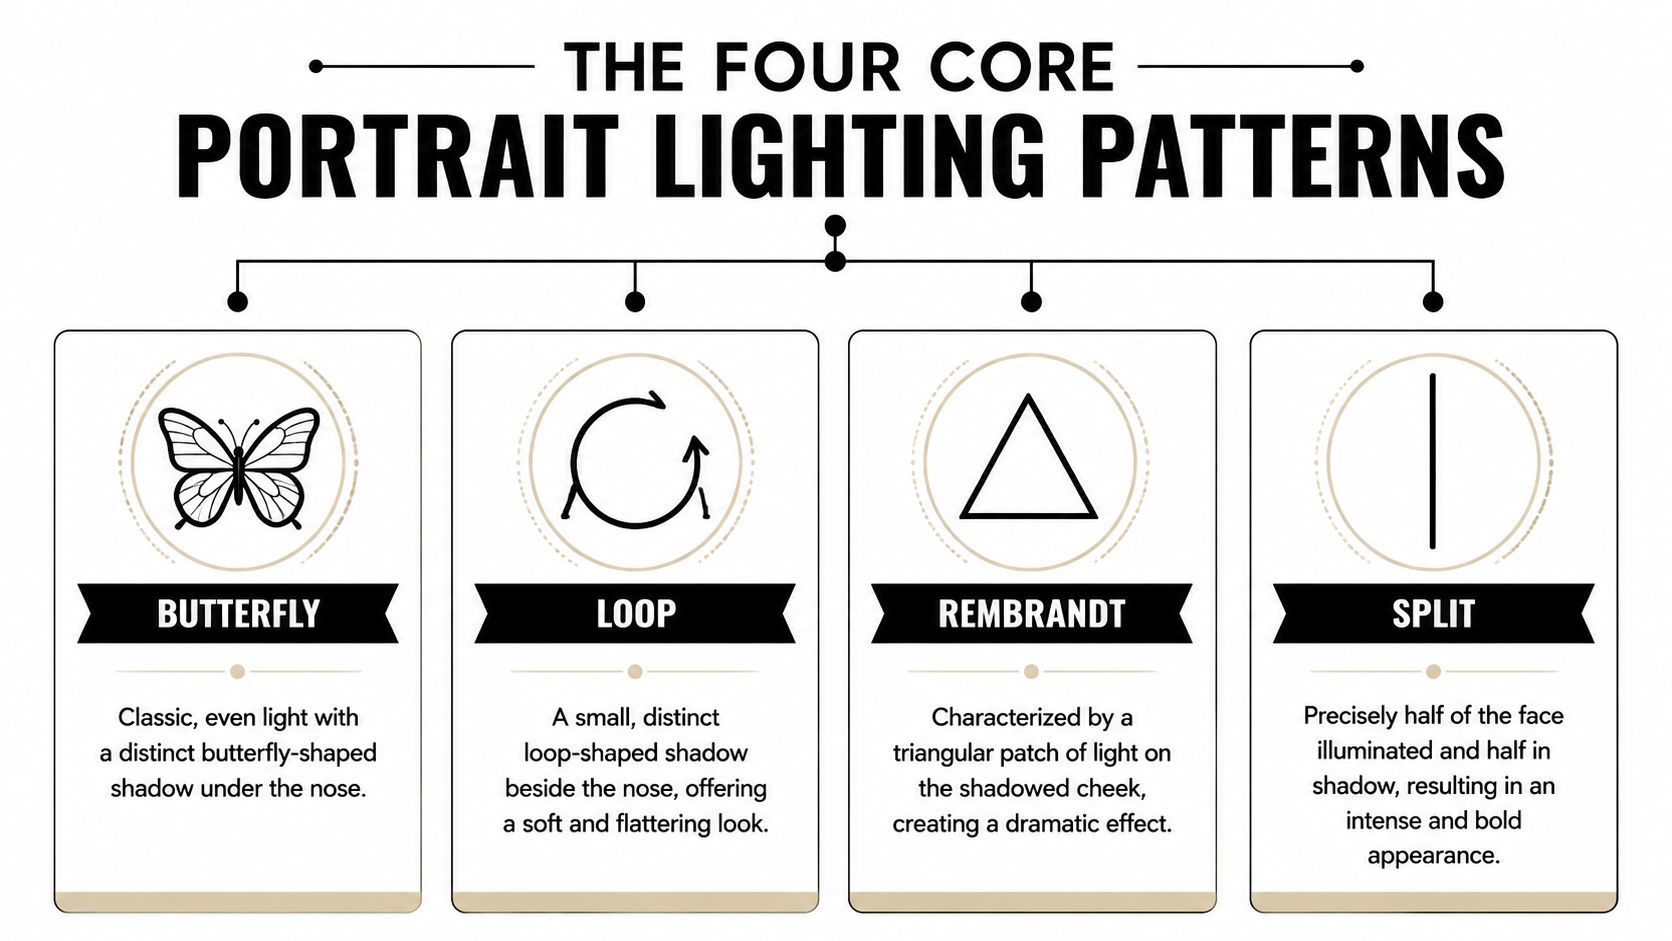
Butterfly lighting
Butterfly lighting places the source slightly above and in front of the subject, often described at 6 o'clock in the clock-face approach from Professional Photographers of America's portrait lighting guide. It creates a centered shadow beneath the nose and a fairly symmetrical look.
This pattern suits portraits that need polish and order. Beauty work uses it often because it opens the face and highlights cheekbones cleanly. In corporate settings, it can work well when the brief calls for confidence without too much drama.
What often fails is placing the light too high. Then the eye sockets go dark, the catchlights disappear, and the subject looks tired instead of refined.
Loop lighting
Loop lighting is the most flexible pattern in professional portraiture. The key light usually sits about 30 to 45 degrees from camera and slightly above eye level, according to Digital Photography School's breakdown of portrait lighting patterns. It creates a small shadow beside the nose without letting that shadow connect to the cheek.
That small shift matters. Loop gives shape without pushing the portrait into overt drama. It's often the safest starting point when you're photographing executives, designers, or editorial subjects who need dimension but not theatricality.
Rembrandt lighting
Rembrandt lighting moves the key farther to the side until the nose shadow meets the cheek shadow and leaves a triangle of light on the shadow side of the face. In clock terms, that's often around 4 or 8 o'clock, as described in the same Digital Photography School reference above.
This pattern has more gravity. It adds character fast, which is why it's useful when the portrait needs intellect, authority, or tension. Editorial portraits benefit from it because it can suggest a point of view rather than simple friendliness.
The common mistake is forcing it onto every face. If the triangle collapses, or the shadow side goes dead, the portrait feels muddy instead of dramatic.
Split lighting
Split lighting uses a single source at 9 or 3 o'clock, again following the PPA clock-face method. One side of the face is illuminated, the other falls into shadow.
This is the boldest of the core patterns. It can look cinematic, austere, or confrontational. It's usually too severe for a general-use company directory, but it can be exactly right for an editorial feature, a founder portrait, or a brand campaign that needs edge.
Choosing the pattern by message
Use this as a working shorthand:
- Butterfly: formal, composed, clean
- Loop: versatile, natural, dimensional
- Rembrandt: serious, textured, intentional
- Split: graphic, intense, high-contrast
The pattern is never the point. The point is what the pattern lets the viewer feel about the subject.
Shaping Your Light Source and Quality
Placement decides structure. Light quality decides texture, edge definition, and emotional temperature.
A hard source creates crisp transitions from highlight to shadow. It emphasizes skin texture, reflective surfaces, and facial planes. A soft source wraps more gradually. It lowers apparent contrast, smooths transitions, and generally feels less aggressive. Neither is automatically superior. The wrong choice is using soft light because someone told you it's universally flattering.
Hard light versus soft light
Editorial work often benefits from a firmer source because it preserves architecture in the face. You see cheekbones, jawline, and the geometry of the head. That can be useful when the portrait needs authority or a more graphic look.
Corporate and institutional work often leans softer, but not because soft light is magic. It's because many clients want approachability with controlled texture. The danger is over-diffusion. If the source gets too broad and too frontal, the portrait loses edge and the face turns featureless.
If the subject's face starts looking wider, flatter, or less decisive, the light is probably too broad or too frontal.
Modifier choices that change the result
Modifiers don't just make light softer. They shape spread, spill, and direction. That's why the same strobe head can produce very different portraits.
| Modifier | Light Quality | Best For | Pro Tip |
|---|---|---|---|
| Softbox | Controlled, soft, directional | Corporate portraits, editorial setups, repeatable studio work | Feather it across the face instead of aiming it straight in to get softer falloff |
| Umbrella | Broad, forgiving, fast to set up | High-volume headshots, simple fill, quick location work | Watch background spill. Umbrellas can light the whole room whether you want that or not |
| Beauty dish | Crisp but still shaped | Beauty portraits, fashion-leaning editorials, controlled contrast | Add diffusion only if you need it. Don't soften away the very character you chose it for |
| Bare reflector or focused source | Hard, specular, graphic | Dramatic portraits, architectural-feeling editorials, strong separation | Use with restraint on skin and glasses. Small moves make a big difference |
For a deeper breakdown of how controlled artificial sources behave in practical shooting, this guide on artificial lighting in photography is useful if you're comparing tools and working methods.
The modifier is not the look
Photographers often talk about softboxes or umbrellas as if the modifier creates the entire portrait. It doesn't. The look comes from the combination of source size, distance, angle, background tone, and what the subject is wearing.
A large softbox placed badly still produces a bad portrait. A smaller source, placed with precision, can look far more refined because it respects the structure of the face. That's the architectural way to think about it. Don't ask whether the light is soft. Ask what the light is building.
Professional Portrait Setups in Action
Theory helps, but assignments get won or lost in the setup. The useful question on set is simple: what arrangement gives you a repeatable result under pressure?
A strong professional setup usually uses two or three lights, with a main light and either fill or a kicker to separate the subject from the background. For outdoor work, the challenge shifts to balancing artificial light with the sun. PPA's guidance featuring John Gress notes that a common technique is to match flash exposure to ambient light, or to use fill flash at -1 to -2 stops so shadows lift without looking artificial.
Here's the studio version first.
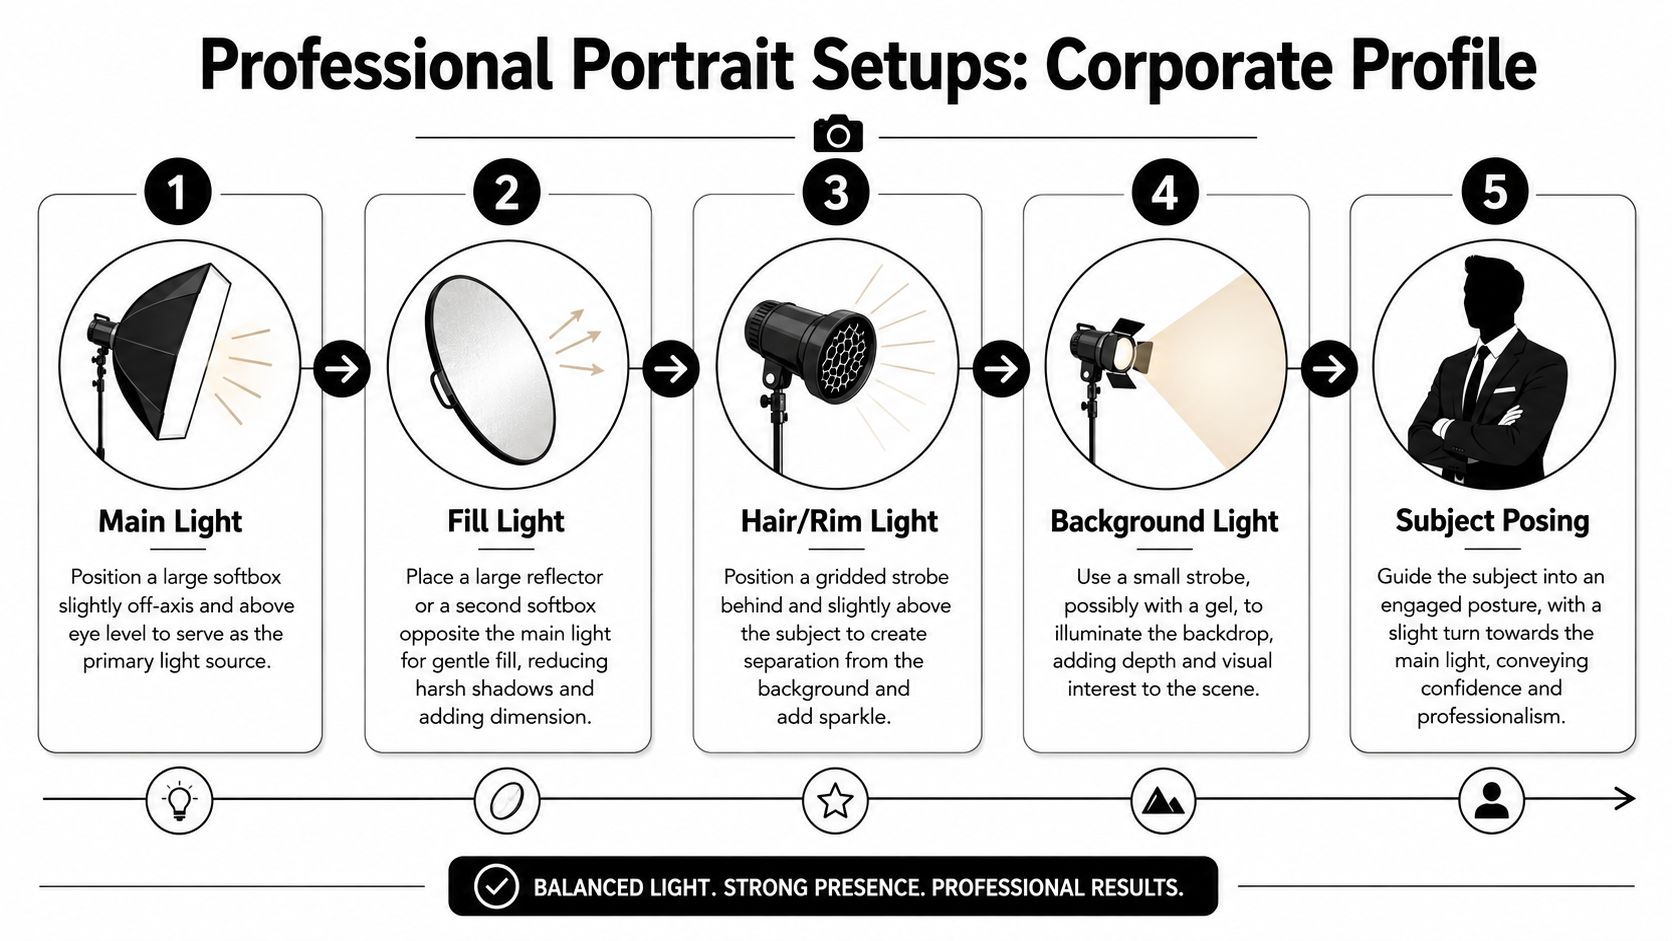
Setup one for a modern corporate headshot
A clean corporate portrait usually needs confidence, approachability, and consistency across multiple faces. That means the setup has to be forgiving, but not bland.
I'd start with a key light slightly off-axis and above eye level, usually in loop territory. That gives the face enough shape to feel intentional without making the portrait too dramatic for broad business use. A medium or large softbox works well because it keeps the transition smooth while still letting you feather the light.
Then add one of these, depending on the brief:
- Fill on the opposite side: Good when the client wants open, friendly faces and minimal drama.
- A subtle kicker or rim: Better when the subject needs separation from a dark background or darker wardrobe.
- A background light: Useful if the brand wants a lighter, cleaner environment behind the subject.
What doesn't work is filling everything until the portrait has no hierarchy. Executives often ask for “flattering” light, but what they usually mean is “don't make me look harsh.” Those are not the same thing. A portrait with no shadow doesn't look flattering. It looks unresolved.
Setup two for an environmental editorial portrait
On location, the background carries narrative. You're not just placing a subject in front of a wall. You're deciding how the person and the environment should relate.
In an office, lobby, manufacturing floor, or designed interior, I usually identify the architectural light first. Is the window light already giving direction? Is there a practical fixture that adds useful depth? Is the sun creating a line or shape worth preserving? Once that's clear, the strobe becomes a supporting instrument, not a blunt override.
A good working approach outdoors or in bright mixed light is to meter the ambient look you want, then bring in strobe until the subject belongs to that scene. If shadows need only a lift, use the fill subtly. If the ambient is beautiful, don't crush it with flash.
For photographers weighing fixture behavior before a location job, continuous light versus strobes is a practical comparison because the choice affects not just exposure, but how the subject experiences the set.
On location, the best supplemental light is the one that doesn't announce itself.
What I watch in high-stakes portraits
For editorial and brand assignments, I'm checking three things constantly:
- Does the subject still feel anchored to the space? If the face is lit beautifully but the environment dies, the portrait loses context.
- Is the separation elegant or obvious? Rim light should define, not scream.
- Would this setup survive a different subject? A lighting design that works only for one face isn't versatile enough for most client work.
That last point matters. The best portrait setups are adaptable. They give you a visual system, not a single lucky frame.
Directing the Subject Into the Light
Lighting and direction can't be separated. A perfectly built setup falls apart the moment the subject lifts their chin too high, turns too far off the key, or settles into a posture that breaks the shadow pattern.
Often, technically competent portraits go wrong in this regard. The lights are fine. The subject isn't occupying them well.
Small movements change the face
You don't need dramatic posing to fix a portrait. Small, precise direction does more.
Try cues like these:
- Turn your forehead slightly toward the light. This usually helps the eyes connect with the source.
- Bring your chin forward, then down a touch. That defines the jaw without forcing tension.
- Rotate your shoulders away from camera, then bring your face back. This adds shape fast, especially in corporate portraits.
- Hold there, then breathe out. Tension in the mouth and brow often softens on the exhale.
The key is not to dump generic posing language on a non-model. Give one adjustment at a time, then watch what the light does.
One pattern doesn't suit every face
Rigid portrait advice often falls short. The same broad, diffused setup won't treat every subject well. Modern portrait practice has moved away from universal formulas and toward adapting contrast and specularity to the individual. 500px's portrait lighting discussion makes that point clearly. Light should respond to skin tone, age, and facial features, not flatten them into a preset.
That means:
- A reflective forehead may need tighter control and less frontal fill.
- An older face may benefit from careful shadow placement, not automatic over-softening.
- A darker suit against a dark background may need edge separation even if the face itself is lit correctly.
- A subject with strong facial structure may look excellent with more directional light than standard “flattering” advice would suggest.
A refined portrait respects the subject's features. It doesn't try to average them out.
For outdoor portraits, tools can help manage reflections and saturation before you even start shaping supplemental light. If glare or surface control is part of your workflow, this primer on the CPL filter for portrait work is one useful reference.
Direct the eyes, not just the body
A lot of portrait authority comes from eye placement. If the subject's body is posed well but the eyes drift out of the light, the frame goes slack. I often tell subjects to move their eyes first, then their nose, then the rest of the head if needed. That sequence keeps the expression connected.
This matters especially with executives and professionals who aren't trained subjects. They don't need elaborate posing. They need calm direction that aligns their face with the light and gives them something clear to do.
Your On-Set Checklist and Troubleshooting Guide
A portrait session goes smoother when you stop treating review as an afterthought. Check the frame with the same discipline you used to build the setup.
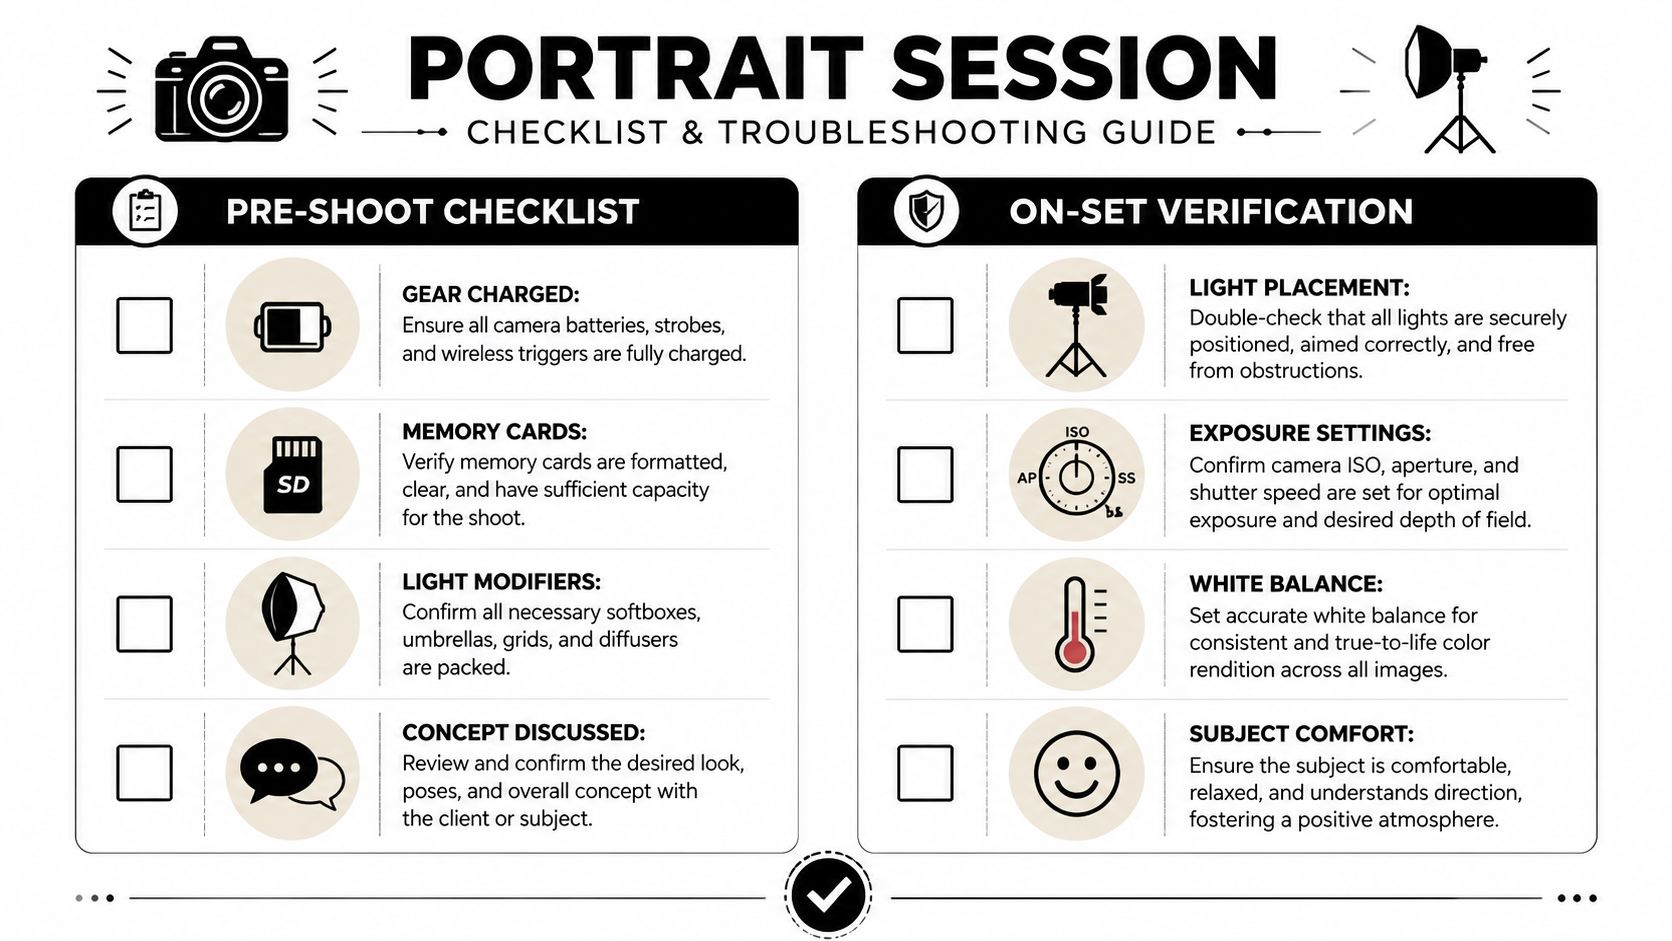
What to verify before and during the shoot
- Eyes first: Make sure focus is on the eyes, and that catchlights look intentional rather than accidental.
- Shadow shape: Check whether nose and cheek shadows still match the pattern you wanted.
- Glasses and skin reflections: Move the light before you assume retouching will fix it.
- Background tone: Confirm the background supports the subject instead of competing with them.
- Subject comfort: If the person looks stiff, the problem may not be technical anymore.
Quick fixes for common problems
| Problem | What you see | Fix |
|---|---|---|
| Flat light | Face has no depth, jawline disappears | Move the key farther off-axis or reduce fill |
| Harsh glare on glasses | Bright reflections block the eyes | Raise or shift the light, then adjust the subject's head angle slightly |
| Background too bright | Subject doesn't separate clearly | Flag spill, reduce background exposure, or increase subject-background contrast |
| Shadows too deep | Eye sockets or far cheek go dead | Add controlled fill or rotate the subject back toward the key |
| Portrait looks artificial outdoors | Flash is obvious | Lower supplemental light and let ambient do more of the work |
Good portrait lighting is controlled, but it shouldn't look over-explained. The final image should feel inevitable, as if the person and the light belonged together all along.
If you need portraits that align with architecture, brand identity, and editorial standards, Jimmy Clemmons Photographer provides portrait, architectural, and commercial photography with a focus on lighting design, on-set direction, and polished final imagery for Atlanta and regional assignments.