

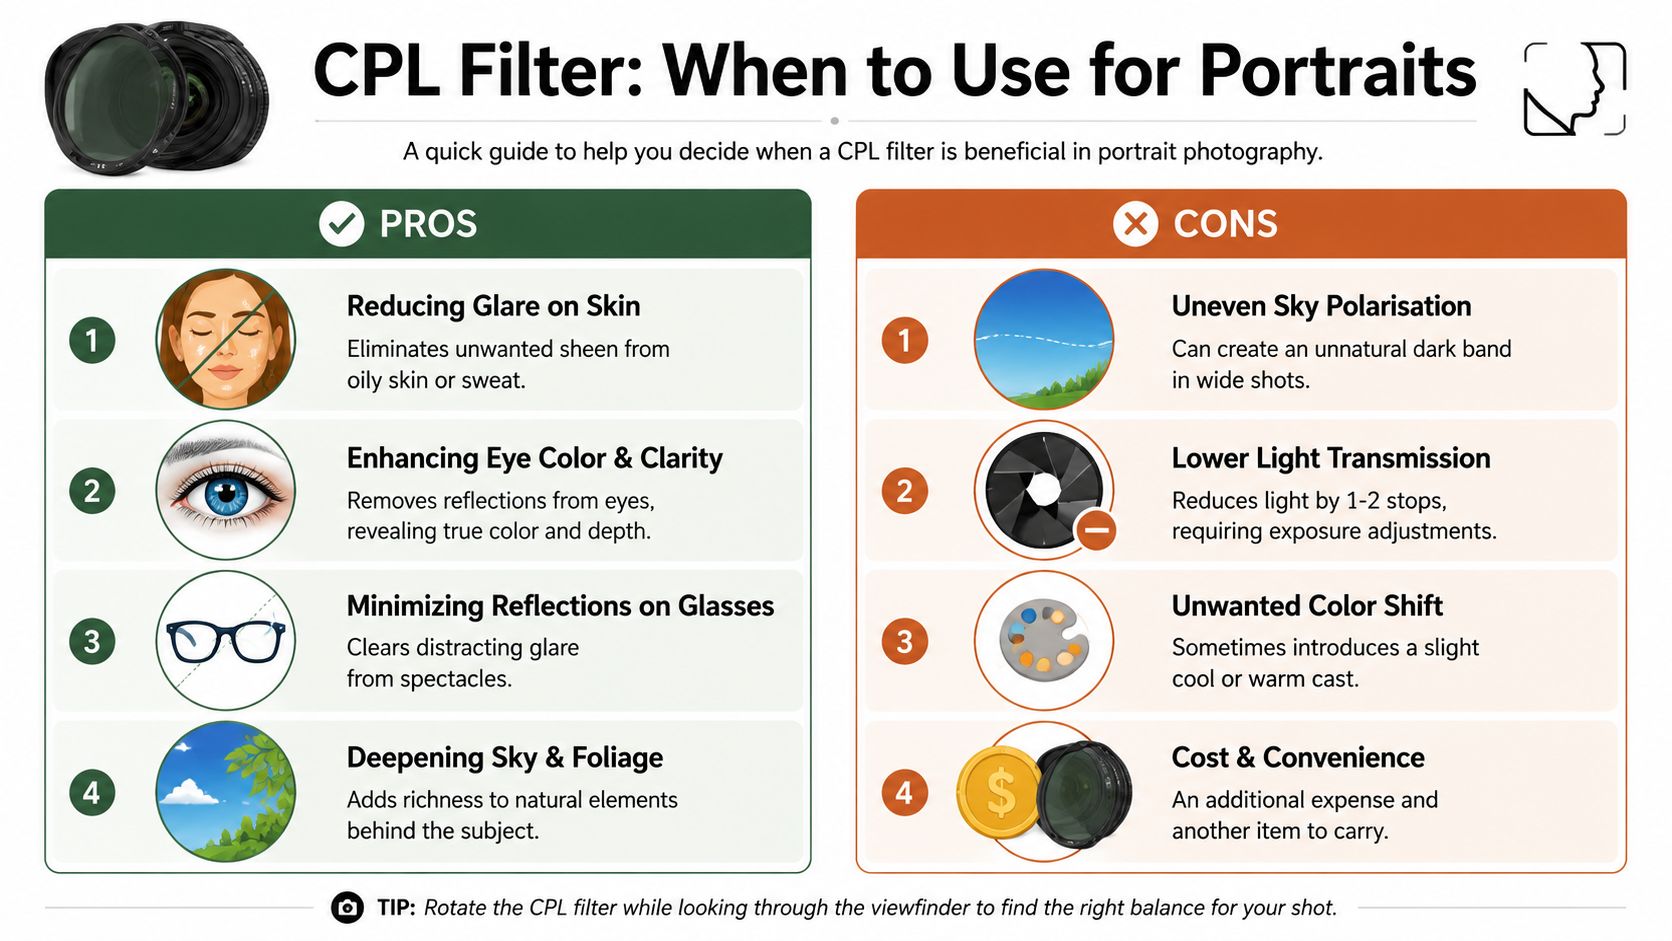
You're outside at noon, the subject looks great in person, and the files still come back with the same problems. Skin picks up a greasy sheen across the forehead and cheeks. Glasses throw a hard reflection. The sky behind the subject turns pale and distracting. You can fix some of it later, but not all of it, and the frame starts to feel worked on instead of well made.
That's where a CPL earns its place in portrait work. Not as an outdoor accessory borrowed for the day, but as a control tool for people. Used well, it can clean up specular glare on skin, calm reflections on hair and glasses, and give the background more separation without forcing a heavy-handed edit. Used badly, it can make skin look dead, skies look strange, and eyes lose life.
A good CPL filter for portrait work is about restraint. The best results rarely come from maximum polarization. They come from knowing exactly what reflection you want to suppress, what reflection you need to keep, and when the cleaner file is worth the trade.
What Is a CPL Filter and Why Use It for Portraits
A circular polarizing filter, or CPL, filters reflected light before it reaches the sensor. Photographers often use it to darken skies or cut glare off water. In portraits, its primary value is more specific. It helps control which reflections stay in the frame and which ones need to go.
That matters because portrait subjects are surrounded by reflective surfaces, and some of them are the subject. Skin carries specular highlights. Hair can kick back hard streaks of light. Eyeglass lenses, cars, windows, wet pavement, and glossy walls all compete with the face if you let them. A CPL gives you another layer of control in camera, which is often the difference between a file that grades cleanly and one that needs repair.

What it changes in a portrait
Used with restraint, a CPL can solve problems that are hard to fix well later.
- Skin highlights become easier to manage when glare is sitting on top of texture instead of shaping the face.
- Glasses often clean up when ambient reflections are stronger than the eyes behind the lenses.
- Backgrounds can separate better when leaves, water, painted surfaces, or glass lose their shiny haze.
- Color usually looks richer because stray reflected light is no longer flattening nearby surfaces.
The trade-off is just as important as the benefit. If you rotate too far, skin can lose healthy sheen, catchlights can weaken, and the portrait starts to look over-controlled. I use a CPL for portraits to trim reflection, not erase every sign of it. Good portrait light still needs life in the eyes and shape on the skin.
This is especially relevant in polished commercial work, outdoor branding sessions, and professional headshot photography in Atlanta, where glasses, skin shine, and reflective backgrounds often need to be handled on set rather than rescued later.
A CPL improves a portrait when it removes distraction without stripping away realism.
Why portrait shooters keep one in the bag
The practical appeal is consistency. If a subject is perspiring lightly, standing beside a bright vehicle, or framed against glossy foliage in hard sun, the filter can clean up the file before retouching starts. That saves time, but protecting image quality is a chief advantage. Heavy correction in post rarely looks as natural as getting the reflection under control at capture.
Portrait photographers adopted the CPL for the same reason product and automotive shooters rely on polarization. Reflection changes how surfaces read. In portraiture, that affects far more than the background. It changes skin texture, perceived color, fabric detail, and whether the viewer stays with the expression or gets pulled toward a bright patch somewhere else in the frame.
Identifying the Right Scenarios for a CPL Filter
The easiest way to misuse a CPL is to screw it on because the light is bright. Bright conditions alone don't justify it. Reflection does.
If the portrait is suffering from glare on skin, glasses, foliage, painted surfaces, or water behind the subject, the filter becomes useful. If the portrait already has good shape, healthy specularity, and strong eye light, the CPL may solve nothing and create new problems.
Situations where a CPL earns its keep
A CPL is strongest when the lens is oriented about 90 degrees from the sun, a principle explained in this Digital Photography School overview of circular polarizers. That geometry is why it works so well in outdoor portraiture when the subject is side-lit or when you're working with angled daylight rather than front light.
Use it when you're dealing with scenarios like these:
- Midday environmental portraits where forehead, nose, cheeks, and hairline are reflecting too much hard light.
- Subjects wearing glasses outdoors or near large reflective surroundings.
- Portraits near water, windows, or cars where background glare competes with the face.
- Green spaces with strong foliage behind the subject when reflected glare is making leaves look chalky rather than rich.
- Editorial headshot conditions on location where you need a cleaner file quickly and don't want to build every correction in retouching.
In polished commercial portrait work, these small controls matter. The same discipline that improves a formal headshot also improves outdoor corporate portraits, especially when wardrobe, skin, and background all carry reflective surfaces. That's part of why photographers who shoot professional headshots in Atlanta often think carefully about in-camera glare control rather than treating retouching as the first solution.
When to leave it off
This matters just as much.
A CPL is the wrong tool when the reflection is helping the portrait. A little shine across the cheekbone can describe form. Catchlights keep eyes alive. Glare on glasses is bad, but all reflected light isn't bad.
Skip the filter when:
- The portrait depends on bright, lively eye reflections
- The skin already looks flat, and removing more specularity would kill dimension
- You're in low light, where losing light creates more trouble than the glare
- You're shooting wide, and the background sky is likely to polarize unevenly
- You want a softer, more luminous rendering rather than a cleaner, more cut-through look
The best test is simple. If the reflection is distracting, control it. If the reflection is describing shape, keep it.
A quick field decision
Before mounting the filter, ask three questions:
- Is glare pulling my eye away from the face?
- Will reducing it improve the subject more than it harms the overall liveliness?
- Does this background benefit from deeper color, or will that look forced?
If the answer to all three is yes, the CPL probably belongs on the lens.
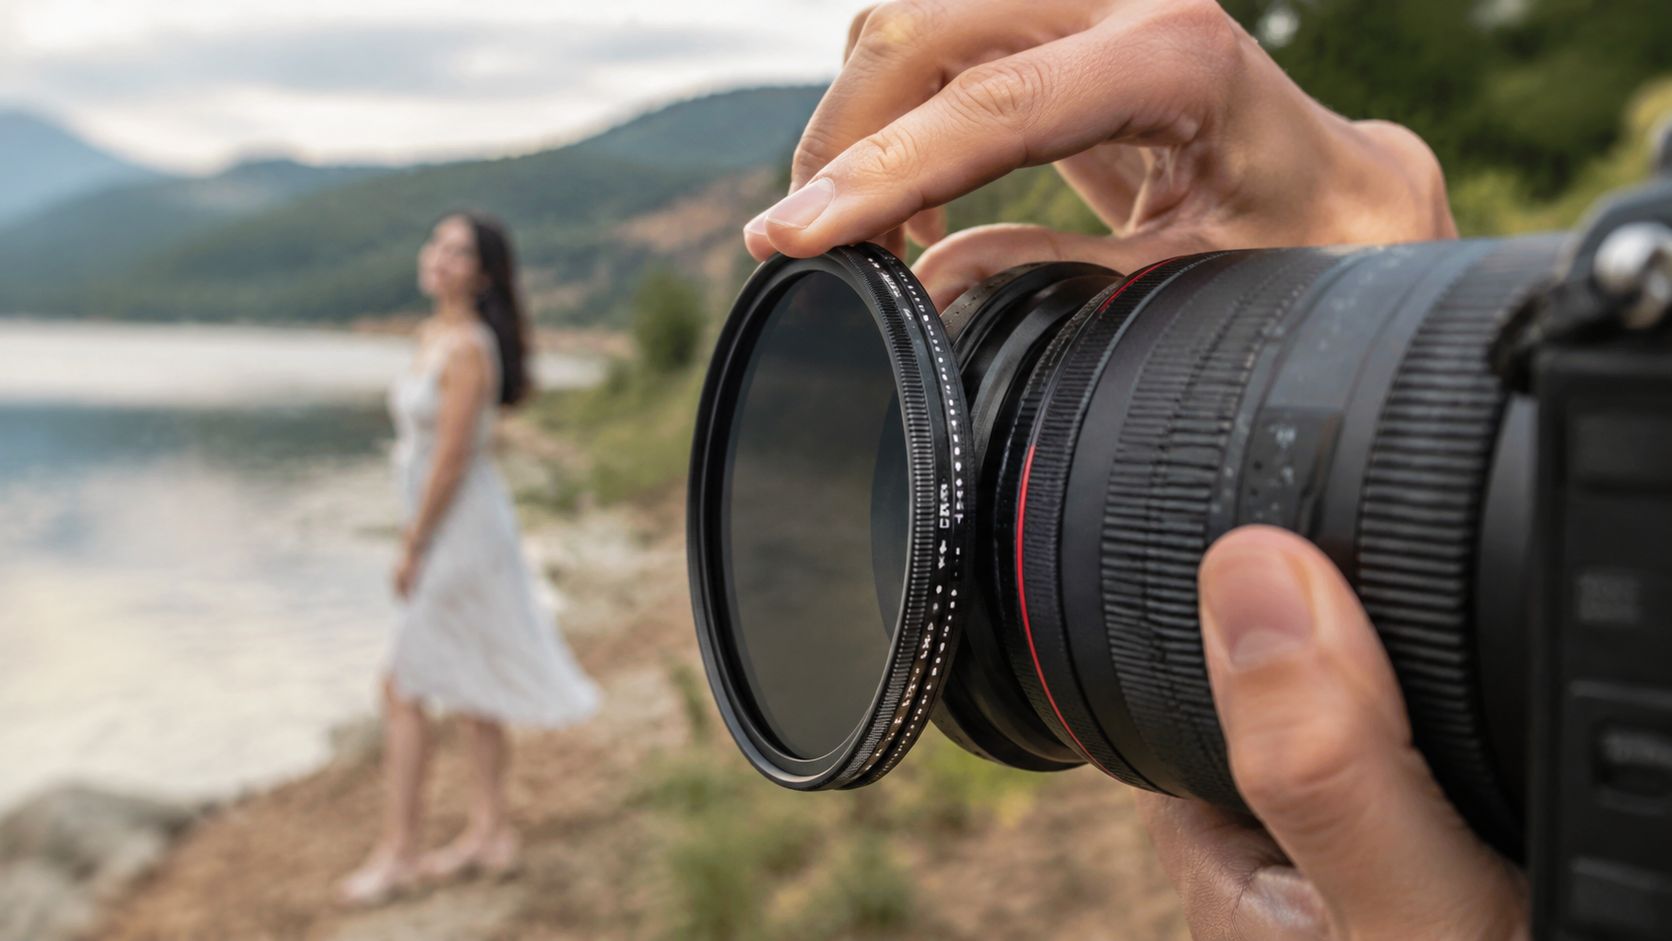
Setting and Rotating Your CPL for Natural Results
You see it fast in the field. The forehead is running hot, the leaves behind your subject are catching too much glare, and the eyes still need clean, living catchlights. That is the point where a CPL can help a portrait, or flatten it if you set it carelessly.
The filter works best when the light is coming from the side rather than straight behind you or straight into the lens. If the angle is poor, rotating the front ring gives you a weak, uneven effect. Before touching the filter, place the subject, choose the background, and check where the sun is hitting the face and anything reflective around it.
Find the working angle first
Good CPL use in portraits starts with position. I want the face lit well before I ask the filter to solve anything. If I am shooting outdoor headshots and the sun is off to camera left or right, I usually have a better chance of reducing glare on skin, hair, glasses, or foliage without wrecking the look of the portrait.
A reliable field workflow looks like this:
- Set the portrait first. Expression, pose, and facial direction matter more than the filter.
- Check the light direction. Side light usually gives the CPL something useful to work with.
- Mount the filter and evaluate the face. Skin and eyes get priority over the rest of the frame.
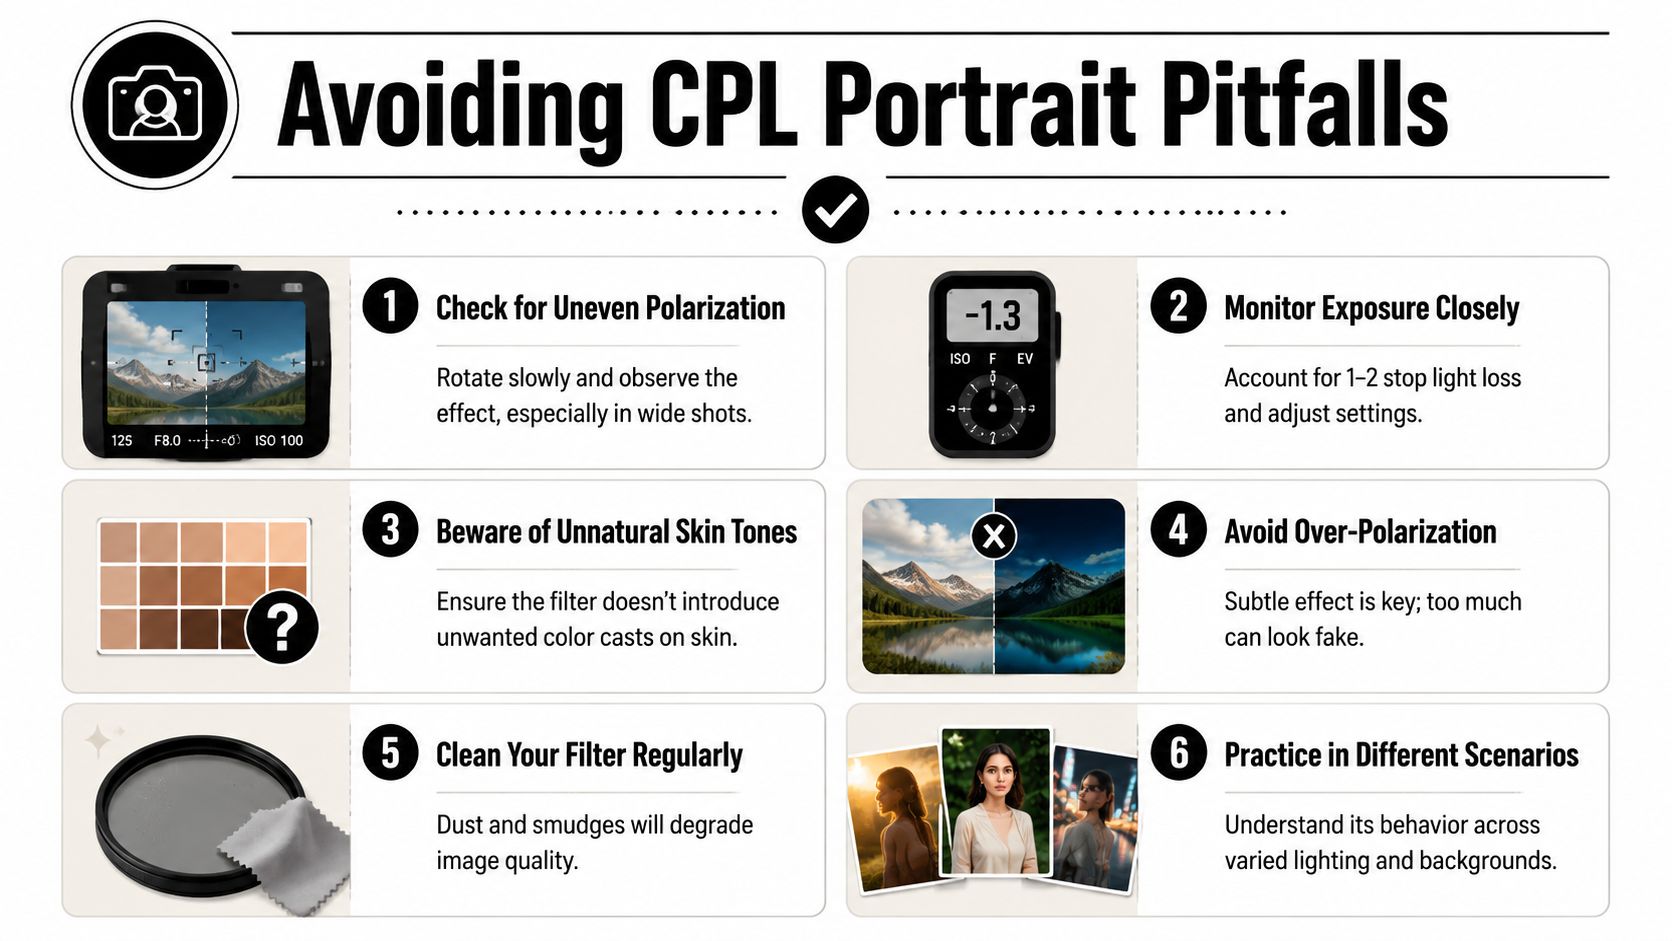
- Rotate slowly. Watch small changes in cheeks, forehead, lips, hair, glasses, and bright leaves or pavement behind the subject.
- Stop before maximum effect. Natural portraits usually live in the middle of the rotation, not at the extreme.
That last step matters most. Maximum polarization often makes skin look over-cleaned and backgrounds look heavy. A good setting removes distraction while keeping the face believable.
Watch specific areas, not the whole frame
Use the LCD, EVF, or tethered screen if you have one. Then judge the image in parts.
Start with the forehead and cheek on the brighter side of the face. Those highlights should calm down, but they should not vanish. A little specularity is what keeps skin from turning waxy.
Then check the eyes. If the filter is cutting reflections from glasses, good. If it is also stealing the catchlights that make the subject look alert, back it off. Portraits can survive a bit of glare more easily than dead eyes.
After that, look at the background. Greens and blues often get richer as you rotate, but people frequently push it too far. A deeper background can help the subject separate. A background that suddenly looks dense, cold, or uneven pulls attention away from the face.
Stop at the point where the face looks cleaner and the eyes still feel alive.
That same discipline matters in mixed setups. When daylight is mixing with strobes or LEDs, the filter's effect can be harder to judge by eye, especially on glossy skin and reflective clothing. In those situations, a solid grasp of artificial lighting in photography helps you tell whether you are fixing glare or just stripping away useful highlight structure.
Here's a quick visual reference before you head out:
Compensate for the light loss
A CPL cuts light. In bright conditions that is often fine. In softer light, late afternoon, or shaded locations, it changes your exposure decisions fast.
| Adjustment | What it helps | What it can cost |
|---|---|---|
| Slower shutter speed | Keeps ISO lower and preserves aperture choice | Subject movement, softer frames, handshake |
| Wider aperture | Gets light back quickly | Less depth of field, harder focus tolerance |
| Higher ISO | Protects shutter speed | More noise, especially in darker skin tones and shadow areas |
In portrait work, shutter speed usually gets protected first. A clean file has little value if the expression is soft from motion. If the subject is steady and the background can tolerate less depth of field, opening up the lens is often the cleaner compromise. If neither option works, take the filter off and solve the reflection another way.
Aim for believable skin
The best CPL portrait does not look filtered. It looks intentional.
Skin should still carry a little sheen where the light naturally describes form. Hair should keep some shine. Lips should not go flat. The background can deepen, but not at the cost of odd color shifts or a face that looks retouched before you ever open the file.
Rotate with restraint, check the face first, and let the filter do less than you think. That is usually where the portrait looks most finished.
Avoiding Common CPL Pitfalls in Portraiture
A CPL usually fails in portraits for one reason. The filter gets treated like a global image enhancer instead of a selective tool.
In portrait work, some reflections need to stay. A controlled sheen on skin gives the face shape. A small highlight on the lower lip keeps texture. Catchlights keep the eyes engaged. The job is to remove distracting glare without draining the portrait of life.
The waxy skin problem
Skin can take only so much polarization before it starts to look over-managed. The forehead goes flat. Cheeks lose their highlight roll-off. The portrait picks up that waxy, pre-retouched look that is hard to fix later because the file is missing the specular cues that made the face feel real.
I see this most often in hard side light and open shade with bright ambient bounce. The photographer rotates until the background looks rich, then notices too late that the face no longer has believable surface texture.
Use a lighter hand here:
- Back off the rotation a little until the skin shows a natural transition from highlight to midtone.
- Check the forehead, cheeks, and nose separately because they rarely respond the same way.
- Let the background give up some depth if that is what it takes to keep the face looking human.
If the skin looks polished instead of alive, the filter is set too aggressively.
Lost catchlights and dead eyes
Eyes are often the first casualty. A CPL can calm harsh reflections on glasses and reduce glare around the eye socket, but it can also mute the tiny highlights that hold attention in a portrait.
This is a practical check, not a theoretical one. Zoom in on playback and inspect one eye before committing to a full sequence. If the iris looks clearer but the eye has gone flat, rotate back slightly or change your angle by a small amount. A modest shift in position often saves the catchlight without giving the glare back.
That same discipline applies when stacking filters. If you have experience from using stronger light-control tools, including setups discussed in this variable neutral density filter review, the same principle holds here. More filtration is not automatically better if it strips the portrait of the visual cues that make it feel alive.
Uneven skies and uneven frames
Wide outdoor portraits can expose another problem. Polarization does not look equally strong across the whole frame, especially when part of the background sits near the strongest angle to the sun and another part does not.
The result is familiar. One side of the sky goes dense and saturated while the other stays pale. Foliage can also shift unevenly, which makes the background look patchy rather than controlled.
A few fixes work reliably:
- Frame tighter if a wide composition is exaggerating the unevenness.
- Lower the composition so the sky matters less.
- Use less rotation when the background starts separating into different tonal zones.
- Check the edges of the frame because that is often where the problem shows up first.
Color and tonality that feel forced
A CPL can make blue skies and green foliage look deeper very quickly. In portraits, that strength can become a liability. If the environment gets too rich while skin stays comparatively neutral, the subject starts to feel pasted into the scene.
Set priorities in the order the portrait needs them:
| Priority | Keep this natural |
|---|---|
| First | Skin tone and facial shape |
| Second | Eye presence and glasses clarity |
| Third | Background saturation and sky depth |
That order keeps decisions honest. If the filter improves the background but costs you believable skin or lively eyes, the setting is wrong.
Alternatives to a CPL and Post-Processing Workflows
A CPL is valuable because it changes the file at capture. Software can't fully recreate that. Once glare has obscured texture or buried color under reflection, post can only interpret what's left.
That doesn't mean the filter is always the best answer.
Physical alternatives on set
Sometimes the cleaner move is to change the light instead of filtering it.
- Reposition the subject so reflective surfaces aren't bouncing back into the lens.
- Turn the face slightly to redirect hot spots off the cheeks or forehead.
- Use a scrim or diffuser to soften the source and reduce hard specularity before it starts.
- Add controlled fill so the face holds shape even if you avoid a CPL entirely.
These options often preserve more natural skin sheen than aggressive polarization. They also help when you can't afford any additional light loss or when you want catchlights to stay strong.
What post can and can't do
Post-processing can refine contrast, tone, and color. It can reduce the appearance of some shine. It can darken a sky and shape local highlights. What it can't do reliably is remove optical reflection in the same way a CPL can before capture.
That's the dividing line.
A CPL is the better tool when reflection itself is the problem. Post is the better tool when the reflection is acceptable but the tonal balance needs refinement. In that sense, the CPL belongs in the same broader decision-making family as filters discussed in a variable neutral density filter review. Each filter solves a different capture problem. The mistake is asking one tool to do the other's job.
A practical pairing
The strongest workflow is often simple. Use the CPL gently on set to control the reflections you know you don't want. Then finish with restrained post to shape contrast and color without trying to manufacture optical cleanup after the fact.
Final Thoughts on Mastering the CPL Filter
A CPL rewards judgment more than enthusiasm. That's why some photographers swear by it and others get inconsistent results. The filter itself isn't unpredictable. The decision-making around it often is.
Used with intent, a CPL filter for portrait work gives you cleaner skin highlights, calmer reflections, and backgrounds with better separation. Used casually, it can flatten the face, deaden the eyes, and push color past credibility. The difference usually comes down to two habits. Position carefully, then rotate less than you think.
The strongest portrait shooters don't treat the CPL as permanent lens furniture. They use it when the scene asks for reflection control and leave it off when natural specularity is doing good work. That mindset itself is the upgrade. Not more gear, just more precise choices.
Mastering the CPL isn't about making every outdoor portrait look richer. It's about knowing exactly which reflections to remove, which ones to preserve, and how to leave the subject looking like a person rather than a filtered concept.
If you need portrait, architectural, or commercial imagery made with that same level of control, Jimmy Clemmons Photographer brings an editorial eye, precise lighting discipline, and polished post-production to assignments across Atlanta and the region.