
Image retouching is a localized post-capture workflow that selectively corrects flaws and distractions with masks and targeted edits, polishing an image while preserving its structure. It can refine color, remove visual noise, and adjust geometry without changing the photograph's essential subject.
A client may receive an architectural photograph that looks excellent at first glance. The exposure is balanced, the composition is deliberate, and the building has the presence it had on location. Then the closer review begins. A stray reflection crosses a window, an outlet interrupts a clean wall, a patch of mixed light turns one section of a room green, or a small object competes with the intended focal point. The photograph isn't broken. It needs a considered finishing pass.
Introduction to What Image Retouching Really Means
Image retouching is the selective correction of a photograph after it has been exposed or digitally captured. Instead of applying one effect across the entire frame, a retoucher isolates a specific area with a mask and changes only what needs attention. That approach preserves the broader exposure balance while addressing a color cast, surface defect, blemish, or distracting object, as described in this technical overview of retouching from negatives to digital images.
For an Atlanta interior, that might mean cleaning a scuff from a floor, reducing a reflection in polished stone, or balancing light near a window without flattening the room's depth. For a portrait, it could mean reducing temporary redness while retaining freckles, pores, and recognizable character. For a product image, it may involve correcting a small imperfection in the background while keeping the product's shape and material believable.
Retouching is not the same as applying a filter
A filter or global adjustment changes the image broadly. It may warm every surface, increase contrast across the frame, or make all colors more vivid. That can be useful during an early editing pass, but it doesn't answer a localized problem. If one wall has a color cast, warming the entire photograph may distort the wood, fabric, or exterior light elsewhere.
Retouching works more like a conservator cleaning one mark from a painting rather than repainting the entire canvas. The retoucher asks three questions:
- What needs correction? A flaw, distraction, tonal imbalance, or compositional problem.
- What must remain intact? Architectural lines, material texture, skin structure, product shape, and the visual truth of the scene.
- How much change supports the image? Enough to clarify the subject, not enough to make the edit announce itself.
Practical rule: If the viewer notices the retouching before noticing the building, person, or product, the edit has probably gone too far.
This distinction gives clients a more useful vocabulary. Instead of requesting an image to “look better,” you can identify whether the need is cleanup, color correction, perspective adjustment, compositing, or a restrained creative change. That makes approval clearer and reduces surprises during production.
Retouching also works best as a collaboration, not a hidden repair service. A photographer can flag issues during the shoot, explain which problems are easier to solve on location, and identify which corrections belong in post-production. The final image should feel polished because the decisions are coherent, not because every visible irregularity has been erased.
How Image Retouching Evolved From Darkroom to Digital
Retouching existed long before Photoshop. Its roots reach back to the 19th century, nearly as old as photography itself, when photographers and editors altered negatives by hand with knives, paint, scratching, and masking techniques rather than software. The history of these methods is outlined in this account of how photo retouching worked before Photoshop.
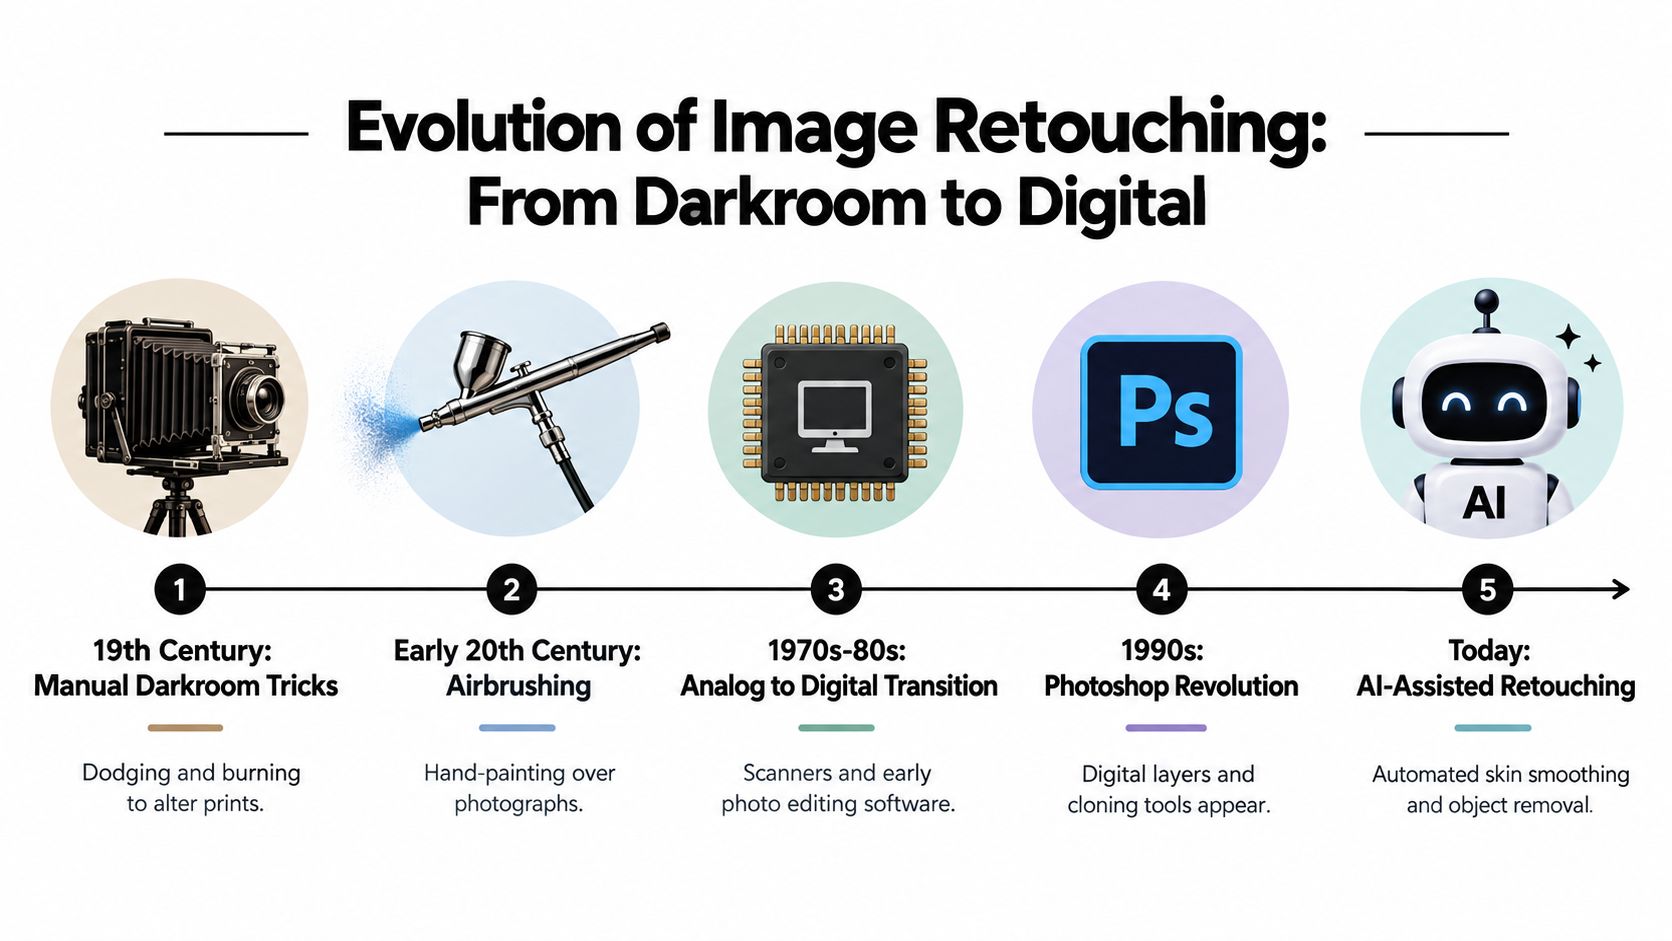
The underlying logic has stayed surprisingly consistent. A photographer identifies an area that distracts from the intended image, isolates it, and makes a controlled intervention. The tools changed from blades and paint to selections, masks, healing brushes, and adjustment layers, but the discipline remained selective judgment.
From physical alteration to digital layers
A major milestone arrived in 1990, when Adobe released Photoshop. The software helped make digital retouching the dominant workflow for professionals and later everyday users. By the early 1990s, commercially available digital cameras created new opportunities for people to edit photographs at home, and mobile editing apps brought retouching into mainstream consumer use by the 2010s, according to the same historical account.
That progression broadened the meaning of retouching. It no longer referred only to correcting a negative or print. Modern practice can include color correction, blemish removal, compositing, and geometric adjustment. An architectural photographer might straighten verticals, a portrait photographer might refine skin tone, and a marketing team might replace a distracting background element.
The shift is easiest to understand through an architectural analogy. A global adjustment is like changing the lighting plan for an entire building. A localized mask is like placing a controlled fixture over one display surface. The first affects everything. The second solves a specific problem while respecting the conditions around it.
When retouching became measurable
Retouching also moved beyond purely aesthetic judgment. In 2011, Dartmouth researchers described a perceptual metric for photo retouching that used eight summary statistics to quantify how much an image had been altered. That work showed that retouching could be studied as a measurable perceptual change, not only as an artist's subjective decision.
For clients, the practical lesson is simple. Digital retouching isn't a single button or a final filter. It's a broad production language that developed from hands-on craft into a layered visual process. The more precisely a team names the intended change, the easier it becomes to protect the photograph's original structure.
Core Techniques That Define Professional Retouching
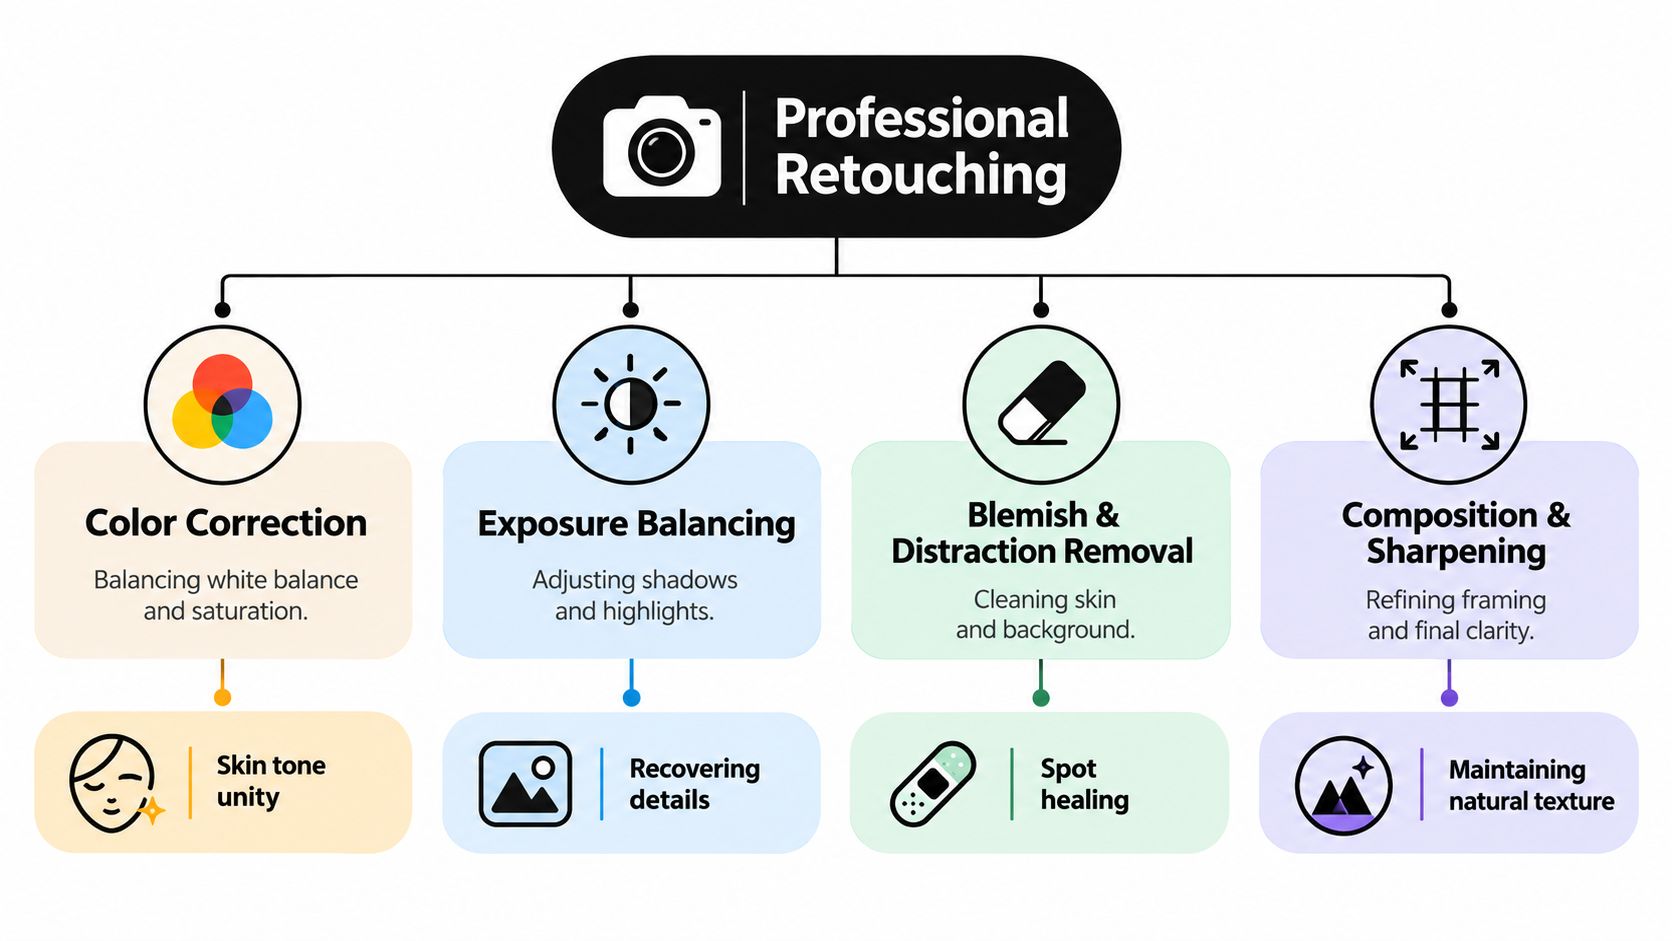
Professional retouching combines several different jobs. A color correction doesn't solve a perspective problem, and a healing brush doesn't replace a thoughtful lighting decision. The strongest results come from matching each visual issue with the least intrusive technique.
Color and exposure serve different purposes
Color correction establishes believable relationships between surfaces. In an interior, neutral walls should remain neutral, wood shouldn't turn unnaturally orange, and daylight shouldn't compete with warm practical fixtures. Selective color work can also bring skin tones into a consistent range across a portrait set. For a deeper explanation of this part of the process, see this guide to color correction in photography.
Exposure balancing manages brightness and detail. It can recover information in a shadowed corner, restrain bright windows, or bring a subject forward without making the entire frame harsh. These adjustments should support the existing light rather than create a different lighting story.
The distinction matters in a glass-walled office. If the windows are too bright, lowering global exposure may make the furniture and floor too dark. A targeted adjustment can control the windows while preserving the room's usable detail.
Removal and refinement require restraint
Blemish and distraction removal handles the small elements that pull attention away from the subject. Depending on the assignment, that can include a temporary skin mark, a stray cable, a scuff, an unwanted reflection, or an object left in the background. The purpose isn't to make every surface sterile. It's to remove visual noise that doesn't contribute to the image.
Perspective and geometric correction is especially important in architecture. Lens correction and controlled geometry can make verticals feel intentional and prevent a room from appearing to lean. The retoucher must avoid overcorrecting, though, because a mathematically rigid image can look less natural than the original capture.
Compositing combines visual information from separate frames or sources. It can help manage changing light, remove people from a scene, or build a cleaner presentation when one exposure can't contain every desired detail. Because compositing changes what appears together, it deserves clear client approval.
Sharpening finishes the image
Sharpening should clarify important edges without turning texture brittle. Architectural detail may benefit from crisp lines in millwork or masonry, while a portrait needs skin to retain softness and natural variation. Product work often requires careful attention to edges, labels, glass, and reflective materials.
A useful review asks what each technique preserves:
| Technique | Primary purpose | What careful work preserves |
|---|---|---|
| Color correction | Align color relationships | Material and skin-tone credibility |
| Exposure balancing | Control brightness and detail | Depth, atmosphere, and usable information |
| Removal | Reduce distractions | Natural surface variation |
| Geometry correction | Refine lines and shape | The building's visual character |
| Compositing | Combine selected image information | A transparent, approved visual story |
| Sharpening | Improve perceived clarity | Texture without brittle edges |
The quality of a retouch often lies in what remains untouched. A clean architectural photograph should still feel occupied by real materials and real light. A refined portrait should still look like the person who stood in front of the camera.
Inside a Non Destructive Retouching Workflow
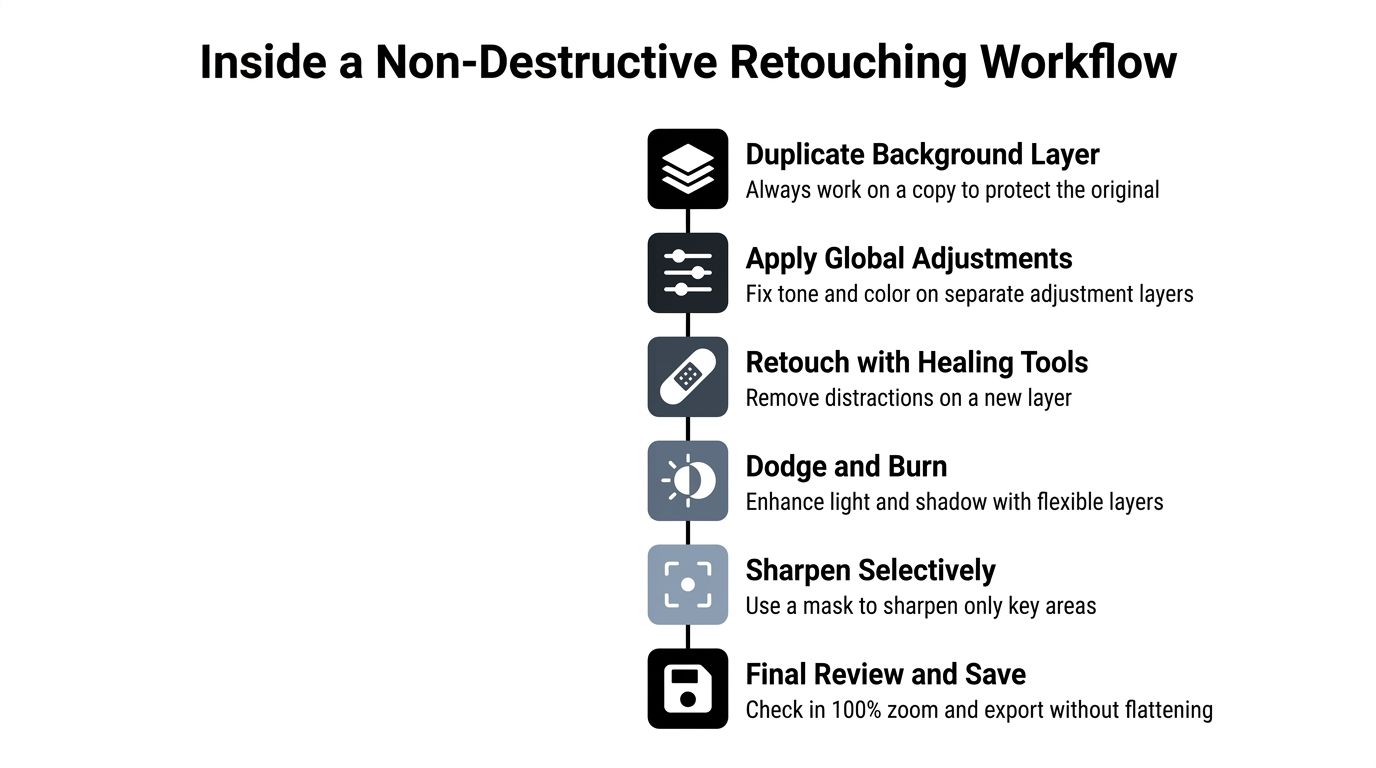
A non-destructive workflow protects the original capture while giving the retoucher room to revise decisions. Professional practice commonly uses Curves, Levels, Hue/Saturation, Selective Color, and layer masks, with opacity and blend modes controlling how strongly each correction appears. This guide to achieving uniform skin tones describes the same layered logic, particularly the relationship between masks, tone, and color.
Protect the original before making changes
The first move is straightforward. Duplicate the background or place corrections on separate layers so the original pixels remain available. That matters when a client later decides that a reflection should be reduced rather than removed, or that a room needs a lighter atmosphere than the first proof suggested.
Global adjustments usually come early. Curves and Levels establish the broad tonal relationship, while Hue/Saturation and Selective Color help align color. Keeping these changes separate means the retoucher can adjust one decision without undoing the others.
Localized work follows. A healing layer can address a distraction, while a mask limits a tonal or color correction to the affected surface. The mask acts like a boundary on a construction drawing. It tells the software where the work belongs and prevents the adjustment from spilling into adjacent pixels.
Use blend modes to keep surfaces believable
Opacity controls intensity. A correction applied at full strength may look technically clean but visually obvious, so reducing opacity lets the original information contribute to the result. That balance is particularly important on stone, wood, skin, brushed metal, and other materials whose character depends on subtle variation.
Blend modes help reconcile a correction with the surrounding image. Multiply can deepen selected areas, Overlay and Soft Light can shape contrast, and Color can influence chroma without treating luminance in the same way. Used carefully, these modes reduce flat-looking surfaces and visible editing artifacts.
A practical sequence might look like this:
- Create a protected working copy. Preserve the capture before any retouching begins.
- Establish tone and color. Keep Curves, Levels, and color corrections on separate layers.
- Clean targeted distractions. Work on a new layer so removals can be revised.
- Shape light selectively. Use controlled dodge and burn rather than forcing contrast across the whole frame.
- Sharpen key areas. Mask sharpening so it supports important edges without exaggerating noise.
- Review at working and full size. Check both the overall impression and the fine detail before exporting.
For a fuller explanation of how stages fit together, see this photo editing workflow guide. The principle remains the same across architecture, portraiture, and commercial work. Separate decisions, targeted masks, and reversible layers give the client a cleaner path to approval.
Before and After Examples Across Architecture Portrait and Commercial Work
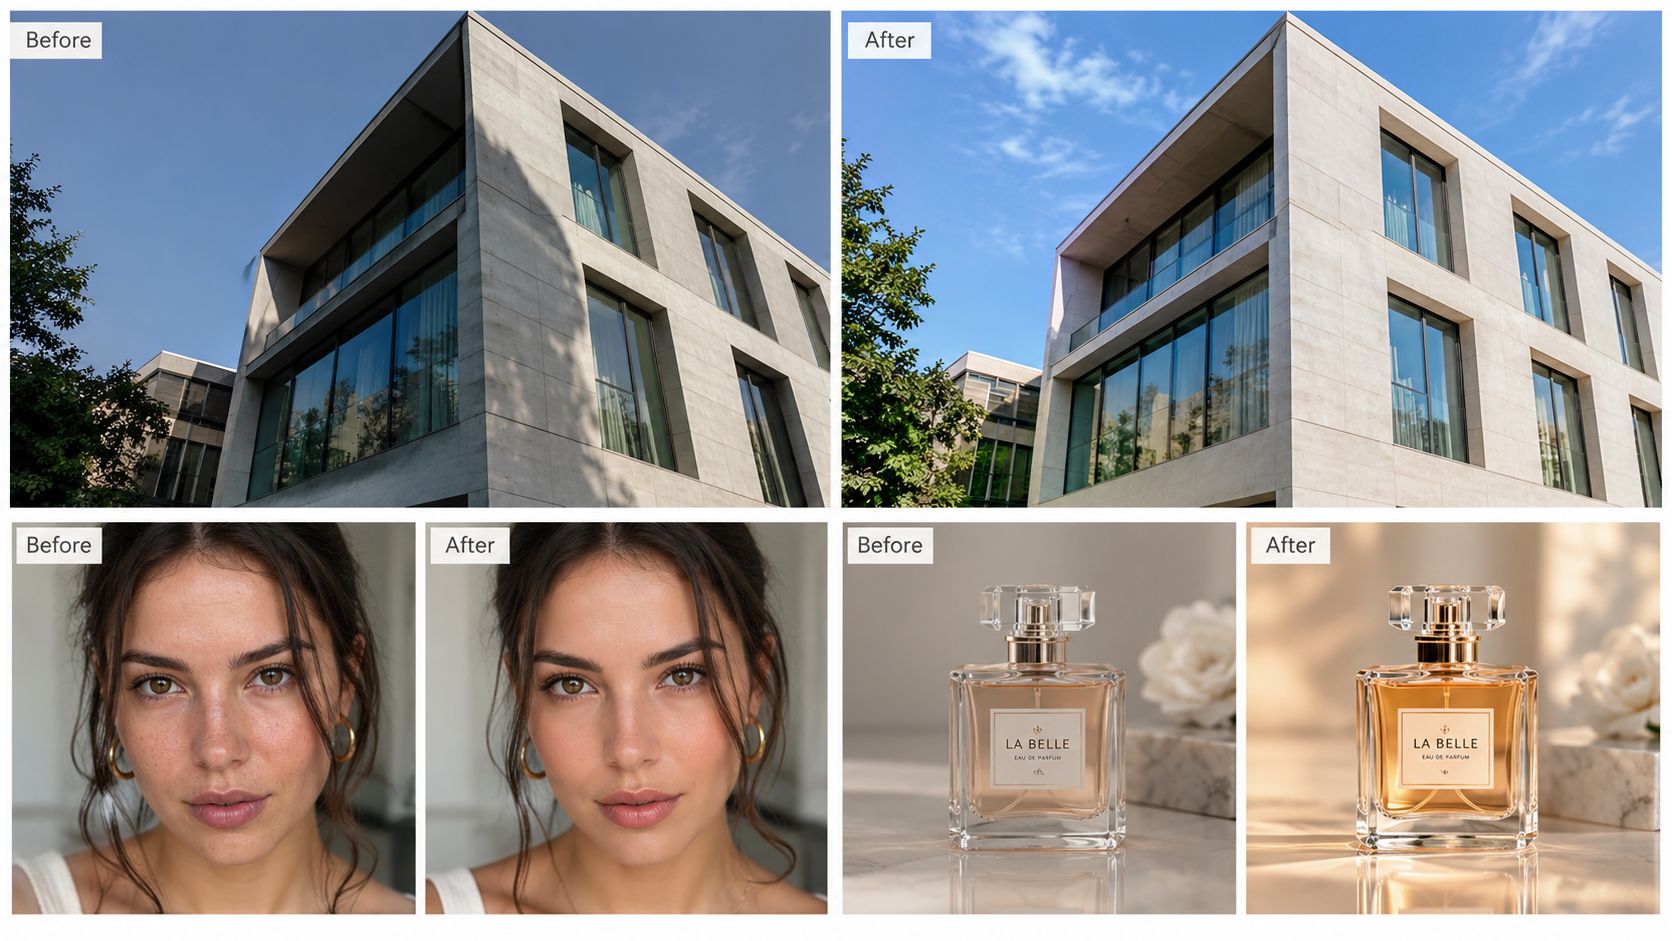
The easiest way to understand retouching is to compare the problem with the intended result. A successful before-and-after pair shouldn't show a more dramatic image. It should make clear what changed, what stayed, and why the adjustment serves the assignment.
Architecture
Consider a finished interior with strong window light and polished surfaces. The capture may show accurate geometry, but a reflection on a cabinet, a visible electrical plate, and a small floor mark compete with the room's design. Retouching can remove or reduce those distractions, balance the window area, and correct a localized color shift.
What should remain? The material grain, the direction of light, the scale of the space, and the relationship between the furniture and architecture. If the retoucher removes every reflection, the room may lose the qualities that make its surfaces believable.
A polished architectural image should clarify the design, not redesign the building.
An exterior photograph may need a different treatment. Vertical correction can make the structure read more confidently, while selective sky or facade adjustments can preserve detail without turning the scene into an artificial illustration. The photographer and client should decide whether temporary elements, such as vehicles or passersby, are distractions or part of the location's story.
Portraiture
A portrait retouch usually benefits from an even lighter touch. Temporary redness, a stray hair, or a small distraction may be reduced, but recognizable marks and natural texture shouldn't disappear without a clear reason. The goal is often to help the viewer see the person rather than the camera's tendency to freeze every minor variation.
The before image might feel uneven because of mixed light. The after image can unify skin color, refine tonal transitions, and guide attention toward the eyes while preserving pores, expression, and identity. That isn't the same as replacing a face with an idealized version.
Commercial and product work
A product photograph may require accurate color, clean edges, controlled reflections, and a background that doesn't compete with the item. A transparent bottle, for example, depends on reflections to communicate glass, but uncontrolled reflections can obscure the label. The retoucher's task is to shape those highlights, not erase the evidence of the material.
AI-assisted tools are changing how teams approach these tasks. Recent 2025 coverage of AI image editing describes tools that can handle lighting, color, sharpness, object removal, background replacement, and context-aware relighting in one workflow, while predictive and natural-language editing are developing quickly.
The convenience doesn't remove the need for review. A semantic tool may understand that a chair should disappear, but a human still needs to inspect the wall texture, floor reflection, shadow, and edge continuity left behind.
Ethics Authenticity and When to Disclose Retouching
Retouching becomes an ethical decision when the image represents a person, a product, a place, or an event that others may rely on. A clean commercial image can remove a temporary distraction without misleading the audience. An editorial image may require stricter limits because alteration can change the meaning of what happened. An identity-sensitive portrait demands particular care because edits can affect how a person is recognized or represented.
The question isn't whether an image has been retouched. Photography has used corrective processes since the medium's early history. The better question is whether the changes preserve the visual claim the image makes.
Match the edit to the context
For architectural marketing, removing a stray object or correcting a color cast may clarify the property as presented during the assignment. Rebuilding a missing architectural feature, changing the scale of a room, or adding a view that wasn't captured creates a different responsibility. The client should know where the boundary lies before production begins.
For portraits, obtain consent for identity-relevant changes. A client may approve temporary blemish reduction but reject changes to facial structure, body shape, age, or distinctive marks. Written direction helps everyone distinguish ordinary polish from an alteration that changes representation.
Editorial teams should document meaningful edits and retain the original capture. That audit trail protects the publication, photographer, subject, and audience when questions arise later.
AI increases the need for provenance
AI-assisted semantic editing can remove objects, replace backgrounds, and relight a scene with limited manual intervention. That can improve efficiency, but it also introduces risks around deepfakes, disclosure, and client approval. Recent discussion of authenticity, consent, and provenance in photo adjustment highlights the relevance of audit trails and provenance standards such as C2PA when altered images may be redistributed.
A practical approval policy can be simple:
- Define permitted changes. Identify cleanup, color, geometry, compositing, and identity edits before work starts.
- Keep the source file. Preserve the original capture and the layered working file where appropriate.
- Record material changes. Note edits that affect context, identity, or the apparent condition of a place or product.
- Show meaningful proofs. Give the client a review version before final delivery when edits could change interpretation.
- Disclose when context requires it. Editorial, documentary, and identity-sensitive uses may need clearer communication than ordinary marketing imagery.
Brands may prefer natural-looking edits, but “natural” doesn't mean unedited. It means the correction supports the subject without creating a false impression. Trust grows when clients know what will change, why it will change, and who has approved the final image.
Pricing Turnaround and Deciding When to Request Retouching
Retouching cost and turnaround depend on the work involved, not on the existence of an editing stage. A straightforward cleanup requires a different level of attention than a detailed architectural composite, a portrait series requiring consistent skin tones, or a product image with complex reflections. The number of final images, the condition of the captures, the requested delivery format, and the approval process all affect the estimate.
Decide whether the edit is essential
Request retouching when the issue distracts from the subject, misrepresents color, weakens architectural geometry, or creates inconsistency across a campaign. It may be optional when the imperfection contributes to atmosphere, when the image is intended for quick internal use, or when the client deliberately wants a documentary feel.
A useful brief describes the desired result in visual terms:
- Subject: Identify the building, room, person, product, or campaign element that must lead.
- Problem: Name the reflection, color cast, surface mark, geometry issue, or background distraction.
- Preservation: State what must remain, such as material texture, freckles, shadows, or visible weather.
- Extent: Separate must-have corrections from optional polish.
- Approval: Identify who reviews proofs and whether AI-assisted edits require additional signoff.
Plan retouching before the shoot
Location scouting and lighting design can reduce avoidable post-production. A photographer may reposition a light, adjust the camera height, remove an object before exposure, or choose a viewpoint that minimizes a reflection. Those decisions don't eliminate retouching, but they reserve it for work that benefits from careful finishing.
When selecting a studio or editor, ask how files are protected, how revisions are handled, and whether the workflow remains layered and revisable. For architecture, commercial brands, and portraits, professional photo editing services should fit the visual standards established during capture rather than apply a disconnected look afterward.
A clear retouching brief saves time because it turns subjective reactions into specific decisions. Instead of saying “make it pop,” explain whether the image needs cleaner lines, more controlled highlights, accurate color, or fewer distractions. That language helps the photographer estimate the work, deliver a coherent proof, and finish the image without sacrificing credibility.
Jimmy Clemmons Photographer provides architectural, commercial, and portrait photography with location scouting, lighting design, on-set direction, and professional editing built around purposeful, controlled retouching. Visit Jimmy Clemmons Photographer to discuss an assignment and define the right finishing approach for your images.