

You're probably looking at a kit list right now and wondering where to spend money first. Maybe you've already learned the hard way that a nice room can fall apart in-camera. The windows go nuclear, the corners go flat, the ceiling turns yellow from mixed bulbs, and the lines on the cabinetry start leaning the second you rush the setup.
That's the key conversation behind real estate photography gear. It isn't about owning the longest list of equipment. It's about solving visual problems on location, quickly and repeatably, without compromising the design of the space.
High-end clients notice the difference. Architects, designers, developers, and commercial property teams aren't only asking whether an image is sharp. They're asking whether the photograph holds the intent of the room. Good gear makes that possible because it gives you control over perspective, exposure, color, and pace.
Beyond the Spec Sheet What Gear Really Means
Walk into a polished kitchen at noon and the assignment is already giving you a brief. The windows are several stops brighter than the cabinetry. Under-cabinet LEDs are adding one color cast, pendants another, and the stone counters are throwing back specular highlights in every direction. If the kit cannot control contrast, color, and perspective at the same time, the room stops reading as design and starts reading as compromise.
That is what gear really decides on site. It determines whether you can preserve the outdoor view without flattening the interior, keep verticals honest without making the room feel forced, and work fast enough to protect the schedule while the property is still camera-ready.
For high-end client work, that matters. Designers, architects, and marketing teams are paying for a clear interpretation of the space, not a pile of features on a spec sheet. A camera body, lens, flash, and support system earn their place only if they help produce files that grade cleanly, hold texture in bright and dark areas, and stay consistent from the hero room to the last secondary frame.
Practical rule: Buy gear for the problem you face on site, not for the fantasy scenario on a product page.
I judge equipment by four outcomes.
- Perspective control. The frame needs straight architecture and believable proportions.
- Exposure control. Windows, shadow detail, and reflective finishes need room to coexist.
- Color control. Mixed light has to stay manageable in capture and in post.
- Operational control. The setup has to repeat across a full property without slowing the shoot to a crawl.
Lens choice is a good example. A wide focal length is useful, but width alone is not the point. Interior work depends on a lens that stays rectilinear, renders edges cleanly, and lets a room feel open without turning it elastic. This guide to the best lens for interior design photography gets at the core concern. The right lens protects the geometry that designers and builders worked hard to create.
The same logic applies across the whole kit. Bracketing is not about showing off dynamic range. It gives you cleaner tonal separation in bright openings and darker millwork. Off-camera flash is not there to make a room look flashy. It lets you restore shape, correct muddy corners, and keep materials looking like themselves. A stable tripod is not just support. It is what makes careful composition, repeatable blends, and detail alignment possible when the room needs precision.
Consistency is the standard. One strong frame does not win repeat business. A dependable kit helps you deliver a full set that feels cohesive, polished, and intentional, which is exactly what premium property marketing and editorial-style interior coverage demand.
The Core Kit Cameras and Lenses
The camera body and lens choice shape almost every decision you make on site. They determine how wide you can work without distortion, how clean your files stay in darker interiors, and how quickly you can move when the schedule is tight.
A lot of people obsess over body specs and ignore lens behavior. In practice, the lens usually shows up first in the final image. If the focal length is wrong or the optical rendering is poor, no amount of menu digging will rescue the frame.
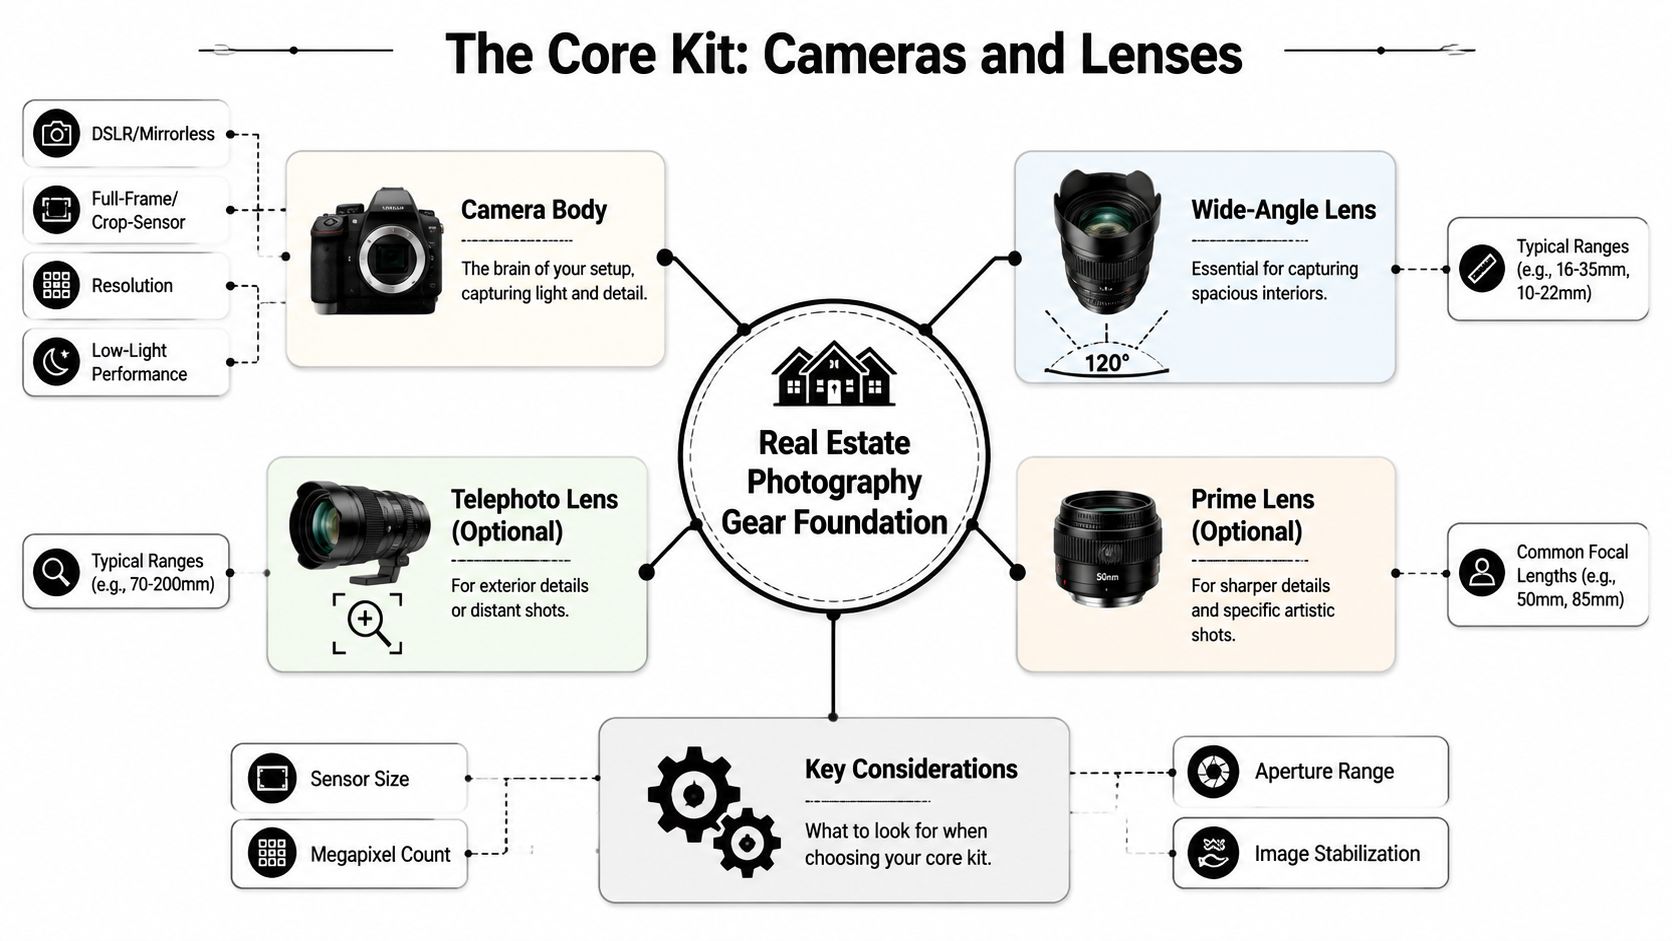
Why full-frame keeps winning
For interiors, full-frame remains the cleanest working format because it gives you access to wide rectilinear lenses without forcing awkward equivalents. That matters more than abstract image-quality arguments. The primary issue is spatial honesty. You want a room to feel open, not stretched.
One practitioner writing at Photography Life on real estate camera gear says a 14–30mm zoom covers about 90% of shots on a typical assignment, with 14mm handling most interior frames and 30mm working for tighter details without changing lenses. That's a very believable real-world range because it covers both the broad establishing image and the more selective composition.
Sensor size is a practical decision
APS-C can absolutely produce professional work. But the trade-offs show up fast in architecture and interiors.
A simple way to think about it:
| Format | Strength | Limitation in property work |
|---|---|---|
| Full-frame | Better access to ultra-wide rectilinear options and stronger low-light handling | Higher buy-in cost |
| APS-C | Lower entry cost and lighter systems | Wide coverage gets harder, and lens choices can feel less flexible for interiors |
If your work leans toward residential interiors, hospitality, and editorial architectural coverage, full-frame saves friction. It gives you width without pushing into a look that feels gimmicky.
For a closer look at lens choices specifically for interiors, this guide on the best lens for interior design photography is worth reviewing alongside your body choice.
The lens that earns its place
The workhorse lens in real estate photography gear is a wide zoom. Think in terms of function, not prestige.
A strong wide zoom should do three jobs:
- Establish the room with enough width to reveal layout
- Stay rectilinear so cabinetry, walls, and window frames don't bow
- Let you tighten up for vignettes, details, and secondary compositions
That's why lenses in the 14–30mm or 16–35mm class tend to stay mounted most of the day. They reduce lens changes, speed up the shoot, and give you a coherent rendering style across the gallery.
A lens that's a little less glamorous but predictable in geometry is usually more valuable than a flashy lens that creates cleanup work later.
What matters more than headline specs
Resolution matters, but not in the way gear marketing suggests. Typical listing deliverables, brochures, and social assets don't demand extreme file sizes. What matters more on a busy property shoot is workflow speed, stable dynamic range, clean shadow recovery, and a lens you trust.
When evaluating camera bodies, prioritize this order:
- Wide-lens ecosystem
- Clean higher-ISO performance
- Reliable bracketing controls
- Handling and menu speed
- Resolution after the above are covered
The body is the platform. The lens is the translator. If either one fights the way you compose interiors, the whole job gets slower.
Optional lenses that actually make sense
Not every extra lens deserves a place in your bag. The useful additions are the ones that solve a specific client need.
- A short telephoto helps isolate facade details, signage, materials, and compressed exterior views.
- A normal or short prime can be useful for editorial detail work where you want a more natural perspective.
- A tilt-shift lens is valuable for architectural specialists, especially when perspective control in-camera saves post time.
For many shooters, though, the best first move isn't adding more lenses. It's mastering one excellent wide zoom so thoroughly that your composition becomes faster and cleaner.
Shaping Light Essential Lighting and Modifiers
Bad lighting gear decisions usually come from ego. People assume a bigger light must produce a more professional image. In property work, that often creates the opposite result. One oversized source can flatten a room, contaminate surfaces with color spill, and slow the shoot to a crawl.
Small flashes placed intelligently are often the smarter tool. They let you build the room in pieces, keep the lighting believable, and preserve the natural relationship between ambient daylight and the interior fixtures.
Why smaller flashes often work better
Recent practitioner guidance argues that large 600Ws strobes aren't necessary for many real-estate jobs because smaller flashes can be distributed through the space to reduce color cast, and the same source says a polarizing filter is less essential when exposure and post-processing are handled well, as discussed in this lighting walkthrough for property interiors.
That tracks with what happens on location. A pair of radio-triggered speedlites gives you flexibility. You can lift a dark kitchen corner, neutralize a muddy hallway transition, or add shape to a living room without making the scene look lit.
For a deeper look at placement strategy and interior flash control, this resource on lighting for interior photography covers the practical side well.
What flash should do in a room
Flash in real estate photography shouldn't announce itself. It should correct.
Use it to:
- Clean up color contamination from mixed bulbs and wall bounce
- Open shadow pockets that feel heavier in-camera than they do in person
- Control transitions between connected rooms
- Preserve texture in cabinetry, stone, fabrics, and millwork
Natural light still does a lot of the emotional work. It gives the room atmosphere and direction. Flash should support that mood, not replace it.
If the client notices the flash before they notice the room, the lighting is doing too much.
Modifiers and restraint
You don't need a truckload of modifiers for most assignments. In fact, too many accessories can slow down decision-making and clutter the process.
A restrained lighting kit usually means:
- Radio triggers you trust
- Compact speedlites
- Simple stands or hand-held placement
- Occasional diffusion when a surface is too specular
Large soft sources have their place, especially for staged editorial work or polished commercial interiors, but they aren't automatically the answer. In many homes, the better move is to place smaller flashes deeper in the space and blend carefully.
The strongest lighting setup is the one that disappears into the image while unobtrusively doing the hard work of balance and control.
Achieving Precision Tripods and Drones
A luxury listing often asks for two very different kinds of accuracy on the same day. Inside, the room has to feel calm, level, and intentional. Outside, the property has to make sense in relation to the street, the lot, the water, the golf course, or the skyline. Tripods and drones solve those two problems.
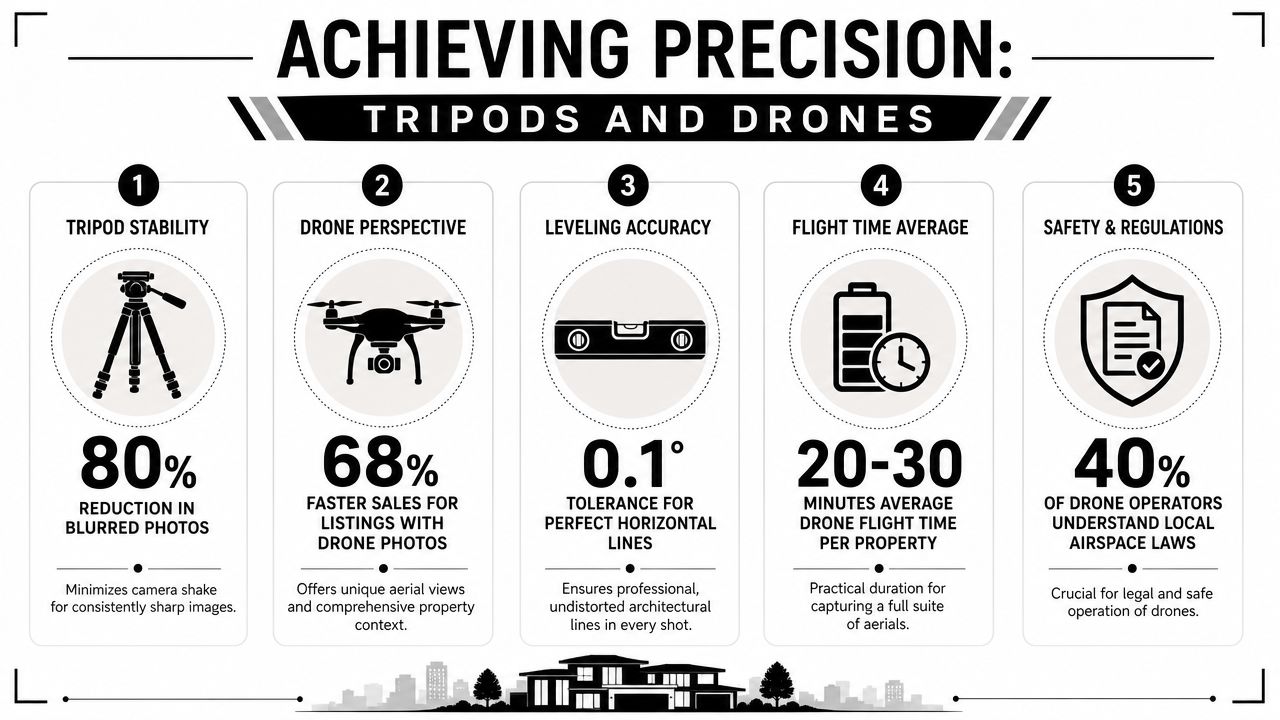
The tripod sets the standard for every interior frame
In architectural interiors, a tripod does more than steady the camera. It fixes the point of view so composition stays consistent while styling shifts, lights move, or bracketed frames stack cleanly in post.
That consistency shows up in the final deliverable. Cabinet lines stay disciplined. Door frames do not drift. Vertical corrections stay minor instead of becoming a rescue job later.
A support system worth carrying gives you:
- Repeatable framing while you refine details in the room
- Cleaner alignment across bracketed exposures
- More reliable control over verticals and horizon
- Stable compositions in dim spaces where ambient light matters
Head choice matters as much as leg choice. A geared head is slower than a ball head, but for architecture that is often an advantage. Small pitch and roll corrections are easier to dial in, especially in kitchens, baths, and tight secondary rooms where a few millimeters of camera movement can change the relationship between counters, cabinets, and window frames.
Cheap tripods cost time. Flex in the legs, a sloppy center column, or a head that creeps after you lock it will show up as crooked lines, inconsistent brackets, and longer edits.
Drones expand the story beyond the walls
A drone earns its place when the setting adds value to the property. That can mean a long private drive, a waterfront edge, adjacency to amenities, topography, acreage, or the way a commercial site sits within a larger development. Ground photography rarely explains those relationships on its own.
Matterport's 2025 real estate photography statistics report broad adoption of drones across agencies and stronger listing performance when aerial imagery is included. That tracks with client expectations at the upper end of the market. Sellers and agents are not paying for novelty. They want context, scale, and a clearer argument for price.
For broader documentation work, this guide to drone photography for site surveying shows how aerial capture can support planning and property analysis, not just marketing images.
The best aerial frame answers a specific question. Where does the house sit on the lot? How private is the yard? What does the approach feel like? How close is the beach, the park, the downtown core, or the neighboring structure? If the drone image cannot answer one of those, it is decoration.
Two tools, two kinds of precision
The tripod protects geometry. The drone explains context.
| Tool | What it needs to do for the client |
|---|---|
| Tripod | Keep interior compositions controlled, aligned, and consistent across exposures |
| Drone | Show how the property connects to its surroundings and why that setting adds value |
Used well, they create a more complete package. One supports measured interior photography. The other gives high-end clients and buyers the wider read on the property that often shapes first impressions.
The Supporting Cast Accessories and Software
A polished interior set can still fall apart for mundane reasons. A trigger misfires. A card fills up halfway through the hero room. Dust on the front element turns a clean window pull into extra retouching. On paid property work, those small failures cost time first, then margin, then confidence.
That is why I treat accessories and software as production tools, not leftovers from the budget after the camera and lenses are chosen. High-end clients do not see the remote release or the backup cards, but they see the result. Straighter frames, cleaner files, steadier color, and a gallery that feels intentional from first image to last.
Bracketing needs to be easy
Real interiors are rarely lit for the camera. Bright windows, dark millwork, glossy stone, and mixed bulbs push a file in several directions at once. If the camera can bracket quickly and predictably, it becomes much easier to hold detail where it matters and keep the room looking believable.
As noted earlier, cameras suited to property work should offer practical auto exposure bracketing. The point is not a spec sheet win. The point is speed on site and cleaner files in post. If bracketing is buried in menus or limited in a way that interrupts the rhythm of a shoot, you feel that friction in every room.
I would rather use a slightly older body with dependable bracketing than a newer one that slows the capture process.
Small tools that protect the shoot
A short accessory list does a surprising amount of heavy lifting:
- Remote shutter release keeps a locked composition steady, especially during bracketed sequences and longer exposures.
- Extra batteries and memory cards protect the schedule. Property shoots often run on narrow access windows, and avoidable delays look amateur fast.
- A reliable leveling method catches small tilts before they turn into stretched corrections later.
- Lens cloths, blower, and basic cleaning tools save retouching time, particularly in backlit rooms where dust and smears show up immediately.
- A dependable flash trigger system makes off-camera light repeatable, which matters when you are building a consistent set rather than chasing one good frame.
None of these items are glamorous. All of them affect deliverables.
Software finishes what the capture started
Post-production is part of the kit because real estate photography is an exercise in control. The files need to hold neutral color under mixed light, clean verticals, and tonal balance that feels natural rather than processed. Luxury listings are especially unforgiving here. Buyers may not name the problem, but they notice when a room feels muddy, bent, or overcooked.
The software stack has to support four routine jobs well:
- Balance mixed color without stripping the character from the space
- Correct perspective with restraint
- Blend exposures cleanly, whether the source is ambient brackets, flash frames, or both
- Keep a full gallery consistent across rooms and lighting conditions
Good software rewards disciplined capture. It does not fix sloppy framing or careless lighting choices. What it does is let a carefully shot set come together faster, with fewer compromises, and with the kind of consistency that commercial clients and strong agents expect.
That is the essential role of the supporting cast. These tools remove avoidable friction and protect the standard of the final gallery.
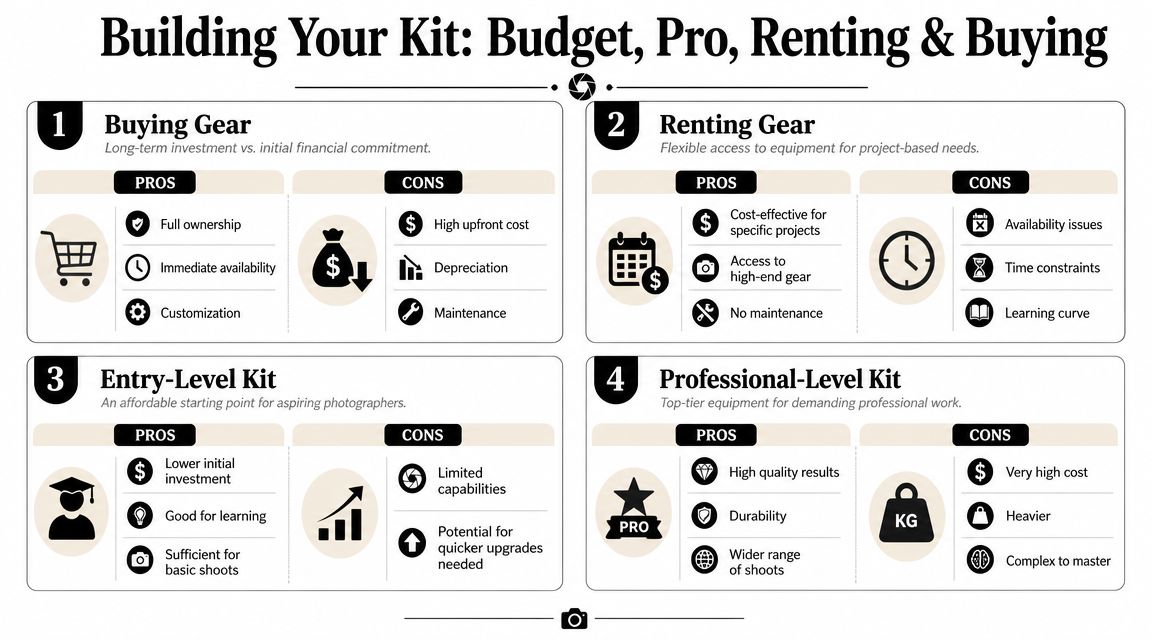
Building Your Kit Budget Pro Renting and Buying
A hotel ballroom is booked for a developer presentation tomorrow morning. The listing agent wants polished interiors, exterior dusk frames, and a few aerials for the campaign. If your kit is built around impulse purchases instead of actual demand, that assignment gets expensive fast.
Most photographers build a working kit one job at a time. That part is normal. The business risk comes from buying too early, buying too broadly, or tying up cash in tools that only solve occasional problems. High-end clients do not pay for gear ownership. They pay for reliable execution, clean files, and a gallery that supports the value of the property.
A camera bag should be built like a production system. Every item needs to earn its place through frequency of use, speed on set, or a clear improvement in the final images.
What a serious kit costs
A real estate and architectural kit is capital equipment, not a casual retail purchase. Once you account for a dependable camera body, wide coverage, lighting, support, storage, software, and often aerial capability, the investment climbs quickly.
The exact total varies by brand, whether you buy used, and whether drone work is part of your service. What matters more is the return. A piece of gear should do one of three things: help you work faster, improve the consistency of the files, or let you sell a higher-value deliverable to the client.
That standard keeps spending honest.
Buy what you use on nearly every shoot
Ownership makes sense for the tools that define your day-to-day workflow. These are the pieces you need to know instinctively, because hesitation costs time when a homeowner is waiting, daylight is changing, or a broker wants the room turned over for the next shot.
Buy these first:
- Your main camera body
- Your primary wide zoom
- Your working tripod
- Your core flash kit and trigger system
- Batteries, cards, cleaning tools, and the software you use every week
These tools shape your baseline look and your pace. I would rather own a familiar, dependable core kit than stretch the budget across specialty items that leave the essentials underfunded.
Rent the gear that solves specific problems
Specialized equipment follows a different rule. Rent it until the bookings justify ownership.
Good rental candidates include:
| Better to rent first | Why |
|---|---|
| Tilt-shift lenses | They solve perspective and composition problems beautifully, but many shoots do not need that level of correction |
| Advanced drone systems | Useful when aerial storytelling adds market value, but unnecessary for many standard residential assignments |
| Additional lighting kits | Worth bringing in for large homes, hospitality spaces, or commercial work with bigger rooms and more complex surfaces |
| Extra or alternate camera bodies | Helpful when testing a system, covering a large production day, or carrying a backup for a specific assignment |
Renting does more than conserve cash. It lets you match the tool to the brief. That is a better habit than forcing every assignment to justify an expensive purchase.
Budget kit versus pro kit
A modest kit can produce strong work in careful hands. The difference shows up under pressure.
A more developed setup usually gives you:
- Cleaner files in difficult mixed light
- More repeatable framing and support
- Faster transitions between rooms and lighting setups
- A broader service menu, including aerial coverage
- More confidence on shoots where timing, access, and client expectations leave little room for trial and error
That does not mean buying everything at once. It means building in the order the work demands. If clients are hiring you for design-led interiors, luxury listings, or commercial spaces, the kit has to support polished capture and efficient delivery.
For some teams, outsourcing remains the better business decision. Jimmy Clemmons Photographer provides architectural and real estate photography services for clients who need finished imagery without managing an in-house production kit.
Gear in Action Recommended Setups for Common Shoots
The right load-out changes with the assignment. A compact residential job doesn't need the same approach as a twilight marketing shoot or a commercial property with scale, signage, and site context. The mistake is carrying every tool to every job, then working slower because the bag is overbuilt.
A professional kit should adapt without becoming chaotic.
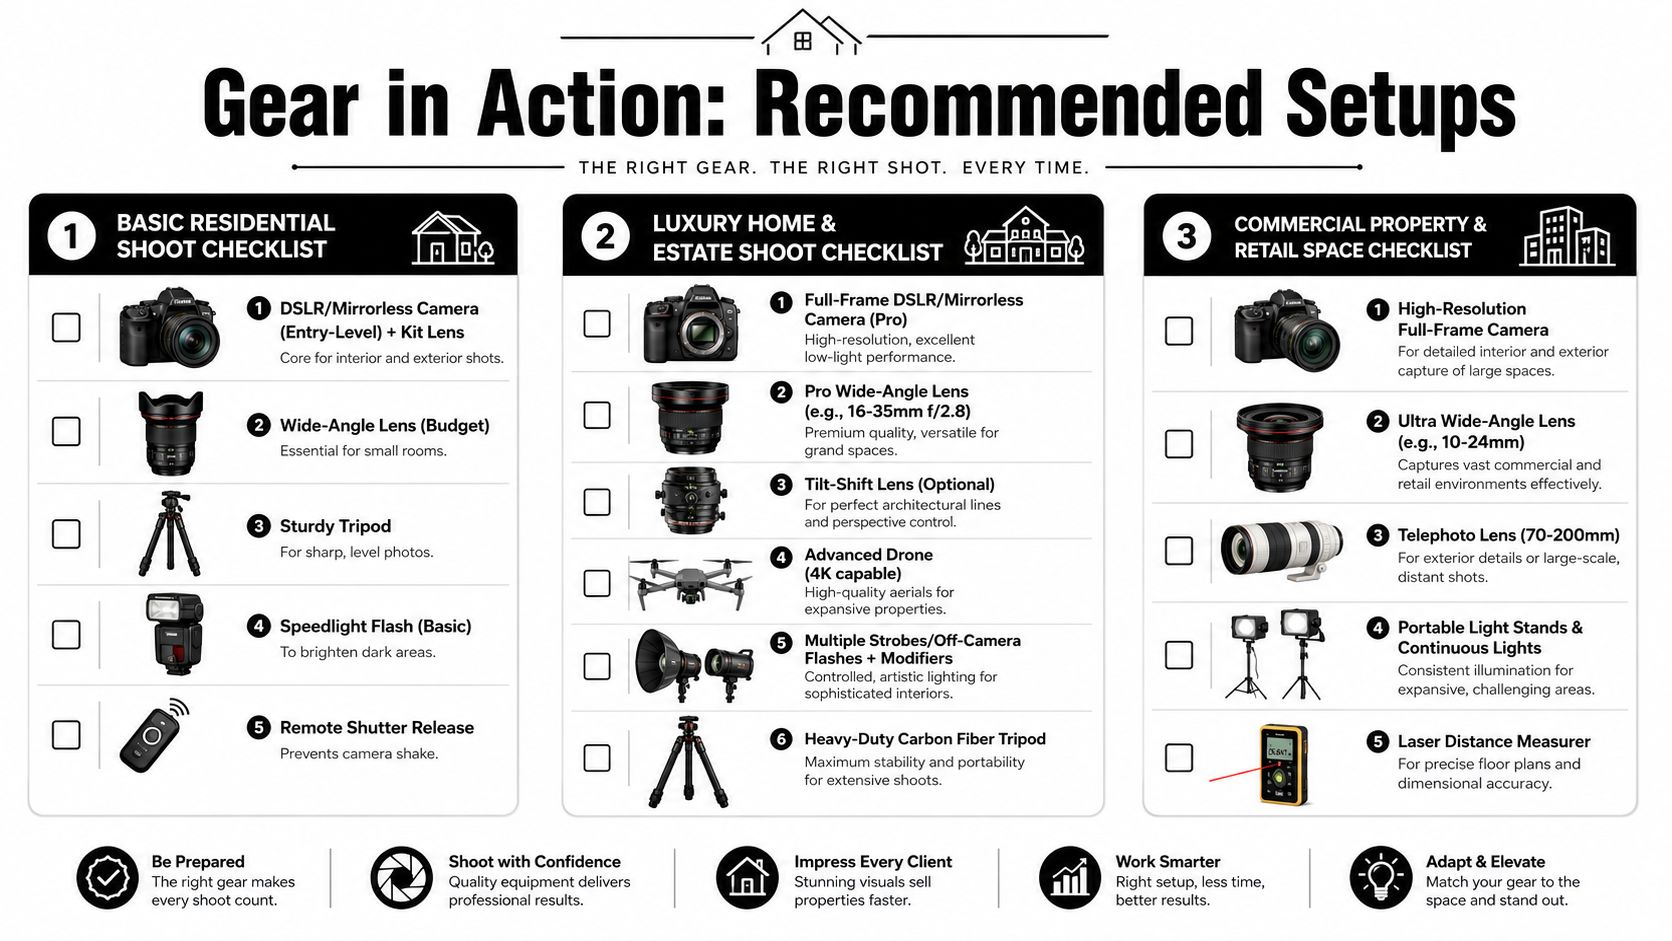
Standard residential interior shoot
This is the bread-and-butter assignment. You need quality, speed, and clean execution.
Bring:
- Full-frame mirrorless body
- Wide zoom as the primary lens
- Sturdy tripod
- Remote release
- Two speedlites with radio triggers
- Basic cleaning kit
- Enough batteries and cards to finish without rationing
The goal here is efficiency. Most frames will come from the wide zoom on a tripod, with flash used selectively to clean up difficult rooms. Keep lens changes minimal. Maintain a consistent camera height unless the room demands otherwise. Let the gear support a smooth rhythm from room to room.
Twilight exterior shoot
Twilight rewards restraint and timing. You're balancing exterior ambient light, interior practicals, and often grounds or pool lighting in a short window.
For this assignment, I'd add:
- A dependable tripod with precise head adjustment
- Flash support for selected windows or entry areas
- A normal or short telephoto option for facade details
- A backup body or battery plan you trust completely
What matters is control. You don't want to troubleshoot gear while the sky is changing. Compose early, test your exposure sequence, turn on the right practical lights, and keep the camera locked. Twilight isn't gear-heavy. It's precision-heavy.
A quick visual overview can help before planning your own load-out:
Large commercial property shoot
Commercial work usually asks more from the kit because the visual brief is broader. You may need clean interiors, exterior architecture, context images, tenant-facing details, and aerial coverage that explains circulation and site relationship.
A stronger load-out looks like this:
| Need | Recommended gear focus |
|---|---|
| Large interiors | Full-frame body, wide zoom, stable tripod, bracketing-ready workflow |
| Facade and signage details | Optional longer lens for compression and isolation |
| Site context | Drone for overview and approach imagery |
| Mixed lighting conditions | Flexible off-camera flash setup |
| Polished delivery | Reliable post workflow for perspective and color consistency |
Commercial assignments also benefit from more planning before arrival. Walk the exterior. Note sun direction. Decide whether the drone images are contextual, promotional, or both. If the property has architectural features that define brand identity, bring the lensing that lets you isolate those details with intent.
Pack for the shot list, not for your anxiety. Extra gear doesn't create better images. Better decisions do.
The simplest way to think about the kit
If you strip away the shopping language, real estate photography gear comes down to a few working questions:
- Can I hold the space accurately with this lens?
- Can I control contrast cleanly?
- Can I place the camera precisely?
- Can I light selectively without making the room look manufactured?
- Can I expand the story when the property needs aerial or contextual coverage?
If the answer is yes, the kit is doing its job.
If your team needs finished architectural or property imagery rather than building and managing a full in-house gear system, Jimmy Clemmons Photographer offers real estate, architectural, and commercial photography with an editorial approach to composition, lighting, and visual storytelling.