

At 4 a.m., a glass office tower can look less like architecture than an active worksite. Rental strobes, a security guard, access instructions, and a narrow window before traffic builds all compete with the camera. That's exterior architectural photography in practice: the photograph depends on the site being ready before the shutter is pressed.
What Makes Exterior Architecture a Distinct Craft
Exterior architectural photography is the controlled capture of buildings, outdoor spaces, and public areas, but the control is never complete. The subject is fixed, often occupied, and exposed to changing weather, moving people, traffic, reflections, and neighboring construction. A client may want an image that feels aspirational, yet the building still has to look accurate enough for an architect, developer, property manager, or publication to recognize its real materials and proportions.
That constraint separates exterior work from related disciplines. In an interior, the photographer can often close doors, suppress daylight, move furniture, and build a lighting environment inside a contained envelope. In outdoor scene photography, the scene may be observed rather than coordinated. An exterior assignment sits between those worlds. The structure doesn't move, but nearly everything around it does.
Practical rule: Treat access, timing, and site conditions as part of the image, not as administrative details outside the creative process.
The medium has a long architectural lineage. Nicéphore Niépce's 1826/1827 view from a window is widely treated as both the first known photograph and the first architectural photograph, while William Henry Fox Talbot's 1835 image of a latticed window at Lacock Abbey shows how central architecture was to photography's earliest years. By the 1860s, architectural photography had become an established visual medium, and by the early 1950s, architects were hiring photographers more regularly for commissioned work, shifting the field toward a more artful professional practice (historical overview of architectural photography).
The tradition includes the precise urban observation associated with Berenice Abbott, the polished commercial vision of Julius Shulman, and today's hybrid practices combining ground cameras, lighting, and drones. The tools have changed, but the central negotiation remains. Each frame must document form while persuading a viewer that the building has value, purpose, and life.
The shutter release is the easy part. The craft lives in deciding which facade matters, securing the right access, reading the sun, managing reflections, and anticipating what the client will need after delivery.
Pre-Production That Saves the Shoot
Most exterior problems are solved before the camera comes out of the bag. A successful shoot begins with a site visit at, or close to, the planned shooting time. Walk the property from several directions, make reference frames, and record where the sun reaches each primary elevation. Note obstructions, construction, parking, roof access, landscaping maturity, exterior lighting, signage, fountains, and sprinkler activity.
A scouting visit should answer practical questions:
- Sun position: Which facade receives direct light, and when does the light begin to rake across the corner?
- Access: Can equipment reach the chosen viewpoint, roof, courtyard, or loading area?
- Foreground: Will parked vehicles, dumpsters, temporary barriers, or tenant deliveries interrupt the frame?
- Activity: When do pedestrians, staff, and traffic become difficult to control?
- Weather exposure: Where can equipment and crew shelter if conditions change?
Property access needs its own checklist. Confirm approval with the owner and management company, notify tenants where necessary, and determine whether street permits, traffic control, insurance certificates, or police coordination apply. Drone work requires a separate airspace and permission review, not a casual decision made after arrival.
The client brief should be equally specific. Ask whether the primary use is a website hero image, print, editorial publication, leasing material, or a broader brand campaign. Identify the audience, mood references, hero elevations, deadline, and elements that must appear or disappear. A developer may need active public space and tenant visibility, while an architect may prioritize clean geometry and material accuracy.
Create a call-time matrix tied to sun position rather than a generic “golden hour” instruction. Include an overcast fallback, access buffer, and time for alternate viewpoints. Share a written shot list with the client before the shoot, including required facades, orientations, context frames, and detail studies. That written record prevents a costly reshoot when a creative director or project lead isn't present on location.
For property-side preparation, the project site preparation guide can help owners and managers organize cleaning, landscaping, access, and visual distractions before the crew arrives.
Gear and Camera Settings That Hold the Line
Gear should follow the facade and the client's visual objective, not a memorized equipment list. A modern commercial exterior with reflective glass, deep shadow, and mixed cladding demands different decisions from a residential property where portability and compressed context matter more.
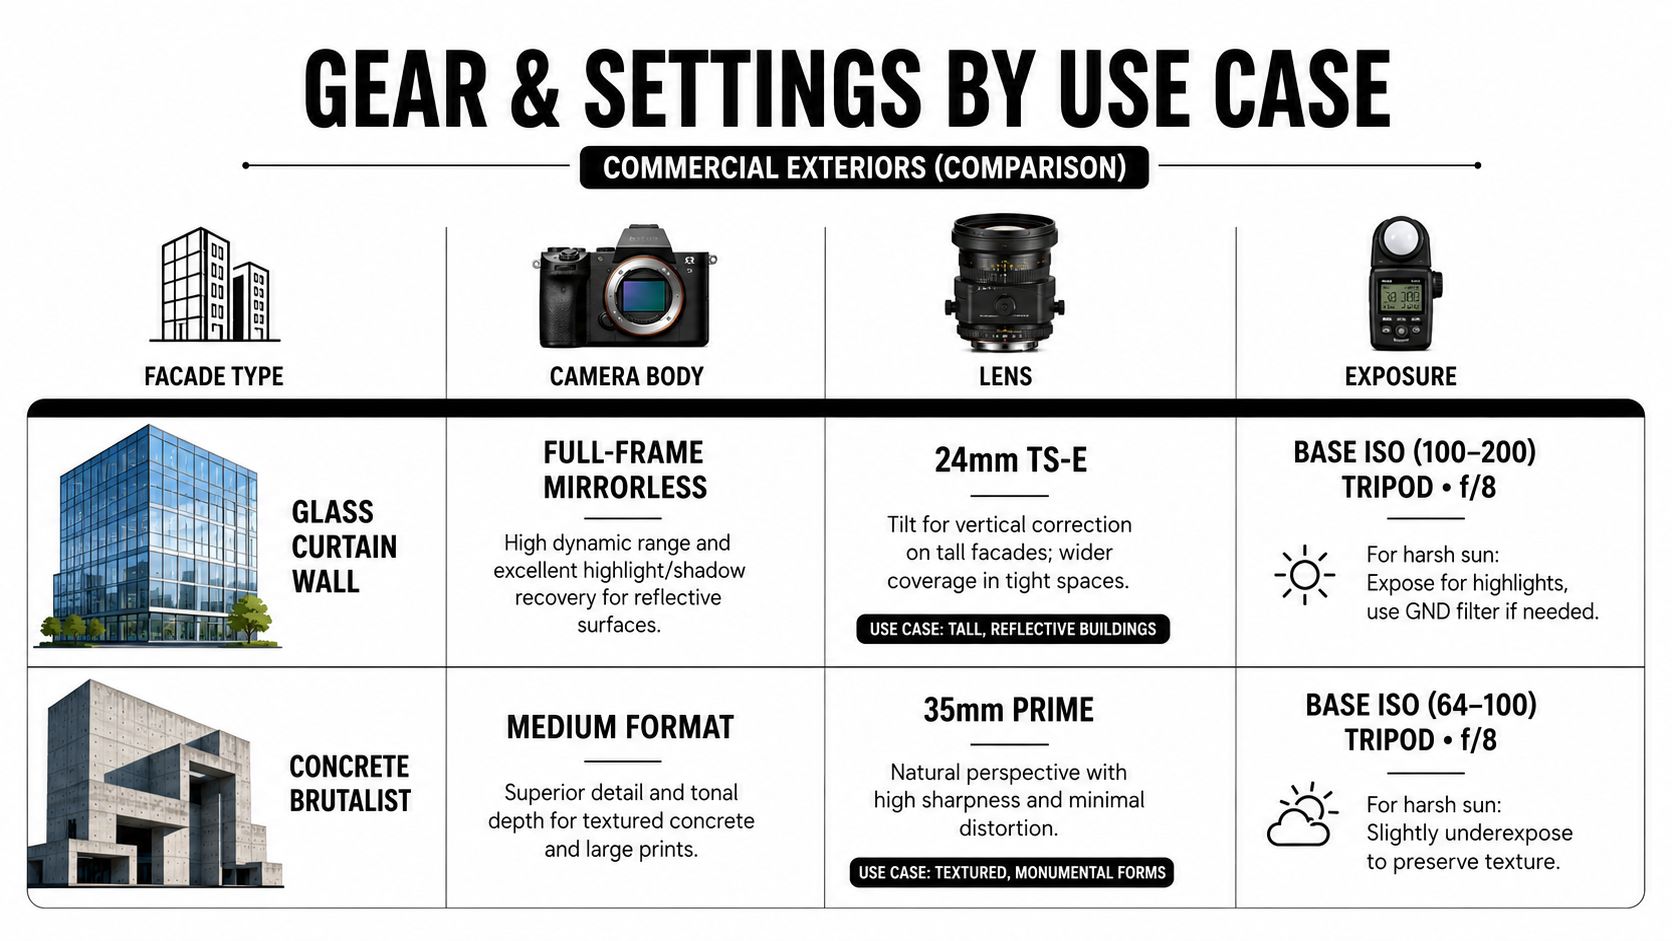
For a glass curtain wall, a high-resolution full-frame body with strong dynamic range gives useful flexibility when the sky, glazing, and shaded entrance occupy the same frame. A tilt-shift lens helps control converging verticals before capture, while a 24-70mm zoom handles environmental views when the building must be shown with its plaza or surrounding street. For residential and hospitality assignments, a lighter zoom may be more practical, with a 70-200mm lens available for compressed views that layer the building against trees, streets, or neighboring forms.
A stable tripod matters more than a premium body used handheld. Choose a heavy, vibration-damped support with a geared head or leveling base. A geared head makes small architectural corrections deliberate, while a leveling base speeds up setup when the ground is uneven.
Settings by facade and light
For bright facade work, manual exposure keeps the frame consistent. Use the camera's lowest native ISO, often ISO 100, and an aperture around f/8 to f/11 when edge-to-edge sharpness matters. Focus carefully, use hyperfocal principles where appropriate, and engage mirror lockup or an electronic shutter when vibration could soften fine lines. A tripod lets shutter speed vary without forcing the aperture or ISO away from the intended look.
Golden-hour scenes usually need longer exposures as the light falls. Keep ISO low, often within the ISO 100 to 200 range, and rotate a polarizer while watching the glass rather than assuming maximum polarization is best. A polarizer can reduce reflections, but it can also make a sky uneven across a wide frame or remove reflections that help explain the building's surface.
Overcast conditions may call for ISO 200 to 400 to keep shutter speeds manageable, especially when people or foliage are part of the composition. Set white balance manually with a Kelvin value and keep it consistent throughout a sequence. That choice makes exposure blending and series matching easier than allowing Auto White Balance to shift between frames.
Three framings that solve common problems
The symmetrical hero frame starts with the building's central axis. Find the position where the entrance, vertical bays, or roofline organizes itself, then level the camera and choose the focal length that preserves that relationship. Keep the horizon intentional, leave enough sky to prevent the roofline from feeling cramped, and use pavement or planting beds as leading lines toward the entrance.
The contextual corner frame begins at street level, usually near a corner that reveals two elevations. Choose the camera position first, then use a moderate wide angle rather than forcing the widest lens available. Anchor the foreground with a person, vehicle, paving pattern, or material transition, but keep that element subordinate to the building's rhythm.
The compressed telephoto study works when the site is cluttered or the facade has a strong repeating pattern. Move back until the chosen elevation compresses into a coherent layer, then select a longer lens to isolate balconies, window grids, signage, or a corner relationship. This approach often produces a more controlled image than standing close and stretching the building with an ultra-wide lens.
Read the facade before choosing the lens. Look for repetition, proportion, solids against voids, and the corner that makes the structure legible. Tilt-shift movements can correct vertical convergence in camera, but careful height and distance choices are still essential. If the camera points sharply upward, post-production correction may require cropping and can reduce the intended composition. Keep the camera level whenever possible, then use selective cropping and restrained keystone correction when needed.
Two bodies, backup cards, and a tested lens set protect a paid day from a single equipment failure. Reliability is part of the creative brief.
Lighting and Time-of-Day Strategy
Light planning begins with the building's orientation. Golden hour isn't automatically the right answer. Warm, low-angle light can reveal concrete texture, masonry, and projecting balconies, but it can also create harsh reflections in glass and leave the main entrance too dark.
Blue hour often works when the building's interior lighting is part of the story. The sky retains color while artificial illumination begins to read on the facade, but the timing is unforgiving. You need the building powered, the windows presentable, and the camera in position before the balance disappears.
Midday can be the correct choice for an editorial or documentary view when direct shadows would obscure the facade. Overcast light is especially useful for pale surfaces and glass-heavy buildings because it produces a broader, softer source. The result may lack dramatic raking light, but it can show materials evenly and reduce the fight between bright sky and shaded elevations.
Use tools such as Sun Surveyor or PhotoPills to plot the sun's path and identify when light will graze a selected corner. The schedule should follow that information. A site-shoot lighting guide can help clients and crews think about the location before selecting a date.
| Time of day | Light quality | Best for | Watch out for |
|---|---|---|---|
| Golden hour | Warm, directional, textured | Masonry, concrete, dimensional facades | Deep shadows and glass reflections |
| Blue hour | Balanced ambient sky with building illumination | Hospitality, offices, civic buildings | Narrow timing window and power requirements |
| Midday | Direct, harder, often more neutral | Documentary or editorial views | Strong contrast and distracting shadows |
| Overcast | Soft, even, low-glare light | Pale materials and reflective facades | Flat atmosphere and weak separation from sky |
Fill flash can help when a foreground entrance or planted area falls too far into shadow, but it should support the available light rather than announce itself. Bracketing is more appropriate when the contrast gap is between the sky and the facade. The useful principle is simple: choose the day for the building's orientation and material, not the other way around.
Drone and Elevation Techniques
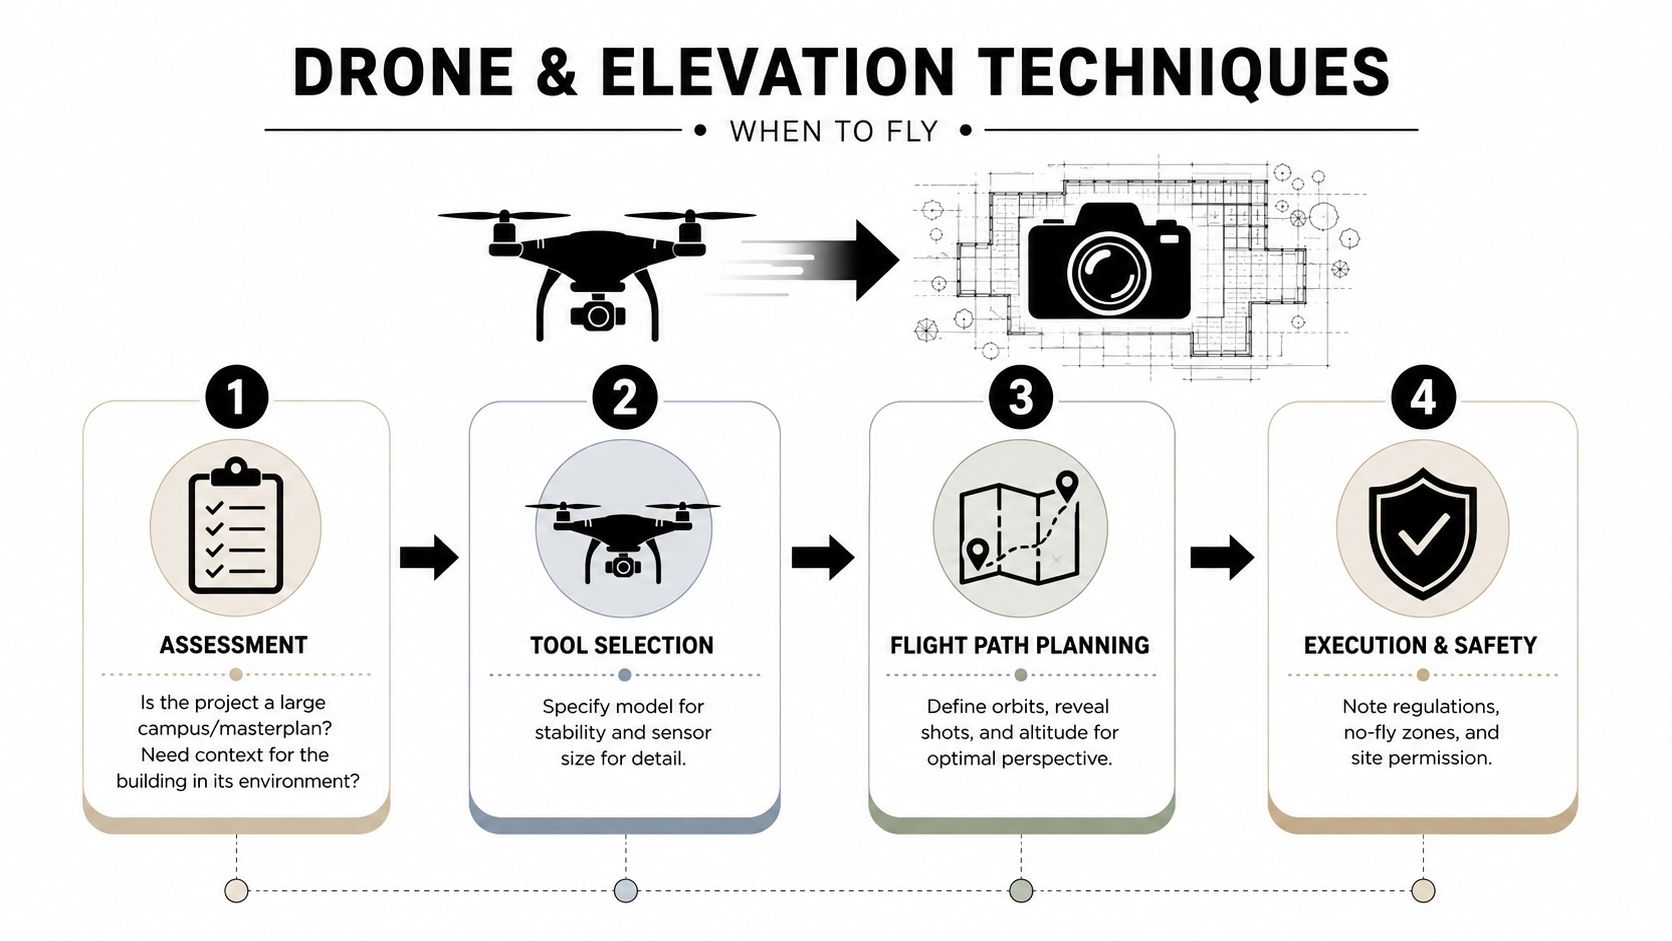
A drone earns its place when elevation explains something the ground cannot. Large campuses, masterplans, rooftops, courtyards, inaccessible terraces, and reveal shots all benefit from a carefully chosen aerial position. A drone adds little when a ground-level frame already communicates the building's relationship to the viewer.
For commercial work, a sub-900g drone with a full-frame-equivalent sensor offers a practical balance of detail and portability. ND filters help maintain controlled shutter speeds in bright conditions, and dual controllers allow a client or director to view the flight without crowding the pilot. The equipment still needs to match the assignment. A small drone is useful for context and access, but it won't replace a ground camera when precise facade geometry and maximum detail are the priority.
Before flight, check airspace, NOTAMs, site restrictions, and permissions for commercial operations. Confirm a launch area, emergency landing options, people and vehicle movement, and who has authority to stop the flight. A boom lift or crane may produce a cleaner low-elevation perspective when the objective is a controlled facade angle rather than a broad site overview. It can also avoid the visual distortion and safety complexity of flying above a dense active property.
Bracketing for high-contrast exteriors
Bracketing solves a specific exposure problem. A single frame may not hold both a sunlit wall and shadow detail beneath a canopy while preserving the sky. Expert architectural workflows commonly use three to five frames at different shutter speeds, with spacing of roughly one-half to one stop, often around two-thirds to one stop between exposures (architectural photography bracketing guidance).
Keep the aperture fixed across the sequence, then vary shutter speed. Mount the camera on a tripod, use a two-second timer or remote release, and engage mirror lockup or an electronic shutter. Consistency matters more than speed because the frames must align for blending and later perspective correction.
A practical workflow looks like this:
- Check the histogram: If highlights and shadows clip at opposite ends, a bracket is justified.
- Capture the sequence: Keep framing, focus, aperture, and white balance unchanged.
- Merge selectively: Use a Lightroom HDR merge for straightforward scenes, manual luminosity masks for controlled blending, or Aurora HDR when glass and stone create complex tonal transitions.
- Mask movement: Cars, pedestrians, foliage, and flags can ghost between frames. Choose one clean base frame and mask moving elements back into the composite.
Don't bracket by habit. If a single RAW file contains the needed highlight and shadow information, it may produce a cleaner result with fewer artifacts. Keep perspective control consistent before blending, because misaligned vertical corrections make cropping and masking harder.
The aerial decision is just as direct. If the high-angle perspective doesn't reveal site context, access, or a meaningful relationship, leave the drone on the ground.
Post-Processing for Exterior Work
Exterior files need an ordered workflow. Random adjustments can make one elevation look polished while leaving the rest of the project inconsistent.
Start by importing, culling, and applying a unified camera profile. Select the strongest frames before spending time on corrections. Then apply lens corrections, followed by perspective work. Use uprights, guided lines, or manual vertical adjustments to lock geometry before changing contrast or color.
Correct structure before tone
Set exposure and white balance after the geometry is stable. Use graduated filters for a bright sky-to-roof transition, radial adjustments for intense window highlights, and local brushes to recover shadow beneath eaves, balconies, or canopies. Keep those adjustments tied to the material. A concrete surface can carry texture in shadow, while reflective glass may need highlight control without losing the readable reflection.
Retouch construction clutter, bins, power lines, temporary signage, and seasonal debris after the tonal foundation is set. Clone-stamp tools provide control when repeating architectural lines, while content-aware tools can work on simpler areas. Inspect every removal at full resolution. A small repeated texture or broken railing can undermine an otherwise accurate image.
The post-production guide for structural photos offers a useful reference for perspective and cleanup decisions. Sky replacement should be a last resort, and it should be approved by the client when the image represents a real completed property. Finish with a restrained grade, perhaps separating warm stone from a cooler sky, and match the look across the delivered series.
Export according to the brief. Print may require full-resolution TIFF files, while web delivery needs appropriately sized JPEGs and a consistent color-space decision. Preserve the original RAW files and blended versions so the client can request a new crop or licensed use later.
Staging, Direction, and Human Presence
A person crossing a plaza can change how a facade is read. The figure establishes scale, shows circulation, and gives the building a reason to exist beyond its materials. Contemporary guidance on contemporary architectural photography techniques treats people as part of the architectural narrative rather than accidental background.
Plan that presence before arriving. Confirm whether the client wants active occupation, a quiet lifestyle cue, or a formally unoccupied view. The choice affects timing, talent, permissions, and the number of frames needed. An institutional or civic building may suit an empty composition because occupants can change its official character.
Direction works best in short, specific instructions. Ask talent to walk to a marked point, pause briefly, or look toward an entrance. Choose clothing that sits apart from the facade, and remove hats when they create hard shadows across faces. Place people along existing lines or in open areas, keeping entrances, structural joints, and important signage clear. A small figure should establish scale without taking over the image.
A person in the frame is a compositional decision, not background decoration.
Handle consent and usage before the shoot. Staged talent may need releases. Staff and incidental pedestrians create different considerations based on the intended use and local requirements. If someone distracts from the architecture, wait for a cleaner pass, reposition them when possible, or crop the frame later.
Set deliverables before packing the camera. A brief may call for eight to fifteen edited hi-res JPEGs per facade, full-resolution TIFFs for print, web JPEGs at 2048px on the long edge, and archived bracketed RAW sets for future use. Confirm quantities, formats, revision limits, turnaround, cancellation or kill fees, and future re-licensing terms in writing. Jimmy Clemmons Photographer provides location scouting, lighting design, direction, and professional editing as part of its architectural photography process.
Use filenames that identify the project, facade, and viewpoint, such as ACMA_Resi_NorthFacade_03.jpg. Deliver through a private gallery or download-tracking platform, then record the supplied files and granted usage. Editorial, portfolio, marketing, and third-party redistribution are separate rights. Price the capture and licensing separately through a creative fee with per-image usage, or a day rate with tiered usage upgrades. A brief post-delivery email leaves both parties with a clear record.