

Shooting a LEED-certified building isn’t like any other architectural project. It’s about more than just capturing beautiful lines and spaces; it's about telling a story of sustainability. Your job is to translate features like daylighting, green roofs, and innovative materials into images that are not just visually compelling, but meaningful.
The real work happens long before the camera comes out of the bag. A generic shot list just won't do. You need to get into the green soul of the project.
Planning Your Shoot to Tell the LEED Story
Everything starts with a detailed client brief. You have to push past the standard "we need photos of the new building" and dig into the specifics that earned those LEED credits. Was it a sophisticated water reclamation system? The use of locally sourced materials? An advanced glazing system that cuts energy use?
Knowing these details is what transforms your shot list from a simple to-do list into a narrative guide.
For instance, if a building got points for its high-performance windows, your task is to show what that feels like. You might capture the soft, glare-free light filling an office on a bright afternoon, showing how the design creates a comfortable space while saving energy. That’s the story.
Research and Collaboration
Before I even think about visiting a site, I dive into the architectural plans and LEED scorecards. Think of these documents as a treasure map leading you straight to the most important visual elements.
I’m always looking for a few key things:
- The LEED Certification Level: Platinum, Gold, Silver, or Certified. This sets the tone for how deep the sustainability story goes.
- Specific Credit Categories: I pinpoint standout features in areas like Water Efficiency, Energy & Atmosphere, or Indoor Environmental Quality.
- Unique Sustainable Materials: I’m looking for textures and details I can highlight, like bamboo floors, reclaimed wood walls, or even the finish from low-VOC paints.
Armed with this research, my conversation with the architects and project managers becomes much more productive. Instead of asking generic questions, I can be specific: "I see you have a rainwater harvesting system that feeds the green roof. Where can we see that connection, and what’s the best time of day to shoot it?"
This teamwork is critical. The architect can give you priceless insight into their design intent, while the building manager holds the keys to the mechanical rooms, rooftops, and other restricted areas that are often central to the LEED story.
Scouting and Site Assessment
Once the research is done, it's time to scout—first virtually, then in person. I use tools like Google Earth and sun-tracking apps to get a preliminary feel for exterior angles and how the light will move across the site.
But nothing beats putting boots on the ground.
Walking the property with your shot list in hand is non-negotiable. This is where you see how light actually interacts with the spaces. A south-facing glass facade is a completely different animal at 9 AM than it is at 3 PM. I pay extremely close attention to how natural light penetrates the building, as daylighting is a cornerstone of so many LEED designs.
The most powerful images often come from understanding how a building lives and breathes. Scouting lets you anticipate those perfect moments where the design's sustainable genius is on full display—like when the afternoon sun pours into an atrium, making artificial lights completely unnecessary.
This simple workflow shows how each phase logically flows into the next.
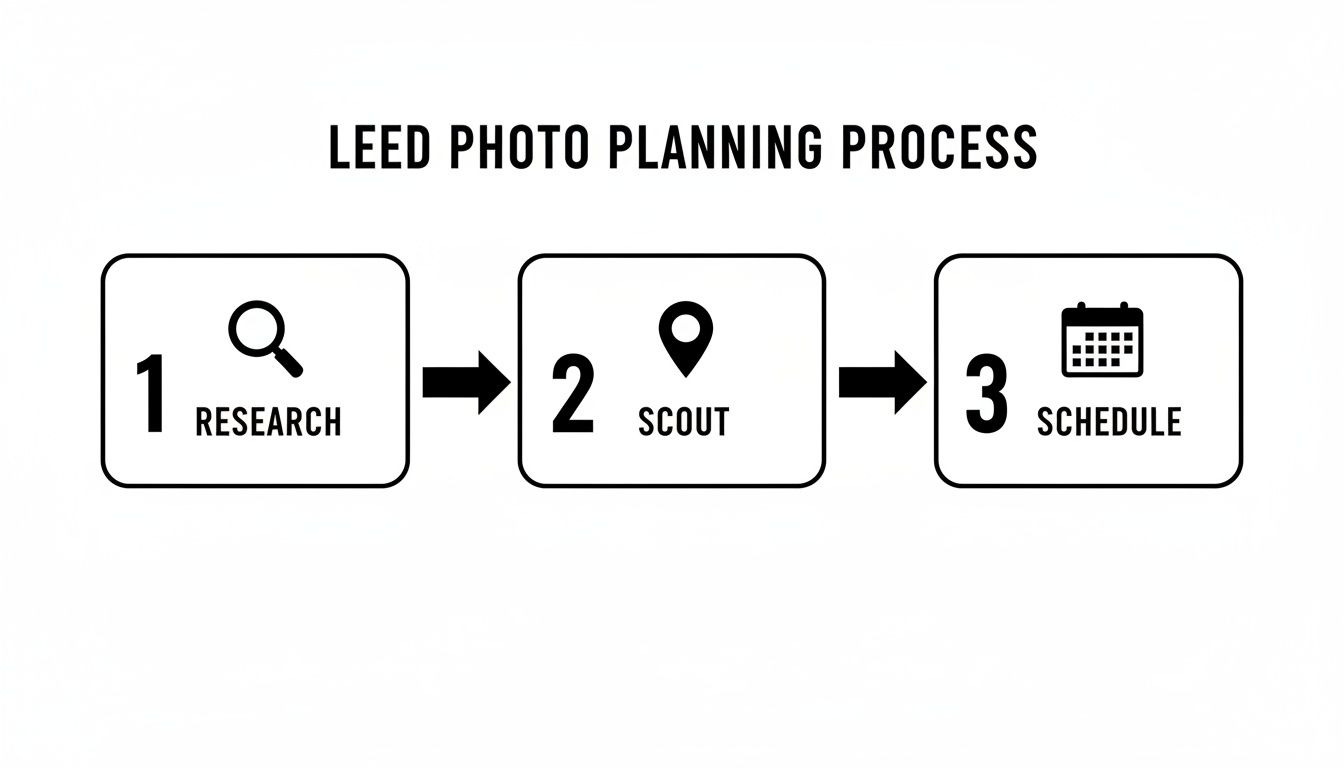
Research informs the scout, and the scout solidifies the schedule. It’s all about making your time on-site as efficient and creative as possible.
Take the Empire State Building, for example. The 102-story icon earned LEED Gold in 2011 after a groundbreaking retrofit that slashed its energy consumption by 38%. Photographing it today means capturing more than its Art Deco history; it means showing the modern, sustainable heart that makes it a benchmark for green retrofitting.
All this prep work leads to a detailed schedule and a crystal-clear plan. Having the site itself ready is just as crucial for a smooth shoot. For more on that, you can check out our guide on how to prepare your project site for a professional photoshoot.
Essential Gear and Camera Techniques for Green Buildings
Photographing a LEED-certified building isn't just about capturing beautiful architecture; it's about telling a story of sustainability. To do that, you need more than a good eye. You need the right tools and a specific approach to translate thoughtful, green design into compelling images.
While your standard architectural kit is a good start, a few pieces of gear are absolutely critical for highlighting the unique features you’ll find in these projects.
The first thing out of my bag on any architectural shoot is a tilt-shift lens, and for LEED buildings, it's non-negotiable. These structures are built with intention, and my job is to preserve that integrity. A tilt-shift allows me to keep vertical lines perfectly straight, even when looking up, ensuring the building's form is presented with power and accuracy.
You'll also run into a lot of reflective surfaces—high-performance glazing, solar panels, and water features are staples of green design. This is where a high-quality circular polarizing filter (CPL) becomes your best friend. With a simple twist, you can cut through the glare on a window to reveal the space within or deepen the blue of the sky against a solar array. It gives you control, letting you create clean, powerful images that focus on the design itself.
Mastering Light and Dynamic Range
One of the main goals of sustainable design is maximizing daylight to save energy. For a photographer, this presents a classic challenge: balancing a bright, sunlit exterior with a dimmer, nuanced interior in the same frame. A single shot will almost always fail, leaving you with blown-out windows or crushed, noisy shadows.
This is precisely why exposure bracketing is my go-to technique here. I’ll take a series of frames at different exposures to capture everything—one for the deep shadows, another for the mid-tones, and a third for the bright highlights outside. In post-production, these images are carefully blended together to create one seamless, natural-looking photograph.
The point of HDR here isn't that over-the-top, surreal effect you sometimes see. It’s about technical perfection and realism. The goal is to create an image that feels like you're standing in the room, seeing all the detail and light just as the architect intended.
When I do need to add light, my approach is always minimal. The last thing I want is for my strobes to fight with the building’s own sophisticated lighting design. I use small, battery-powered strobes and LED panels for subtle "light painting," not to flood the room. This might mean:
- Adding a gentle kiss of light to bring out the texture on a wall of reclaimed timber.
- Using a soft bounce to define the shape of a sustainably sourced piece of furniture.
- Lifting the shadows just enough in a large open-plan space to create balance.
We go into much more detail on this in our guide to choosing the best light for a site shoot.
Your Go-To Camera Settings
While every situation demands adjustments, having a solid starting point for your camera settings is key to capturing consistent, high-quality images.
Aperture: I’m almost always shooting between f/8 and f/11. That's the sweet spot for getting a deep depth of field, keeping everything from the chair in the foreground to the building across the street tack-sharp. It's crucial for showing the full scope and context of the space.
ISO: Keep it low. Always. Since the camera is locked down on a tripod, I set my camera to its lowest native ISO, usually ISO 100 or 200. This gives me the cleanest possible file with maximum detail and zero noise.
Shutter Speed: This is your variable. With a low ISO and a mid-range aperture, your shutter speed will depend entirely on the light. Don't be afraid to let it drag. Long exposures are your friend, especially at twilight or inside, allowing the camera to soak in the light and capture the building’s true atmosphere.
Essential Gear for Photographing LEED Buildings
To do the job right, you need the right tools. Here’s a look at the essential gear I bring to a LEED building shoot and why each piece matters.
| Equipment | Primary Use in LEED Photography | Pro Tip |
|---|---|---|
| Tilt-Shift Lens | Correcting perspective distortion to keep vertical lines straight, preserving the building's architectural integrity. | A 24mm tilt-shift is my workhorse, but a 17mm is invaluable for tight interiors or dramatic, wide exterior shots. |
| Sturdy Tripod | Essential for sharp, noise-free images, enabling long exposures and precise exposure bracketing. | Invest in a quality ball head or geared head. The ability to make fine, precise adjustments without the camera drifting is a game-changer. |
| Circular Polarizer | Managing reflections on glass, water, and solar panels; enhancing sky color and contrast. | Don't go cheap on your CPL. A high-quality filter will prevent color casts and a loss of sharpness. I always check my polarization at 100% on the live view to ensure I'm cutting the right reflections. |
| Drone | Capturing unique perspectives of green roofs, solar arrays, site context, and the building's overall form. | Always check for flight restrictions (especially near airports) and get the proper permits. A drone shot can be the hero image that ties the whole sustainability story together. |
| Off-Camera Flash/LED | Adding subtle, controlled light to accentuate textures, fill shadows, and balance interior lighting. | Use them sparingly. The goal is to enhance the existing light, not overpower it. I often bounce a small strobe off a neutral wall or ceiling just out of frame for a soft, natural-looking fill. |
| High-Resolution Camera | Capturing the fine details in sustainable materials like reclaimed wood, recycled metal, or low-VOC paints. | More megapixels give you more flexibility for large prints and cropping in post. Look for a camera with excellent dynamic range to make exposure blending easier. |
This isn't an exhaustive list, but it's the core of my kit. Having this gear on hand ensures I’m ready to tackle any challenge a green building throws at me and tell its story effectively.
Building a Story with Composition and Context
A great architectural shot is more than just a record of a building. It tells a story. When I'm shooting a LEED-certified building, my composition is how I narrate its story of sustainability. I'm not just capturing a structure; I'm building a visual case for its performance, its purpose, and its connection to the people who use it.
This means getting away from those cold, static, empty-room shots. The real goal is to show the building alive and breathing—demonstrating the human benefits that come from smart, green design. I’m always looking to capture people genuinely interacting with the space. An image of a team collaborating in a sun-drenched meeting room tells you more about daylighting than any technical spec sheet ever could.
Weaving in the Human Element
The most powerful images of sustainable architecture show how the building makes life better for the people inside. This is where I connect the dots between a specific LEED feature and a real-world benefit.
- Biophilic Design: I'll frame a shot to include views of nature from inside the building. Capturing someone at their desk with a clear view of a green space, or working near a living wall, visually communicates that connection to the outdoors. It’s an instant story about well-being.
- Thermal Comfort: Look for people comfortably gathered near large windows on a bright day. That simple scene subtly says that the high-performance glazing is working perfectly, creating a pleasant environment without overheating.
- Air Quality: You can't photograph air, but you can photograph what good air feels like. I look for crisp, clean-looking interiors where people appear alert and engaged. The goal is to evoke a sense of freshness.
These shots add a crucial emotional layer. They show that a building isn't just efficient, but a place you'd actually want to be. If you want to go deeper, you can learn more about the science of architectural composition and how to guide the viewer’s eye.
Showing the Bigger Picture
A LEED building doesn't exist on an island. Its relationship with its surroundings—whether it's a dense city block or a sprawling natural landscape—is a huge part of its narrative. My establishing shots have to illustrate this connection.
A wide angle that shows a building’s green roof blending into a nearby park tells a story of ecological integration. A shot from the street, showing an accessible ground floor full of people, speaks to its role as a community hub.
The most compelling shots place the building in a meaningful context. They show how it contributes to the streetscape, respects its neighbors, or restores a piece of the natural environment. This turns a simple building portrait into a much richer statement.
Even historic buildings have a powerful sustainability story to tell. For example, the Sede Centrale Ca’ Foscari in Venice, Italy, a building originally from 1453, has earned LEED certification. This proves that green principles can enhance and preserve our most treasured structures, not just newly built ones. It’s fascinating to explore stories of preservation and see how LEED gives these historic places a new lease on life.
Visualizing the Invisible
So, how do you photograph things you can't see, like acoustic serenity or low energy use? You focus on the results.
For acoustic performance, a shot of an open-plan office or library where people are quietly focused implies excellent sound design. For hidden energy systems like geothermal wells, I might focus on the clean, minimalist control panels or the unobtrusive vents. The story is in the serene, uncluttered result, with captions filling in the technical details.
By layering sweeping establishing shots, contextual community views, and intimate scenes of people enjoying the space, you build a persuasive visual argument. Your portfolio won't just show a building; it will tell the complete story of why its sustainable design truly matters.
My Post-Production Philosophy: Honoring the Architect's Vision
The shoot might be wrapped, but the real work of telling the story has just begun. For me, post-production isn't about creating a digital fantasy; it's about honoring the architect's intent. When I'm working with images of a LEED-certified building, my editing philosophy is one of enhancement, not alteration.
Every step, from the moment I import the RAW files, is disciplined. It's a process of meticulous color correction and exposure blending that brings the final image into perfect focus. The goal is to present the space with absolute clarity and precision, revealing the soul of the sustainable design.
Getting the Color and Materials Just Right
In architectural photography, accurate color is everything. Those specific tones—the bamboo flooring, the recycled steel, the low-VOC paint—weren't chosen by accident. They're fundamental to the design story.
My first move is always to apply lens corrections and neutralize any color casts, which gives me a clean, true-to-life baseline. I work exclusively on a calibrated monitor to ensure the colors I see are the colors that will be delivered to the client. If a project features locally sourced timber with a unique warmth, that exact hue must come through in the final image. Getting it wrong misrepresents the entire design palette.
The best edits are the ones you never notice. The final photograph should feel as natural as looking through a perfectly clean window into the space itself. Subtlety is the secret to authenticity.
The Art of Flawless Exposure Blending
One of the signature challenges with LEED buildings is balancing the bright, natural light from the exterior with the nuanced lighting inside. This is exactly why bracketing exposures on-site is non-negotiable. It’s where the technique often called "flambient" blending becomes my most powerful tool.
Instead of relying on automated HDR software that often looks artificial, I blend multiple exposures by hand to create one seamless, perfect image.
- I start with a solid ambient light shot as my base layer. This captures the natural mood and feel of the room.
- Next, I gently paint in light from a flash exposure, just enough to lift the shadows and bring out the texture and definition in furniture and finishes.
- Finally, I "pull" the perfectly exposed exterior view from a darker bracketed frame and composite it into the windows.
This manual process gives me total control, resulting in a clean, bright, and detailed image that professional clients expect.
Ethical Retouching and Strategic Sharpening
The final pass is all about refinement. My rule for retouching is simple: if it’s temporary and distracting, it can go. I’m talking about scuff marks on the floor, fingerprints on a glass partition, or a stray power cord someone forgot to move.
What I will never do is remove a structural column, change the color of a permanent fixture, or alter the building's design. That crosses the line from photography into fiction and undermines the image's integrity as a marketing tool.
After cleaning up the image, I apply a final sharpening pass, but I do it selectively. A global filter can make everything look crunchy and fake. Instead, I paint sharpness onto specific areas to make key materials feel tangible.
I might add a touch of sharpness to:
- The crisp edges of photovoltaic panels.
- The unique grain of reclaimed wood.
- The subtle weave of a sustainable fabric.
This last step is what makes the sustainable story come alive. The finished photograph isn't just a picture; it's a carefully crafted piece of communication that authentically conveys the innovation and quality of the building.
The shoot might be wrapped and the final images edited, but my job isn’t truly done. Getting the photos into the client’s hands—and making sure everyone knows how they can use them—is the final, critical piece of the puzzle. It’s all about professionalism and setting up a smooth relationship for the future.
When you’re shooting a LEED-certified building, this is even more important. You’ve got a lot of stakeholders—the architect, the developer, the contractor—and they’re all going to want to use these photos. A clean delivery and a crystal-clear license are non-negotiable.
My Approach to File Delivery
I want to make life as easy as possible for my clients. My goal is to anticipate their needs so they don't have to ask. That means organizing the files into a secure online gallery with folders that make immediate sense, so their marketing team can find exactly what they need without a second thought.
A good delivery package needs to be versatile. Here’s what I typically provide to cover all the bases:
- High-Resolution TIFFs: These are the big guns—the uncompressed master files. I provide these for large-scale prints, like a massive trade show display or a full-bleed magazine spread where every pixel counts.
- Full-Resolution JPEGs: For 90% of a client's needs, these are the go-to files. They're perfect for brochures, internal presentations, and general marketing materials, offering a great balance of quality and file size.
- Web-Optimized JPEGs: I pre-size and compress a set of images specifically for digital use. This means they are ready to be dropped straight onto a website, social media feed, or email blast without slowing anything down.
Thinking ahead like this shows you’re a partner, not just a vendor.
Navigating Image Licensing for Multiple Stakeholders
Licensing can feel like a minefield, but it’s really about protecting your work and giving your client clarity. On a LEED project, it’s a given that the architect, developer, and key consultants will all want a piece of the action.
My agreements spell out exactly who can use the images and how. I’ve found that tiered licensing works best. The main client—usually the architecture firm—gets broad usage rights. From there, other parties like the general contractor or the lighting designer can purchase a more limited license for their own portfolios or award entries.
Think of your licensing agreement as a roadmap for your images. By defining usage for every party upfront, you avoid confusion down the line and ensure you’re fairly paid for the widespread value your photos create.
Embedding the Story with LEED Metadata
Here’s a step I never skip, especially with LEED projects: I bake the building’s story directly into the image files. This adds lasting context that travels with the photo wherever it ends up.
Using a program like Adobe Lightroom or Bridge, I add key details into the metadata fields (IPTC). I always include:
- The building’s official name and location.
- Its specific LEED certification level (e.g., “LEED Platinum Certified”).
- A short description of the sustainable features visible in the shot, like a "rainwater harvesting system" or "a facade designed for daylighting."
- My name and contact info for proper credit.
This simple act transforms a beautiful photograph into a powerful, self-contained marketing asset. Years from now, when someone downloads that image, the crucial sustainability narrative is right there, ensuring the building’s hard-won credentials are never forgotten.
A Photographer's Guide to LEED Buildings: Your Questions Answered
Shooting a LEED-certified building isn't just about taking a pretty picture. It's about translating a complex story of sustainability into a single, compelling frame. I get a lot of questions about this, both from clients and fellow photographers, so I wanted to share some insights from my own experience behind the lens.
Let’s get into some of the most common questions I hear. My goal here is to give you the practical, real-world answers that help you walk onto your next LEED project with a clear vision.
How Do I Actually Photograph Energy Efficiency?
This is the big one. Energy efficiency is invisible, right? You can't exactly take a photo of a lower utility bill. The trick is to stop thinking about the abstract concept and start focusing on the tangible features and the feeling they create.
Take daylighting. A building designed to welcome in natural light is a gift to a photographer. I look for wide shots of atriums or open-plan offices just drenched in sunlight, which immediately says "we don't need a thousand lightbulbs on." A little bit of creative lens flare can even emphasize the warmth and quality of that light streaming through high-performance windows.
And what about solar panels? The angle and time of day are everything. A flat shot from the ground is a missed opportunity. Getting up high with a drone shows the impressive scale of the array, turning a functional element into a powerful statement. I always try to shoot them during the golden hour; that low-angle light creates beautiful textures and reflections on the panels.
Even the hidden systems, like advanced HVAC, have visual anchors. Look for the public-facing pieces: a sleek thermostat, cleanly integrated air vents, or a well-designed control panel. Your job is to frame these details in a way that feels intentional and use your captions to explain their role in the building's high performance.
It's my job to connect the feature to the feeling. I want to show the comfort of a well-insulated room, the brightness of a daylit space, and the intelligence of smart building controls. It's all part of telling a story of thoughtful, human-centric design.
What's the Biggest Mistake Photographers Make on a LEED Shoot?
The single biggest mistake is shooting a LEED project like any other building. I’ve seen it happen: a photographer captures stunning but generic images that completely miss the why behind the design. They fail to communicate the sustainability story.
They might get beautiful compositions but walk right past the reclaimed wood floors, the biophilic walls that connect people to nature, or the clever water-saving fixtures. What they deliver is a set of technically perfect photos that fall flat as a marketing tool, because they don't show what makes the building special.
The fix is all in the pre-production. Before I even think about a shot list, I ask the architect and client one critical question: "What specific features earned you LEED points, and how can we best visualize them?"
This one question changes everything. It shifts the entire project from just documenting a space to building a strategic visual narrative. If you skip this, you're only telling half the story.
Does a LEED Shoot Cost More?
Not always, but it can. The certification itself doesn’t add a line item to my invoice. The potential for a higher budget comes from the expanded scope required to tell the sustainability story with real depth.
Several things can influence the final cost:
- More Pre-Production: It takes time to dig into LEED scorecards and architectural plans to build a shot list that tells a story.
- Longer Shoot Days: Capturing the full arc of daylight in a space might mean being on-site from sunrise to sunset.
- Specialized Gear: Documenting a green roof or a large solar array the right way often means bringing in a drone, which is an added cost.
- A Higher Shot Count: Telling the full story often requires more images—from wide, establishing shots down to the macro details of a recycled material.
I always frame this as an investment in a more powerful marketing asset, not an extra cost. The effort we put in results in images that can help justify higher rents, attract top-tier tenants, and win design awards. When I provide a quote, it reflects the value I’m creating, and clear communication about these goals is key.
How Should I Use People in My Shots?
In a LEED building, people are never just for scale. They are the main characters. My goal is to show them genuinely interacting with the building’s human-focused features. This is how you prove the design works.
I’m always looking to capture authentic moments that speak to comfort, health, and productivity.
- Show a person actually enjoying the view from a huge, triple-pane window.
- Capture a team brainstorming in a meeting room filled with natural light.
- Photograph people relaxing in a green courtyard or on a rooftop garden.
Stiff, posed models are the enemy of authenticity. I direct people to engage with the space in a way that feels real. These shots become the most powerful proof that the building isn't just a structure, but a place that improves quality of life.
I’ve found that capturing the essence of a LEED-certified building is a unique challenge that requires a thoughtful, story-driven approach. It’s a process we specialize in at Jimmy Clemmons Photographer.
To help you get started on your own projects, here's a quick summary of the questions we just covered.
FAQ Quick Reference
| Question | Short Answer |
|---|---|
| How do I photograph energy efficiency? | Focus on tangible features like daylighting, solar panels, and smart controls. Show the effect of efficiency. |
| What is the biggest mistake to avoid? | Treating it like a generic shoot. You must ask the client which LEED features to highlight and build your story around them. |
| Does it cost more to photograph a LEED building? | It can, due to a larger scope (more planning, longer shoot days, specialized gear), but it’s an investment in better marketing. |
| How should I handle people in my shots? | Use them as characters, not props. Show authentic interactions with the building's human-centric and sustainable features. |
Ultimately, my work is about creating architectural images that tell the full story of your project’s design and purpose. If you have a space that deserves to be seen, let's connect. Visit us at jimmyclemmons.com to see our work and start the conversation.