
You're standing in a warehouse with a camera in hand, and the space looks bigger on site than it did in the brief. The challenge isn't just making it look clean. It's making the building make sense to someone who wasn't there, a broker, tenant, investor, or operations lead who needs to understand how the place works, not just how tall the ceilings are.
Why Professional Warehouse Photography Matters
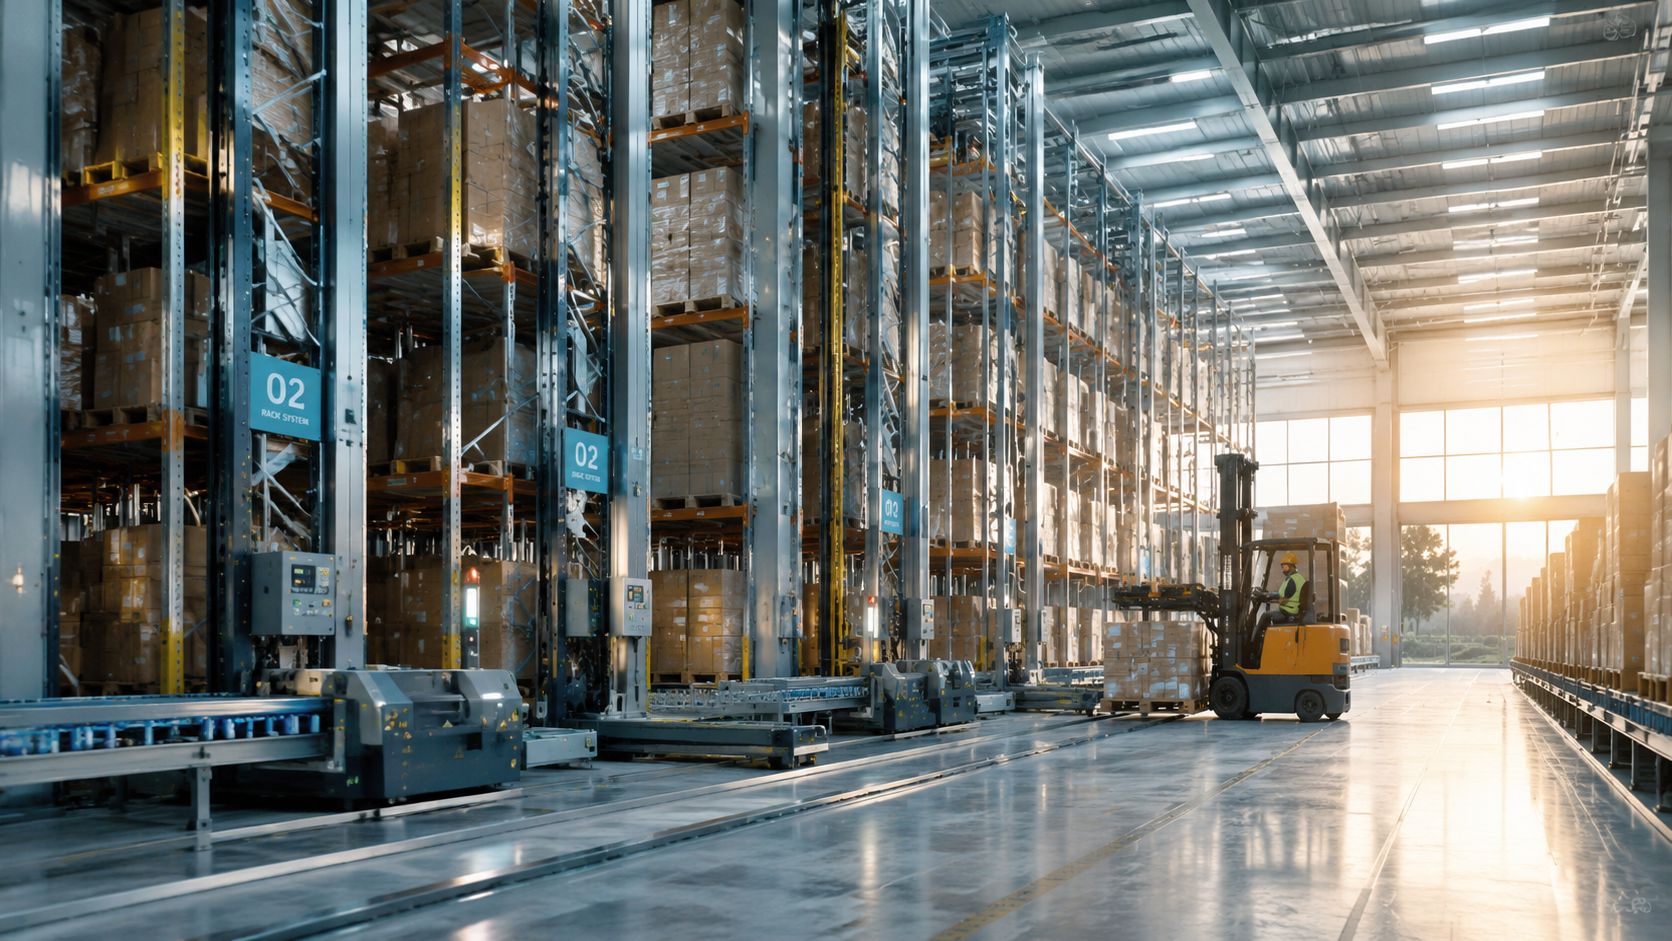
Warehouse photography belongs to a much older visual tradition. Historians trace industrial photography in the United States back to the 1880s, and describe it as maturing quickly in the first 30 years of the 20th century as companies used photographs to communicate complex visual information quickly and accurately, which is still the job modern warehouse imagery has to do. The same source notes that the U.S. had just over 1 million warehouse and storage buildings as of 2018 with 17.4 billion square feet of total floorspace, which makes this a serious built-environment category, not a niche sideline. The historical foundation matters because warehouse imagery now serves a vast asset class.
A warehouse is a working system. Racking, circulation, docks, staging, office support, and safety controls all have to read clearly in a few frames, because the client is not buying a picture of a big room, they are buying proof that the operation makes sense. Strong images help a broker explain access, help a developer show build quality, and help a logistics team communicate operational discipline without forcing the viewer to sort through a long presentation.
The commercial case is part of a larger image economy. Industry reports place the global photography market at $105.2 billion in 2023, with a projection of $161.8 billion by 2030 at a 4.4% compound annual growth rate, and say North America accounts for about 45% of global revenue while Western Europe accounts for about 25%. For a deeper look at the return on professional imagery, see the ROI of professional photography. That doesn't make warehouse photography a vanity exercise, it makes it part of how modern businesses sell trust visually.
Practical rule: if the image does not help a viewer understand capacity, flow, or credibility, it is probably not doing enough work for the client.
The best warehouse photographs prove more than occupancy. They show that the space is organized, usable, and ready for business, and that is a different standard altogether.
Planning Your Shoot for Flawless Execution
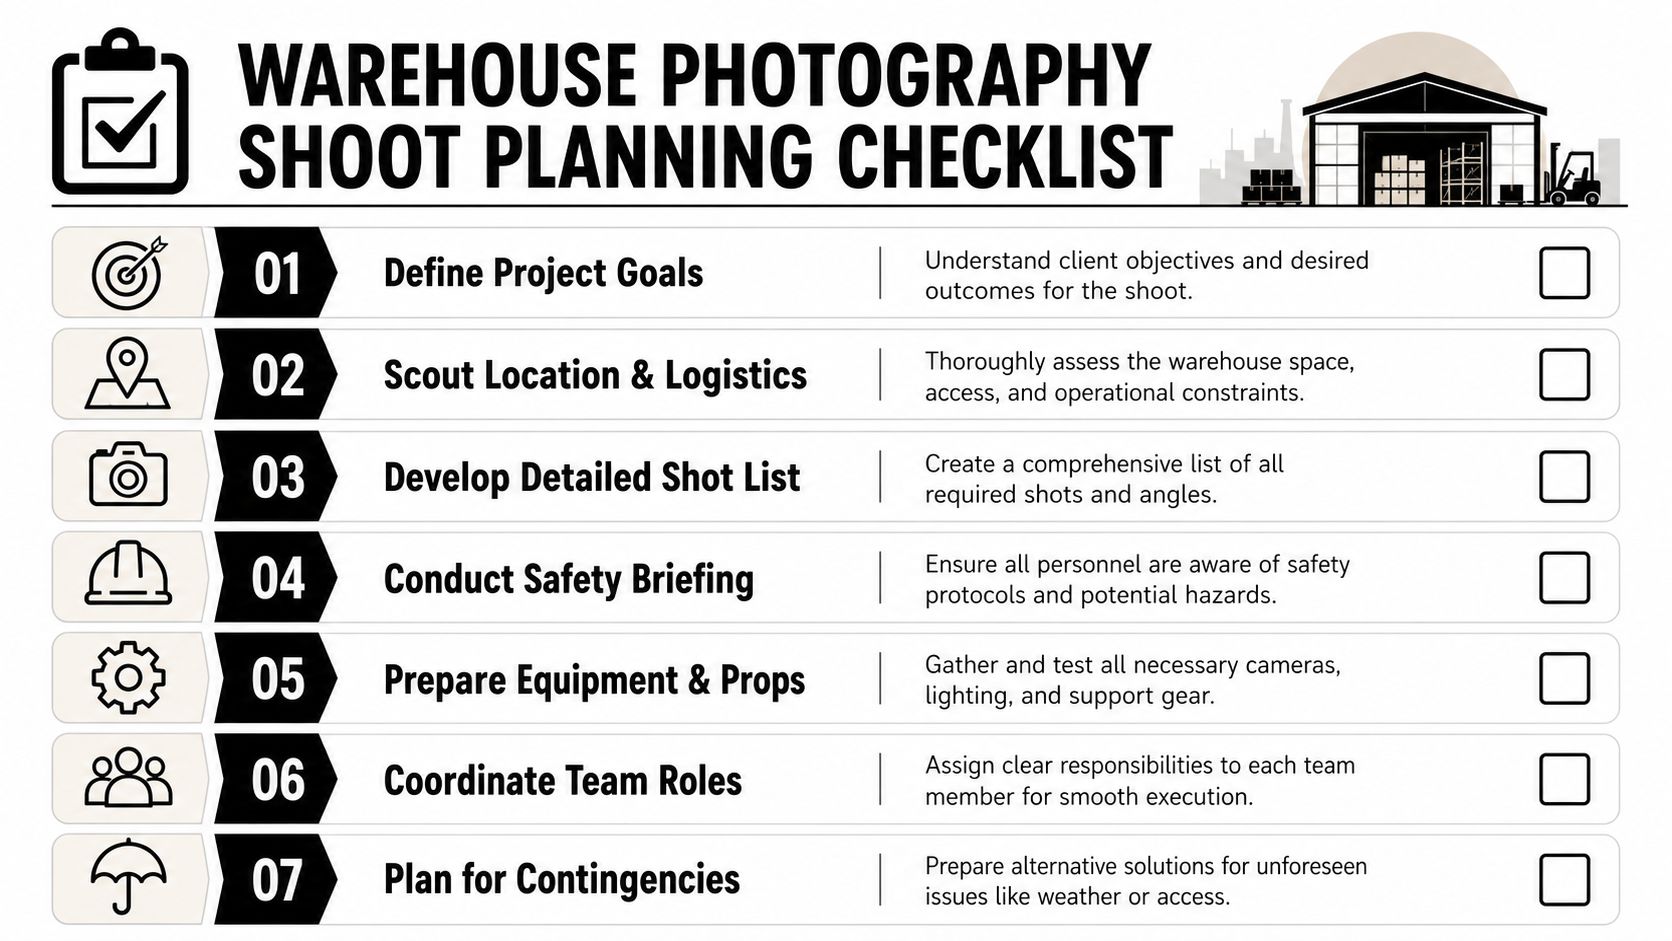
A warehouse shoot starts before the camera comes out of the bag. The client brief should spell out what the images need to accomplish, whether the goal is leasing, investment, recruitment, corporate marketing, or operational documentation. If the space needs to read as efficient and trustworthy, the plan has to support that story from the start.
The scout is where most problems surface early enough to solve. Walk the building with the client or site contact and note light sources, dock traffic, ceiling height, ceiling clutter, safety zones, power access, and any areas that will be off-limits during working hours. If the warehouse is running live operations, ask where forklifts move, when pickups happen, and which aisles need to stay clear so you do not build a shot around a space you cannot occupy.
Build a narrative shot list
A narrative shot list works better than a checklist because it organizes the building around the way a viewer understands it. Focus on the spaces that tell the operational story, then set priorities around the client's goal and the constraints you found on site. For the recommended shot sequence, see the composition section.
Show the way people move through the place, not just the way the place looks when it is empty.
A useful planning document should also include staging notes. Clean floors, straightened pallets, and labeled zones matter because clutter interrupts the read on circulation and scale. Client communication matters here, because downtime, staging, or partial shutdowns may be necessary to get a frame that reads clearly. If a client wants the warehouse to feel active, the space still needs enough order that the viewer can follow the work without getting distracted by mess.
For a practical site-prep framework, see this pre-shoot site preparation guide, then turn those notes into a schedule that fits the building's real rhythm. A smart schedule leaves room for cleaning, move-in activity like pallet racking installation or dock leveler testing, and retakes if one area photographs better after the light changes.
The clearer the plan, the less you have to force on shoot day.
Essential Gear and Camera Settings for Industrial Scale
The right gear in a warehouse solves perspective, not ego. A wide scene can look impressive and still fail if verticals converge badly or the foreground feels distorted, so lens choice should follow the message you need the image to carry. Ultra-wide lenses can be useful in tight aisles, but they exaggerate space if you stand too close, while a standard wide lens often gives a calmer, more believable rendering of walls, racks, and dock doors.
Choose gear for the problem in front of you
A tilt-shift lens is the cleanest way to keep vertical lines straight when you need precision in architectural frames. It takes more time to use, but it reduces the perspective corrections that can make a warehouse look bent or cartoonish. For broader coverage, a sturdy tripod matters more than one might expect, because low ISO, consistent framing, and deliberate bracketing are much easier when the camera isn't moving between exposures.
If you want a practical gear baseline, this real-estate photography equipment guide is a good reminder that support tools matter as much as camera bodies. In warehouse work, that means a tripod with a solid head, spare batteries, enough memory cards, a remote release, and a lens cloth, because dust and industrial particles find every exposed surface.
Camera settings should prioritize depth and control. A mid-range aperture usually gives enough depth of field to keep both the foreground and the rack line readable, while ISO should stay as low as the light allows so concrete, painted metal, and signage don't get noisy. Shutter speed is less about speed than stability, which is another reason the tripod is doing real work here.
A drone can be valuable for exterior context and high-angle perspective, especially on large sites where the roofline, yard, docks, and circulation are part of the story. Indoors, it's a selective tool, not a default one, because the airspace, lighting, and safety constraints can create more problems than it solves. Use it when it helps a viewer understand scale or site layout, not just because it looks dramatic.
The best kit is the one that lets you correct perspective in camera instead of rescuing it later.
Mastering Light and Space in Warehouse Environments
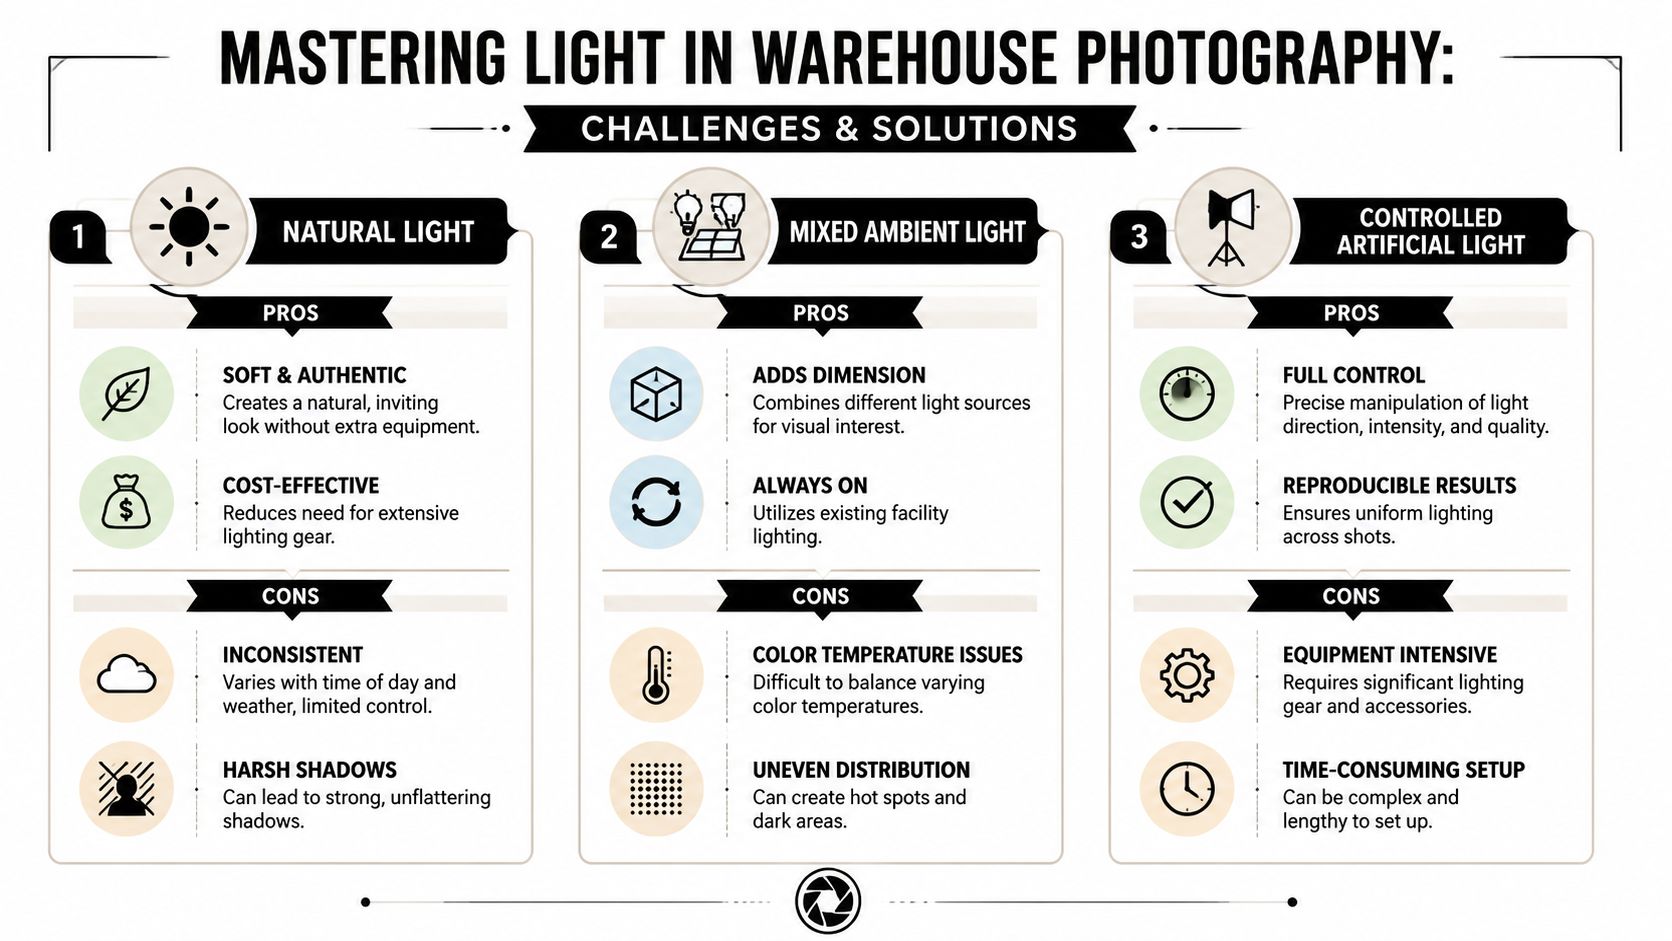
Warehouse lighting starts with what already exists in the building. Natural light can be excellent when skylights, dock openings, or large exterior doors give the space direction and dimension, and experts recommend scheduling around golden hour when possible. That softer angle can help the structure feel dimensional instead of flat, especially when the client wants the building to look clean and intentional.
Natural light first, but only when it serves the story
Natural light works best when you can control the timing and the camera position. It's often the easiest way to keep the space feeling honest, but it can also create hard patches and dark corners if the sun is too direct. If the warehouse has strong daylight, use it to establish mood and openness, then move deeper into the building only after you've seen where the shadows fall.
Mixed ambient light is where a lot of warehouse files go sideways. Fluorescent fixtures, LEDs, skylights, and spill from exterior openings can all carry different color temperatures, which means one frame can look clean in one corner and green or amber in another. The fix is to decide which light source should dominate, then balance the others with supplemental light and white balance choices that keep the materials believable.
Controlled light gives you the most authority
Artificial light is the most deliberate option and usually the most time-consuming one. It lets you soften harsh shadows on concrete, reveal texture in steel shelving, and separate the subject from cluttered backgrounds, but it requires enough gear and setup time to justify the result. The most reliable workflow is to test one area first, build a repeatable lighting pattern, and then move that pattern across similar zones.
Color accuracy matters more in industrial work than in lifestyle work, because buyers and tenants are reading durability, cleanliness, and maintenance through the image.
Staging supports all three lighting scenarios. Straightened pallet rows, cleared walk paths, and removed trash make light easier to work with, because there are fewer random highlights and fewer distractions competing with the structure. When a space is both operational and tidy, the photograph reads as real without looking neglected.
Composing Shots That Tell a Functional Story
The strongest warehouse photographs make the building easy to read. That comes from composition shaped by function, not just by symmetry, so the viewer can see where people enter, how goods move, and what the space is built to support. A clean frame helps, but a frame that explains circulation does more work for the client.
Lead the eye through the building
Aisles, conveyors, dock lanes, and painted floor markings already give you structure. Use those lines to point toward loading areas, storage depth, or the end of a bay, because those are the parts of the image that communicate capacity and operational logic. If the camera stays too high and too centered on every frame, the warehouse can turn into a flat diagram, so vary height and angle to keep the space from feeling generic.
Framing is just as useful. Shoot through a doorway, a rack opening, or a partially open bay to add layers, because those layers help the viewer understand depth without losing orientation. That is one of the easiest ways to make a cavernous building feel legible at human scale.
Scale is the piece many warehouse galleries miss. A forklift, a person in PPE, or a truck at the dock gives the viewer a reference point and turns an abstract expanse into something measurable. Industrial listing guidance even recommends including people for scale, and in practice that small choice often does more than another wide empty frame.
Movement also deserves attention. A frame that catches a forklift lane crossing the racking, a worker near a pick face, or a truck being loaded tells a better operational story than a static wide shot alone. Buyers and tenants are not only looking at size, they are looking at how the building supports throughput, access, and daily use.
The point isn't to make every image busy. It is to give each frame a job. One photograph can establish scale, another can show circulation, and another can highlight the systems that make the facility useful.
If the viewer can trace the movement of goods and people through the frame, the image is doing commercial work.
That approach also helps the gallery hold together. Instead of a stack of isolated “pretty” frames, you give the client a visual sequence that reads like a short, efficient tour.
Polishing Your Images in Post-Production
Post-production for warehouse photography should protect structure before it beautifies anything. Start with lens distortion and perspective correction, because straight walls, doors, racks, and rooflines are the foundation of credibility in an industrial image. If those lines drift, the building stops feeling trustworthy, even if the exposure is technically fine.
Edit in the order the image needs
The best workflow usually goes from geometry to tone to detail. Correct distortion first, then balance brightness, contrast, and color temperature, and only after that move to clarity, sharpening, and minor cleanup. That order helps preserve the shape of concrete, metal, painted floor lines, and overhead systems without pushing them into an over-processed look.
A warehouse can look too digital very quickly if the shadows are crushed or the metals are oversharpened. Keep texture visible, but don't chase fake drama, because industrial clients usually need realism more than spectacle. Dust spots, stray tape, and a few distracting reflections can be retouched, yet the room should still feel like a working facility, not a showroom built on a render.
Redundancy helps at capture stage too. Independent catalog-photography guidance recommends taking at least two frames of every subject because one can be blurred or improperly exposed, and that advice is especially useful in warehouses where people, forklifts, and changing light can interrupt a clean frame. That simple backup habit saves time later in the edit pass.
Deliver for use, not just for approval
Client delivery should match the way the images will be used. Web galleries need clean, lightweight files that load fast, while print or large-format marketing pieces need higher-resolution exports and careful sharpening. A well-ordered gallery should also preserve the narrative sequence from the preproduction shot list, so the client can reuse the images in a way that still tells the same functional story.
If you need warehouse photography that shows more than square footage, Jimmy Clemmons Photographer brings editorial discipline and built-environment experience to the job. Visit Jimmy Clemmons Photographer to discuss imagery that communicates scale, flow, and operational value with clarity.