
You arrive at the gym with enough room to make almost any picture, but no clear agreement about which picture the client needs. The polished floor looks attractive from the entrance, the bleachers disappear into shadow, banners compete with windows, and athletes are already warming up beneath fixtures that don't share the same color. A gymnasium can be an architectural interior, a sports venue, a school brand environment, and a live production space at the same time.
Successful gymnasium photography starts before the camera comes out of the bag. You need a visual brief, a location plan, a deliberate camera position, and a lighting strategy that respects both the building and the people using it. The strongest assignment-ready workflow treats scale, motion, color, timing, and post-processing as connected decisions rather than isolated techniques.
Define the Gymnasium Photography Assignment
The first conversation usually sounds simple: “We need photos of the gym.” That request could mean a wide architectural record for a school, recruiting images for an athletics department, portraits for a campaign, construction documentation, or a set of editorial photographs that make the venue feel active and welcoming. Each purpose changes where you stand, when you shoot, what you light, and how much of the environment must remain visible.
Start by turning the request into a short visual brief. Ask whether the client values spatial scale, material craftsmanship, athletic energy, school identity, or a balanced collection of all four. A developer may need clean views of the court, seating, wall finishes, windows, and circulation. A college marketing team may care more about athletes interacting with the space, recognizable colors, banners, and images with usable negative space for copy.
Decide what cannot be compromised
A useful shot list might contain an establishing interior, a strong view toward the main architectural feature, a detail of materials or branding, an athlete in motion, a controlled portrait, and several vertical frames for digital placements. Keep the list compact enough to guide the session without preventing useful discoveries.
For each requested image, define the practical result:
- Spatial frame: Show the court, ceiling, seating, and circulation without making the room feel distorted.
- Brand frame: Keep banners, logos, floor markings, and school colors legible.
- Action frame: Separate the athlete from clutter while preserving enough context to identify the venue.
- Portrait frame: Shape the subject cleanly without turning the gym into an anonymous studio.
- Detail frame: Isolate craftsmanship, texture, hardware, or lighting design with deliberate focus.
Practical rule: If the client can't describe where an image will be used, don't assume the widest view will solve the problem.
Access matters as much as aesthetics. Confirm whether the gym is empty, occupied, or shared with a game, practice, ceremony, or construction crew. Ask where stands may be placed, whether cables can cross the floor, which entrances remain open, and when athletes can move through the planned camera positions. A beautiful composition that blocks a team entrance or violates a venue rule isn't a usable solution.
The building's history can also affect the story. School photography emerged from the broader tradition of class portraits in the 1850s and 1860s, after photography's invention in 1839, and early group photographs were often made outdoors because long exposures needed daylight. By around 1900, improved cameras and shorter exposure times allowed more school portraits to move indoors, as described in this history of school photography and class portraits. That progression is a useful reminder that the gym isn't merely a backdrop. It carries institutional memory, community identity, and evidence of how people have used the space.
Scout the Space Before the Shoot
A gym can look orderly from the entrance and become difficult once a camera, lights, athletes, and cases occupy the floor. Scout it as both an architectural interior and a working production space. Start at the entrance, walk toward the strongest visual anchors, and photograph each possible camera position with a phone. Record your facing direction, then note how the court, bleachers, banners, windows, ceiling fixtures, and circulation routes enter the frame.
Measure only what will affect the assignment. Estimate the room proportions, distances from likely camera positions to subjects, heights of important features, and whether a tripod can stand level. Wall color changes reflected light. Polished wood can bounce a fixture into the image. High windows may create a bright band that shifts as daylight moves.
Walk the route, not just the room
Trace the equipment path from parking or load-in to the shooting area. Check doors, ramps, elevators, storage locations, and places where cases can remain clear of the frame and walking paths. Confirm the venue contact, access window, occupancy restrictions, permitted power sources, and which group controls the floor. Ask when athletes, staff, or spectators will cross planned camera positions.
Inspect each light source on its own. Record whether fixtures are fluorescent, sodium, LED, or daylight-balanced, and check for flicker or visible differences between banks. Older gyms may combine several source types. Newer LED systems can still require manual calibration. Under some LED fixtures, white balance may fall roughly within the 4100–5400K range, or require a custom setting rather than automatic white balance alone, as outlined in this indoor sports photography guide.
Make a simple floor plan before leaving. Mark the main entrance, court lines, bleacher edge, windows, outlets, subject routes, and proposed light positions. Beside every camera point, write the intended frame, such as “wide court toward banner wall” or “portrait beside north windows.” Grouping images by position reduces resets during the paid shoot window and keeps the architectural views consistent with portraits or action frames.
| Scout Item | Record Before Leaving |
|---|---|
| Access | Contact, arrival route, doors, permitted areas, and schedule |
| Architecture | Room proportions, ceiling height, windows, banners, bleachers, and floor condition |
| Light | Fixture types, daylight direction, flicker, color variation, and power access |
| Camera positions | Stable viewpoints, sightline obstructions, floor reflections, and intended compositions |
| Safety | Athlete routes, cable paths, stand locations, exits, and occupied zones |
| Shot sequence | Empty interiors, details, portraits, action, and required vertical frames |
Save the phone images and floor plan in the project folder. This architectural photography reference for indoor athletic facilities offers useful context for judging camera height, circulation, and visual anchors before the final setup.
Choose Lenses and Camera Positions
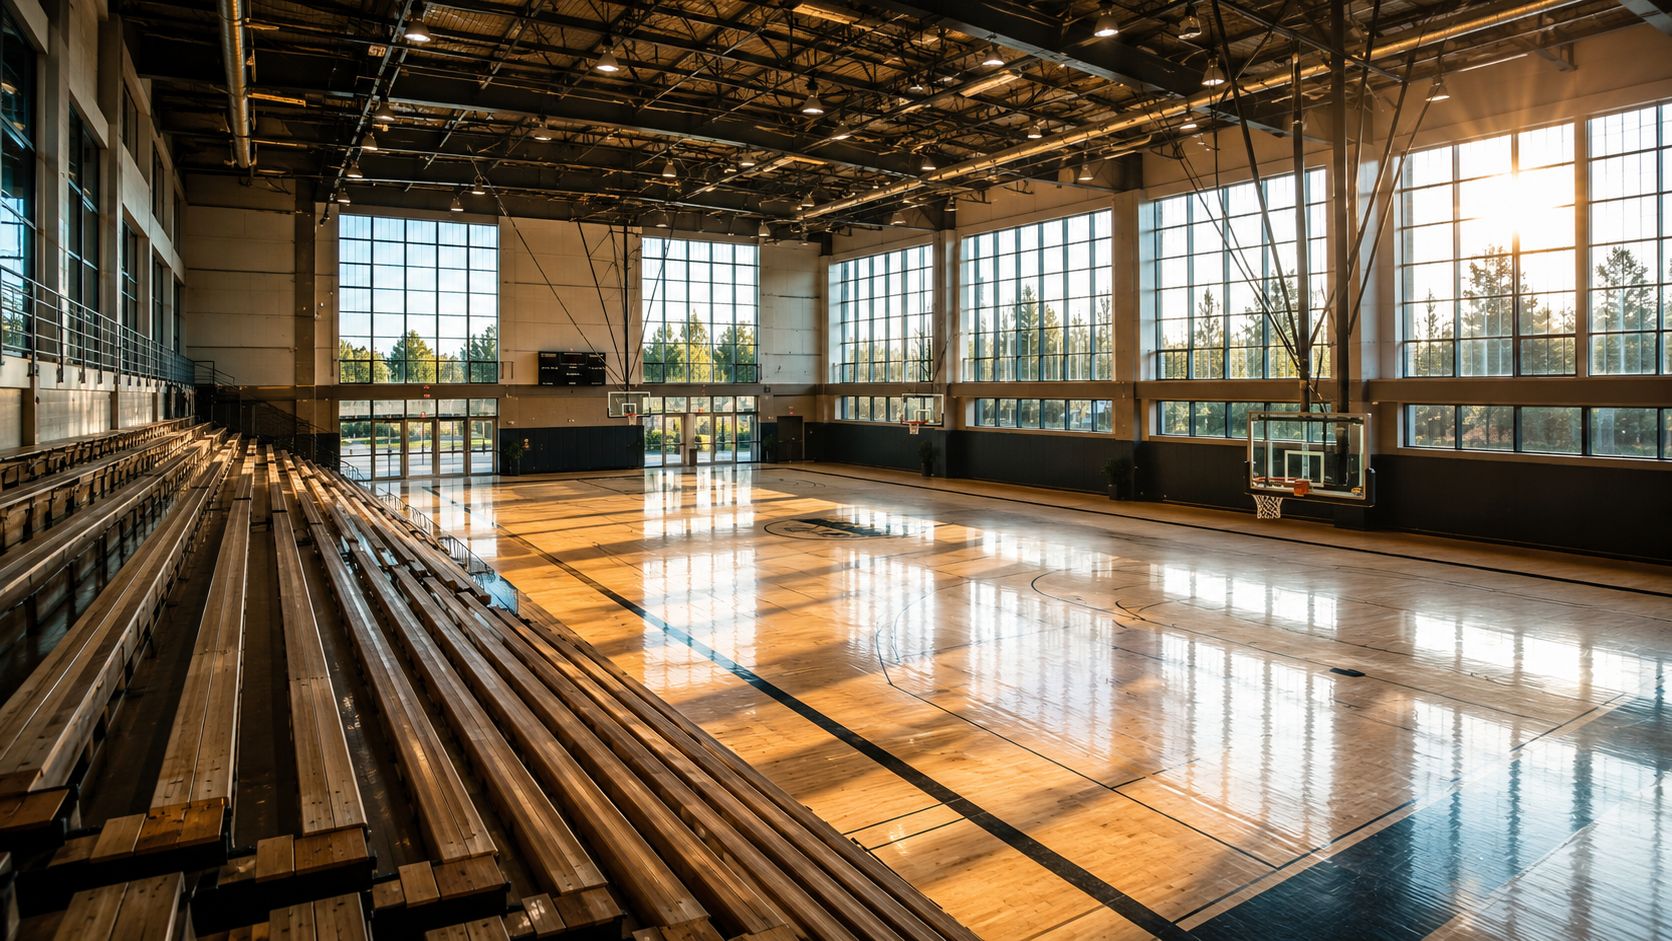
The widest lens isn't automatically the most professional choice. It may include the entire court, but it can also stretch the foreground, enlarge near bleachers, and make the far wall feel distant. In a gym, that exaggeration becomes obvious when court lines bend toward the corners or verticals lean at the frame edges.
Match perspective to the story
Use a wide-angle lens when the assignment depends on spatial inclusion. It works for showing the relationship between the court, seating, ceiling structure, and windows, especially when the camera cannot move far enough back. Keep the camera level, watch the outer edges, and leave enough room for perspective correction without cutting off key architecture.
A normal lens gives a more restrained interpretation. It can suit a championship banner display, a clean view of a scoreboard, or a portrait that needs recognizable environmental context without dramatic stretching. The result often feels closer to how a person understands the space from a standing position.
A telephoto lens changes the assignment from inclusion to selection. From the opposite side of the court, it can compress the far wall, layer banners with players, or isolate a design detail without placing a tripod in a busy area. It also helps when the venue is occupied and you need to work from a safe, unobtrusive position.
Move before changing glass
Focal length and camera position solve different problems. Changing lenses alters the angle of view, but moving the camera changes the relationship between foreground, subject, and background. If the bleachers dominate the lower frame, backing away may reduce their visual weight more effectively than switching to a wider lens. If a banner feels too small, moving closer can give it authority without allowing the entire room to become distorted.
For architecture, use a sturdy tripod when the room is static and the composition benefits from careful leveling. Handhold when athletes, banners, portraits, or event conditions change quickly. Compose foreground layers deliberately, keep floor lines useful rather than accidental, and leave negative space when the client may place recruitment or campaign copy over the image.
The relationship between wide-angle lenses and building proportions is especially important in gyms because long straight lines expose perspective mistakes immediately. A level camera and modest correction usually look more convincing than an extreme lens used from an awkward position.
Control Ambient and Added Light
Lighting strategy should follow the intended use of the image. Ambient-only work preserves the venue's actual atmosphere, flash or strobe gives you greater control, and a hybrid approach lets a subject remain inside the existing environment while receiving enough definition to hold attention.
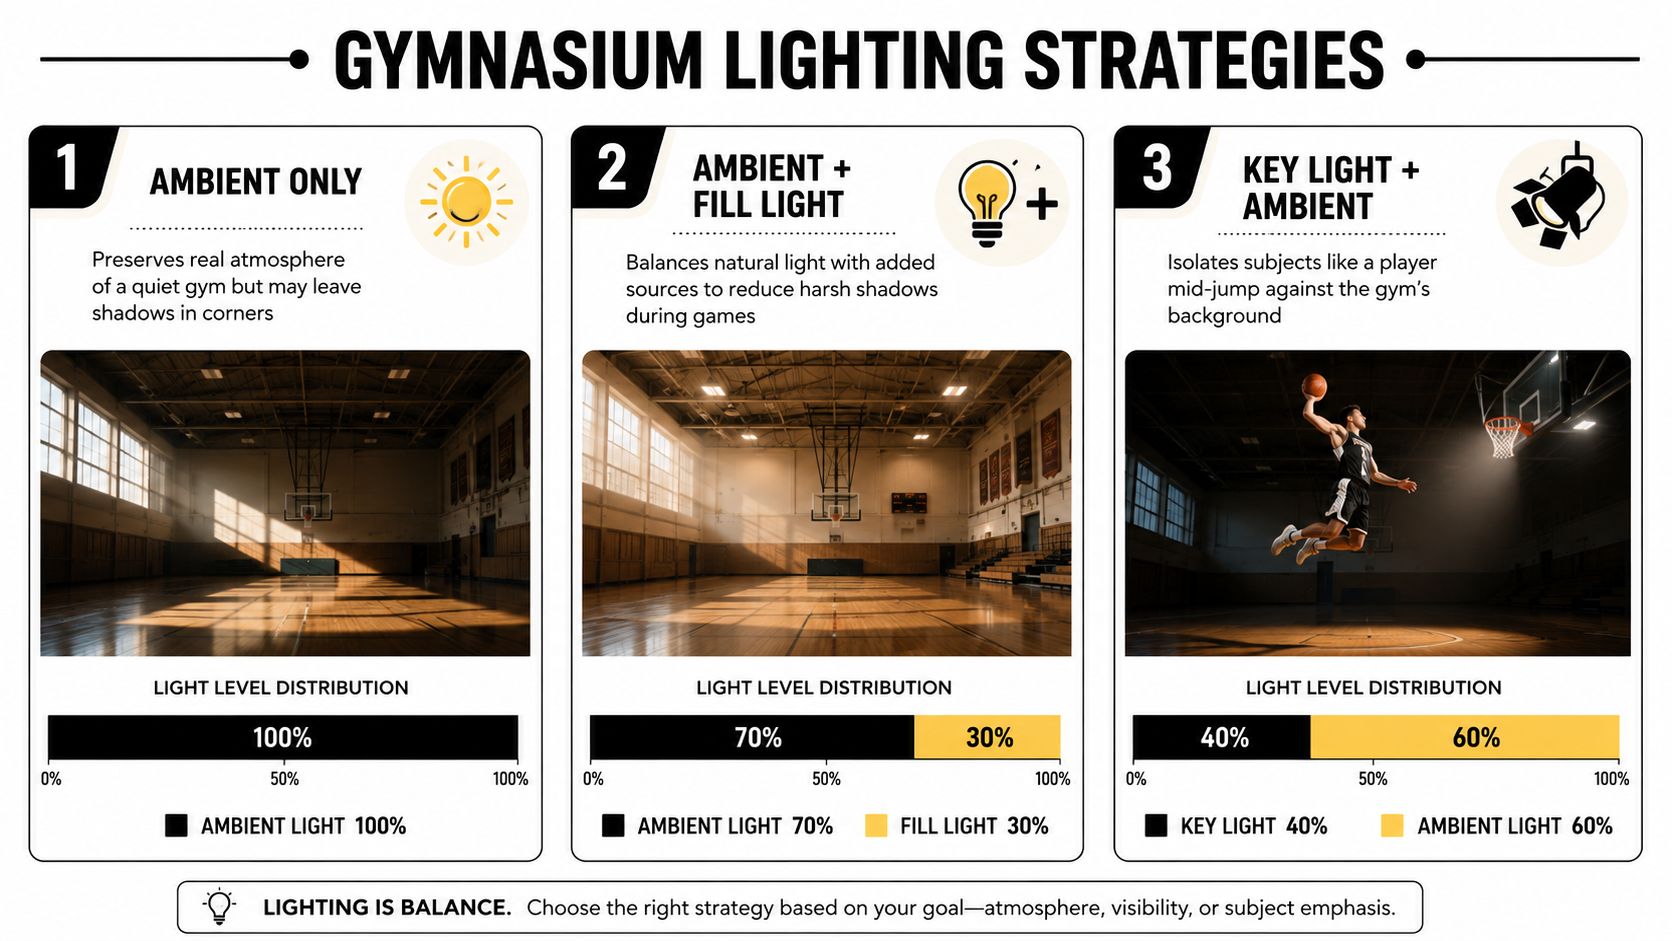
An empty gym before dawn may benefit from ambient light because the quiet, cool atmosphere is part of the story. The trade-off is uneven brightness across the court, shadowed bleachers, and possible color contamination from fixtures. If the image is for architecture or construction documentation, that reality may be valuable. If it's for a polished campaign, it may need more control.
Choose the least complicated setup that works
Flash or strobe is useful when banners, athletes, or architectural surfaces need separation from a dim interior. Flag fixtures that enter the frame, bounce light from controlled surfaces when possible, and use diffusion carefully so the floor doesn't become a large uncontrolled reflector. Meter both the bright ceiling or windows and the darker seating before committing to the final exposure.
For a portrait beside a bright window, position the subject so the window becomes a shape rather than a blown rectangle. A simple key-and-fill arrangement is often enough. The key defines the face and jersey, while restrained fill keeps the shadow side from collapsing into the background.
A more advanced editorial portrait may use a 3–4 light setup. The key can sit about 45 degrees off camera and 8–12 inches above eye level, with two rim lights behind the athlete and a front fill or accent light for separation and shape, according to this gymnasium lighting guide for dramatic sports portraits. That arrangement creates stronger subject isolation, but it also introduces more opportunities for spill, clipped uniforms, and reflections on polished floors.
Light the subject, then inspect the room. A clean face and jersey aren't enough if the added sources create bright patches across the court or distract from the architecture.
White uniforms are exposure traps because they can clip before the surrounding gym looks bright. Dark bleachers can tempt you to overexpose, while high ceiling fixtures may create hard pools across the floor. Check highlights during breaks, keep lights raised and flagged, and never place equipment where it blinds players or interferes with movement.
Hybrid lighting often gives the most flexible result. Let the ambient environment establish the room, then add controlled fill or a key to direct attention toward a player, coach, or portrait subject. The mixed-lighting photography guidance is relevant here because color contamination is often harder to correct than simple underexposure. If the venue combines daylight, LED, fluorescent, and sodium sources, control what you can before trying to repair every color shift later.
Compose for Scale, Motion, and Color
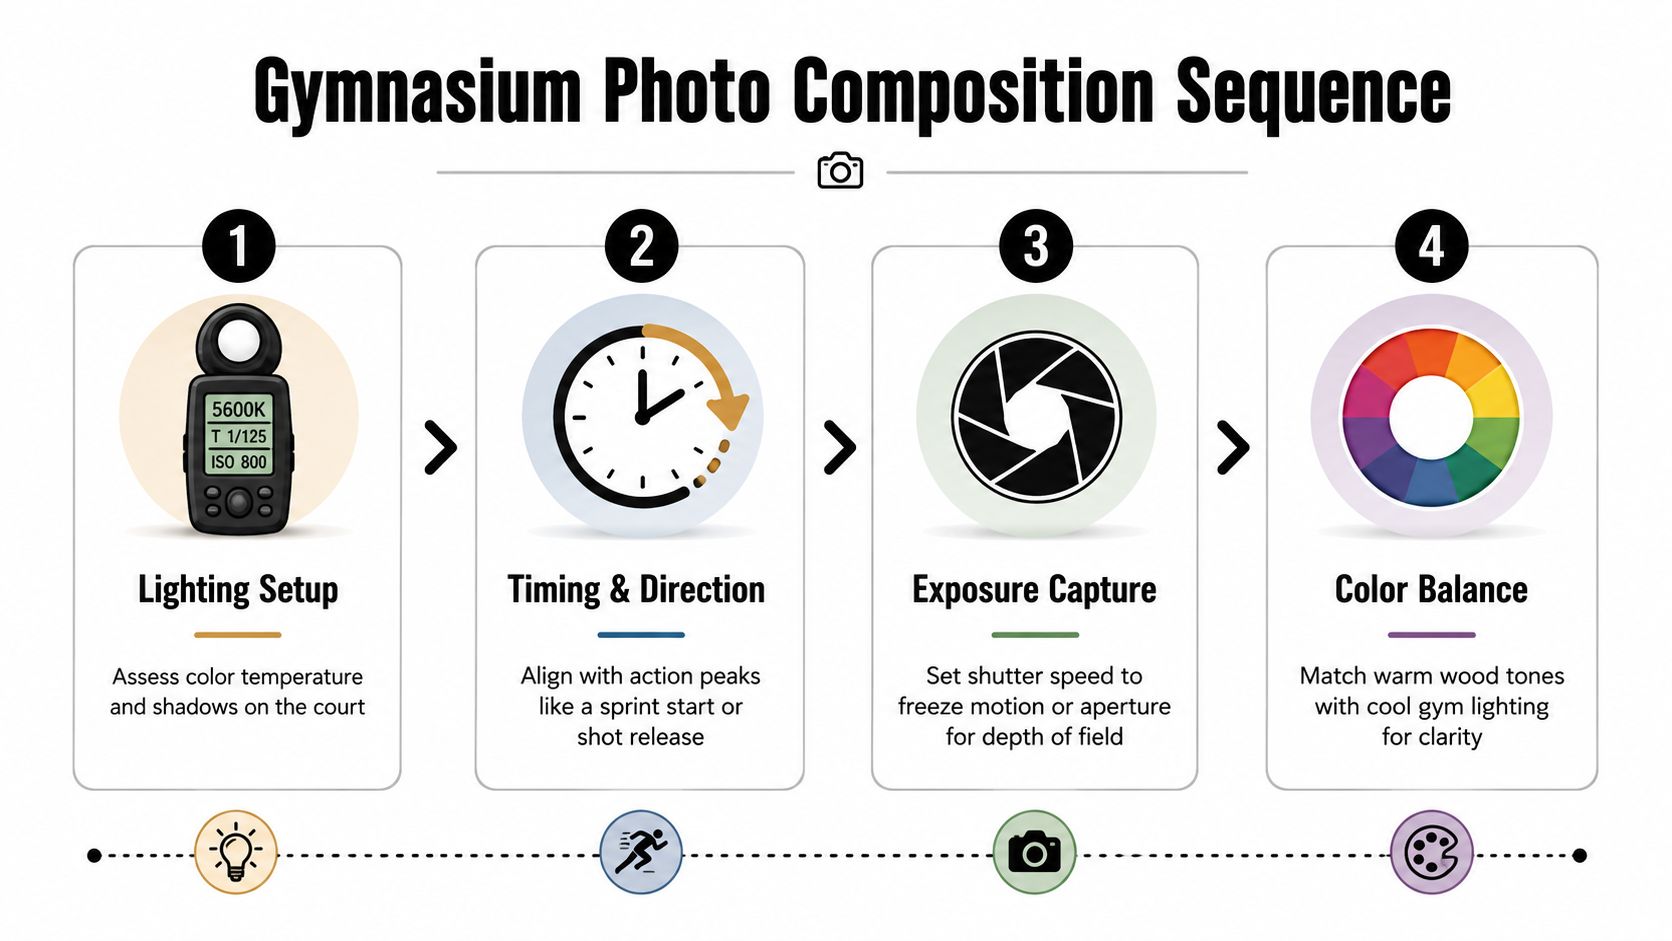
Start with the gym as architecture, before practice or competition fills the frame. Make a quiet exposure while the court is clear, refine the verticals and floor lines, and decide whether banners, bleachers, and seating support the assignment. Once athletes enter, retain that structural foundation while using timing to show how movement activates the room.
For a static view, set manual exposure, level the camera, and stop the lens to a depth of field that covers the required focus range. Choose the aperture according to the architecture and available light, then adjust shutter speed and ISO while checking the histogram, windows, and bright fixtures. A tripod makes repeated frames easier and keeps alignment consistent across a sequence, although it reduces your ability to react quickly once play begins.
Use settings as starting points
A slower drill or environmental portrait gives you more control. Continuous autofocus can follow modest movement, while a single focus point may hold more reliably when the subject stays still against a busy background. Open the aperture enough to separate an athlete from the bleachers, but keep the face and jersey sharp. The shallowest possible focus is rarely the most useful result.
Fast action requires a different compromise. Use manual exposure and open the lens as far as the available light demands. Treat around 1/500s as a practical minimum, then raise the shutter toward 1/800–1/1250s as movement accelerates. Pair that setting with an aperture and ISO that preserve the subject, and test it before the decisive sequence. A gym may contain several lighting zones, so one position can require a different adjustment from another.
Continuous autofocus, high-speed burst, and RAW capture provide more usable frames during active work. Burst mode still depends on timing, and autofocus cannot repair a distracting background. Aim for the moment when a hand, ball, expression, and body position reinforce the composition.
Use the schedule to create cleaner action when possible. Ask a player to repeat a movement along a known route, keep a portrait subject away from a bright fixture behind the head, and use court markings to predict where the action will peak. A small change in camera position can remove a scoreboard, trash can, or exit sign without forcing a complete lighting reset. It can also change the apparent scale of the athlete against the roof, bleachers, or court.
Build a review rhythm
Review the rear LCD and histogram during breaks. Check clipped white uniforms, blocked faces, motion blur, missed focus, and color shifts between fixture zones. Use highlight warnings and magnification on the face, hands, ball, and important architectural edges rather than judging only the overall LCD appearance.
Mixed light needs a reference. Photograph a gray card or another neutral target in the main subject area, then record a manual white balance instead of relying only on an automatic setting. Gym environments vary widely, and some fixtures sit around 2800–3200K, while stadium lighting may run hotter. That difference explains why one white-balance value rarely serves every venue. The gymnasium lighting white-balance tutorial provides useful context for handling those changes.
Keep a reference frame for each materially different lighting zone and note intentional adjustments as you move. Consistent color should connect wide interiors, portraits, details, and action without erasing the room's character. If portraits look green, action frames blue, and the wood floor shifts warm between angles, the assignment will feel unfinished even when individual images are well exposed.
Edit a Cohesive Gymnasium Story
A gymnasium assignment often arrives in the editing room as several different visual categories: wide interiors, moving athletes, portraits, details, and possibly construction records. The set becomes coherent when each category receives the same underlying treatment, while its own purpose remains intact.
Begin with technical restoration. Apply lens corrections, straighten deliberate architectural lines, and correct perspective without making the room look unnaturally rigid. Then set a consistent white balance and exposure baseline across related frames before using local adjustments. This order prevents you from making a portrait warm only because the surrounding floor is warm, or cooling an entire interior to compensate for one blue window.
Protect the character of the room
Selective color correction is often necessary under mixed lighting. A ceiling may need a cooler treatment while the wood floor stays warmer, but the transition should follow the actual light rather than become an obvious effect. Use masks to control skin tones, jerseys, banners, and reflective surfaces separately, then compare the result against your neutral reference.
Watch every color channel in high-risk areas:
- White uniforms: Check clipping in fabric highlights and preserve texture where possible.
- Bright windows: Keep the window from becoming the visual subject unless that is part of the brief.
- Polished floors: Reduce distracting reflected fixtures without flattening the floor's material character.
- Dark bleachers: Open important structure carefully, while retaining depth and contrast.
- School colors: Match branding across views instead of allowing each lighting zone to define a different version.
For architectural frames, prioritize line integrity, depth, and believable scale. For action frames, the face, ball, gesture, and relationship to the court usually matter more than perfect symmetry. A crop that improves the decisive moment may be appropriate for an athletics image, while the same crop could damage an architectural record.
Local light shaping should guide attention, not advertise the edit. Reduce a bright patch behind the athlete, lift a face that falls beneath a fixture, or calm a competing banner. Avoid heavy clarity, aggressive saturation, or excessive vignette if the client needs images for web, print, recruitment, and formal documentation.
Finish with a quality-control pass. Cull duplicates for sharpness and expression, confirm that requested horizontal and vertical compositions exist, verify metadata, inspect file names, and export according to the client's supplied specifications. Keep a consistent master grade, then create web-ready or print-ready versions as requested. The final collection should feel as though one photographer made deliberate decisions throughout the venue, even when the images were captured under different conditions.
Run a Final Gymnasium Photo Checklist
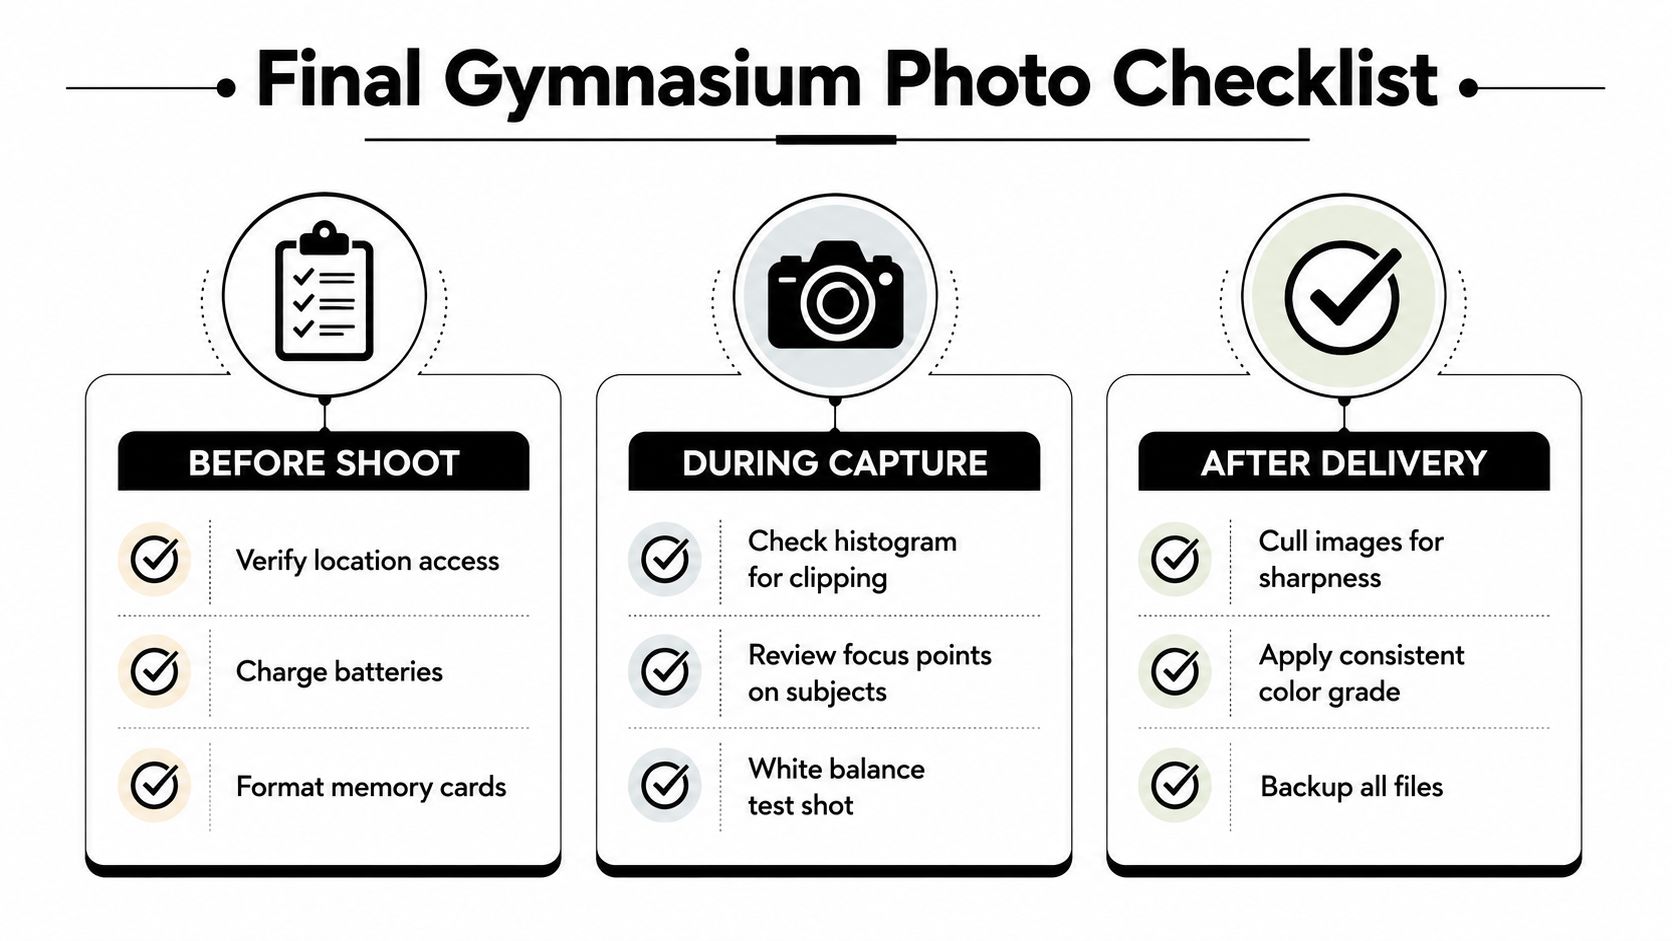
A polished workflow can still fail because of a forgotten access detail, unstable stand, empty battery, or missing vertical frame. Treat the checklist as a diagnostic tool, not paperwork.
Before travel
- Confirm access: Verify the venue contact, arrival time, permits, parking, load-in route, and clothing or equipment restrictions.
- Pack deliberately: Charge batteries, format memory cards, bring cleaning materials, tripod hardware, light stands, flags, and a gray-card reference.
- Review the brief: Keep the shot list, floor plan, intended uses, and unacceptable compromises available on your phone.
On arrival
- Walk the space: Confirm camera positions, power, storage, occupied areas, exits, and safe stand placement.
- Check the light: Look for flicker, reflections, bright windows, and color changes between fixture zones.
- Protect the venue: Keep cables covered or routed safely, and never obstruct athletes or emergency paths.
Before the first frame
- Verify capture: Set RAW, level the camera, check the histogram, confirm lens correction, and make a known-good test frame.
- Record color: Photograph the gray card or neutral reference in each distinct lighting area.
During capture and before departure
- Review continuously: Check focus, motion, highlights, backgrounds, and color continuity during breaks.
- Count everything: Complete the shot list, take a final walk, count equipment, and back up files before leaving.
- Confirm delivery: Make sure the requested interiors, details, portraits, action frames, crops, metadata, and output formats are accounted for.
For assignments that combine architectural interiors, athletic action, portraits, and commercial storytelling, Jimmy Clemmons Photographer offers location scouting, lighting design, on-set direction, and professional editing. Visit the studio to discuss a gymnasium photography brief and build a focused visual plan around your venue, schedule, and intended deliverables.